Arrays are a fundamental feature of PowerShell. Arrays make it possible to ingest, manipulate and output true data structures (and not just raw strings). This capability makes PowerShell different and more useful than other scripting languages.
In this article, we’ll explain what arrays are, and how to use them in PowerShell. We’ll first show you how to create arrays in PowerShell, and then how to use basic functions to manipulate them. Then we’ll look at several different types of arrays, and explore some of the more subtle features of them.
Get the free PowerShell and Active Directory Video Course
Our aim is to give you a good grounding in working with arrays in PowerShell. Once you’ve mastered these basics, you can take a look at our course on PowerShell to learn more.
- Array Fundamentals
- Arrays of Objects
- Operators For Arrays
- How to Add Values to an Array
- Array Types
- Advanced Array Functions
PowerShell Arrays

Arrays are a common feature of almost all programming languages. They are a data structure that serves as a collection of multiple pieces of data. When working with an array, you can either use the same command to perform the same function on each item within an array, or access and manipulate individual elements using an index.
Arrays in PowerShell can contain one or more items. An item can be a string, an integer, an object, or even another array, and one array can contain any combination of these items. Each of these items has an index, which always starts (sometimes confusingly) at 0. So the first item in an array is given the index 0, the second is indexed as 1, and so on.
PowerShell arrays are such a fundamental part of PowerShell that they appear in every PowerShell tutorial out there, and a good knowledge of how to work with them is critical for many aspects of using PowerShell, from configuring Office 365 to using PowerShell for Pentesting.
An Example of a PowerShell Array
The easiest way to illustrate what an array is to take an example. Let’s make an array that represents a bowl of fruit.
There are several ways to create arrays in Powershell, but the easiest is to run this command:
@()
This will create an empty array. An empty array is not that useful, however, so let’s add some fruits to our new array. These will be represented as text strings. To do that, run this command
$fruit = @('Apples','Oranges','Bananas')
This will name an array “fruit”, and add three items to it. To see that this has worked, you can read the array using this command:
PS /Users/yourname> $fruit
Which will now return:
  Apples

  Oranges

  Bananas
As you can see, this array is a group of individual pieces of data. PowerShell will automatically index them in the way we’ve explained above: “Apple” will be indexed as 0, “Oranges” as 1, and “Bananas” as 2.
This example might make it seem like arrays are quite simple objects, and in a way they are. Their simplicity, however, is also what makes them such flexible, powerful objects. In the rest of this guide, we’ll give you a taste of what you can do with arrays.
Array Fundamentals
In this section, we’ll look at the most basic ways to create and work with arrays in PowerShell.
Create an Array
First, we’ll create an array. The standard way of doing this is to use @(), though there are other ways.
For now, let’s create an array called “data”. To do this, run:
$data = @()
This array is empty at the moment because we haven’t specified any data for it. To check how many items are in an array, we can use the count function:
$data.count
Which, at the moment, will return a 0, because there are no items in our array. To make an array with some data in it, we put these data inside the parentheses after the @:
$data = @('Zero','One','Two','Three')
Run the same count function now, and you’ll see that there are 4 items in this array. To see these items again, we just invoke the array:
$data
Which will list the items we put in the array.
Accessing Items
Now we have an array, we will want to access items from it. There are several ways to do this. The first is to use the index of the items in the array. As we said before, indexes start at 0, so to retrieve the first item in our array we will need to tell PowerShell to look at the item whose index is zero. We do that by running:
$data[0]
This will return “zero” because that was the first string we put in our array.
We can also extend this syntax to return multiple items from the same array, just by putting more indexes in the same command. For example, run:
$data[0,2,3]
This will return “Zero Two Three”. The items are returned in the same order that you entered the indexes. You can also use further syntax to return sets of items from an array. For instance:
$data[1..3]
Will return all items with an index between 1 and 3 (inclusive). And:
$data[-1]
Will return the last item in the array: the negative number tells PowerShell to count backward from the end of the array, so in this case, this command will return “Three”, the last item in our test array.
Changing Items
The same method can be used to update the items in an array. For instance, to update the item whose index is 2 (remember that this is the third item in the array), we can run:
$data[2] = 'second'
This gives us direct access to the items inside an array.
Iterated Actions
One of the most powerful features of PowerShell (and, in fact, of any command-line interface) is the ability to perform the same action on all the items in an array. There are a number of different ways of doing this.
The most basic is to use a Pipeline, which is the character |. When you pass an array to a pipeline, each item in an array is processed individually. As we’ve pointed out in our article on PowerShell objects and data piping, this is often the simplest way to perform iterated actions.
For instance, to add a description to each item in our array, we can use this command:
$data | ForEach-Object {"Item: [$PSItem]"}
This command tells PowerShell to take the items in $data one at a time, and then for each of them add “Item: “ to the beginning, followed by the original value.
There are several other ways to perform iterated actions in PowerShell, many of which will be familiar if you’ve used other programming languages: PowerShell includes ForEach loops, For loops, and Switch loops. For more details on these, check the Microsoft documentation.
Arrays of Objects
So far, we’ve been working with an array that contains basic data: a string. However, arrays can also contain objects, and many of the most common uses of PowerShell – like configuring Office 365 – require that you know how to work with objects. So let’s look at some basic commands for doing that.
Creating an Array of Objects
We can create an array of objects in the same way that we did with strings, using the @() function. For instance, to make a test list of employees, we can use:
$data = @(

       [pscustomobject]@{FirstName='Kevin';LastName='Marquette'}

       [pscustomobject]@{FirstName='John'; LastName='Doe'}

   )
Most cmdlets will return an array of this type when you assign them a variable to work with.
Accessing Objects from Arrays
The process we ran through above to access individual pieces of data can equally be used with arrays that contain objects. For instance, running:
$data[0]
Will return:
   FirstName LastName

    -----     ----

    Kevin     Marquette
Alternatively, we can access the properties of individual objects by specifying which property we would like within the same command, like this:
$data[0].FirstName
Which will return “Kevin”.
Updating Object Properties in Arrays
Going further, the same syntax gives us the capability of updating individual properties within objects that are held in arrays. For instance:
$data[0].FirstName = 'Jay'
Will update the FirstName property in the first item in our array to “Jay”.
Accessing Every Property in an Array of Objects
In most programming languages, we would have to use an iterative process (see above) to access all the properties in an array of objects. We can do that in PowerShell as well, of course, by running:
$data | ForEach-Object {$_.LastName}
This will return a list of all of the LastName properties in our array, but it is computationally expensive and difficult to write every time you want to see this data. So instead, PowerShell has a shortcut. Run this:
$data.LastName
And you will see the same list. PowerShell is actually taking each object in turn, just as before, but it hides this complexity from us.
Operators For Arrays

Almost all of the operators that we use for individual data items in PowerShell will also work with arrays, but some of them work a little differently when used in this way. So let’s take a look at the most common operators, and how you can use them in arrays.
-join
The -join operator is one of the most used commands in PowerShell, and it is extremely useful when working with arrays. It can be used iteratively on the items in an array to join them together in the output of an array.
Let’s take an example. First, create a simple array:
$data = @(1,2,3,4)
And then use -join to insert a hyphen in between each item, and output the result:
$data -join '-'
Which will return “1-2-3-4”. The -join operator can also be used without a delimiter, in which can the items in an array will be output as a series of unseparated values.
-contains
The -contains operator works on arrays in a very similar way to its usage with single data points. You can use it to check if an array contains a particular string, and it will output a Boolean value. For instance:
    PS> $data = @('red','green','blue')

    PS> $data -contains 'green'

    True
Equalities
There are two operators for checking for equality in PowerShell: -eq and -ne. If you are used to using these on single values, though, the way that these work in relation to arrays can seem a little strange. If you use -eq, for instance, the operator will not output a Boolean “True”, but instead will return the object that matches.
For instance:
    PS> $data = @('red','green','blue')

    PS> $data -eq 'green'

    green
The -ne operator works in much the same way, except that it will give you all the values that are not equal to your specified value. So:
    PS> $data = @('red','green','blue')

    PS> $data -ne 'green'

    red

    blue
You can, however, use an if() statement to compare the output of these operators with your expected output, and return a “True” or “False” output.
How to Add Values to an Array
After all of the instructions above, you are probably wondering why we’ve left out adding data items to an array. That’s because there is no way of doing that. An array, once created, stays the same size forever, and so in order to make it larger you need to copy it to a new array, and delete the original.
That sounds complicated, but Powershell handles this process for you using a series of pretty simple operators. There are two main ways to do this.
Array Addition
PowerShell can add two arrays together using the “+” operator, which hides the complexity of what the system is actually doing. For instance, if you make two test arrays like this:
    $first = @(

        'Zero'

        'One'

    )

    $second = @(

        'Two'

        'Three'

    )
You can then add them together using just:
PS> $first + $second
This will make a new array with all four values, and output the results. Note, however, that it will not give this new array a new name. To do that, we use the += operator.
Plus Equals for Combining Arrays
Instead of using the “+” operator in the above example, we could have used the “+=” operator, which will give us a whole new array:
$first += 'Two, Three'
The command looks simple, but it is hiding what PowerShell is actually doing here. It is copying all of the values from $first, and making a new array that includes the extra values. It then deletes the original array.
This is somewhat problematic because it is computationally expensive. With small arrays, you might not notice, but with large amounts of data this method can quickly lock up your system. That’s why we’ve given you a way around this problem, below.
Array Types

So far, we’ve been dealing with default arrays in PowerShell. Though PowerShell didn’t tell us at the time, every array that we’ve created so far is of one type, the [PSObject[]] type. This type of array can hold any type of data value.
Strongly Typed Arrays
However, there are times when you want to restrict the types of data or objects that an array can hold to just one. We can do this by using a strongly typed array, which can only contain the specified data type.
For instance, to make an array that can only take integers, we can use:
PS> [int[]] $numbers = 1,2,3
If you try and put the wrong type of data value into a strongly typed array, it will return an error code.
ArrayList
As we’ve said above, adding items to arrays can be a hassle. However, there is a different type of collection – ArrayList – that handles this more elegantly. In order to use this type of collection, however, we will have to invoke the .Net framework, which can throw some unfortunate outputs in our way.
To create an ArrayList, and then add items to it, run the following:
   $myarray = [System.Collections.ArrayList]::new()

    [void]$myArray.Add('Value')
Here, we can use the default .Net constructor to create a new ArrayList, and then using the -Add operator to add items to it. The [void] operator is there because sometimes these commands throw out strange outputs that can mess with the code.
Going Further
These are the most common array types in PowerShell, but there are a few others. If you are developing as a PowerShell user, it’s useful to start using ArrayLists instead of straight arrays, but you should also be aware that this type of array is not used by advanced users.
Instead, most experienced coders will use a generic list type called List[]. This type of list is a little more complex to use because it is derived straight from C#, but once you’ve mastered it, it offers far more flexibility than the arrays we’ve discussed so far.
Advanced Array Functions
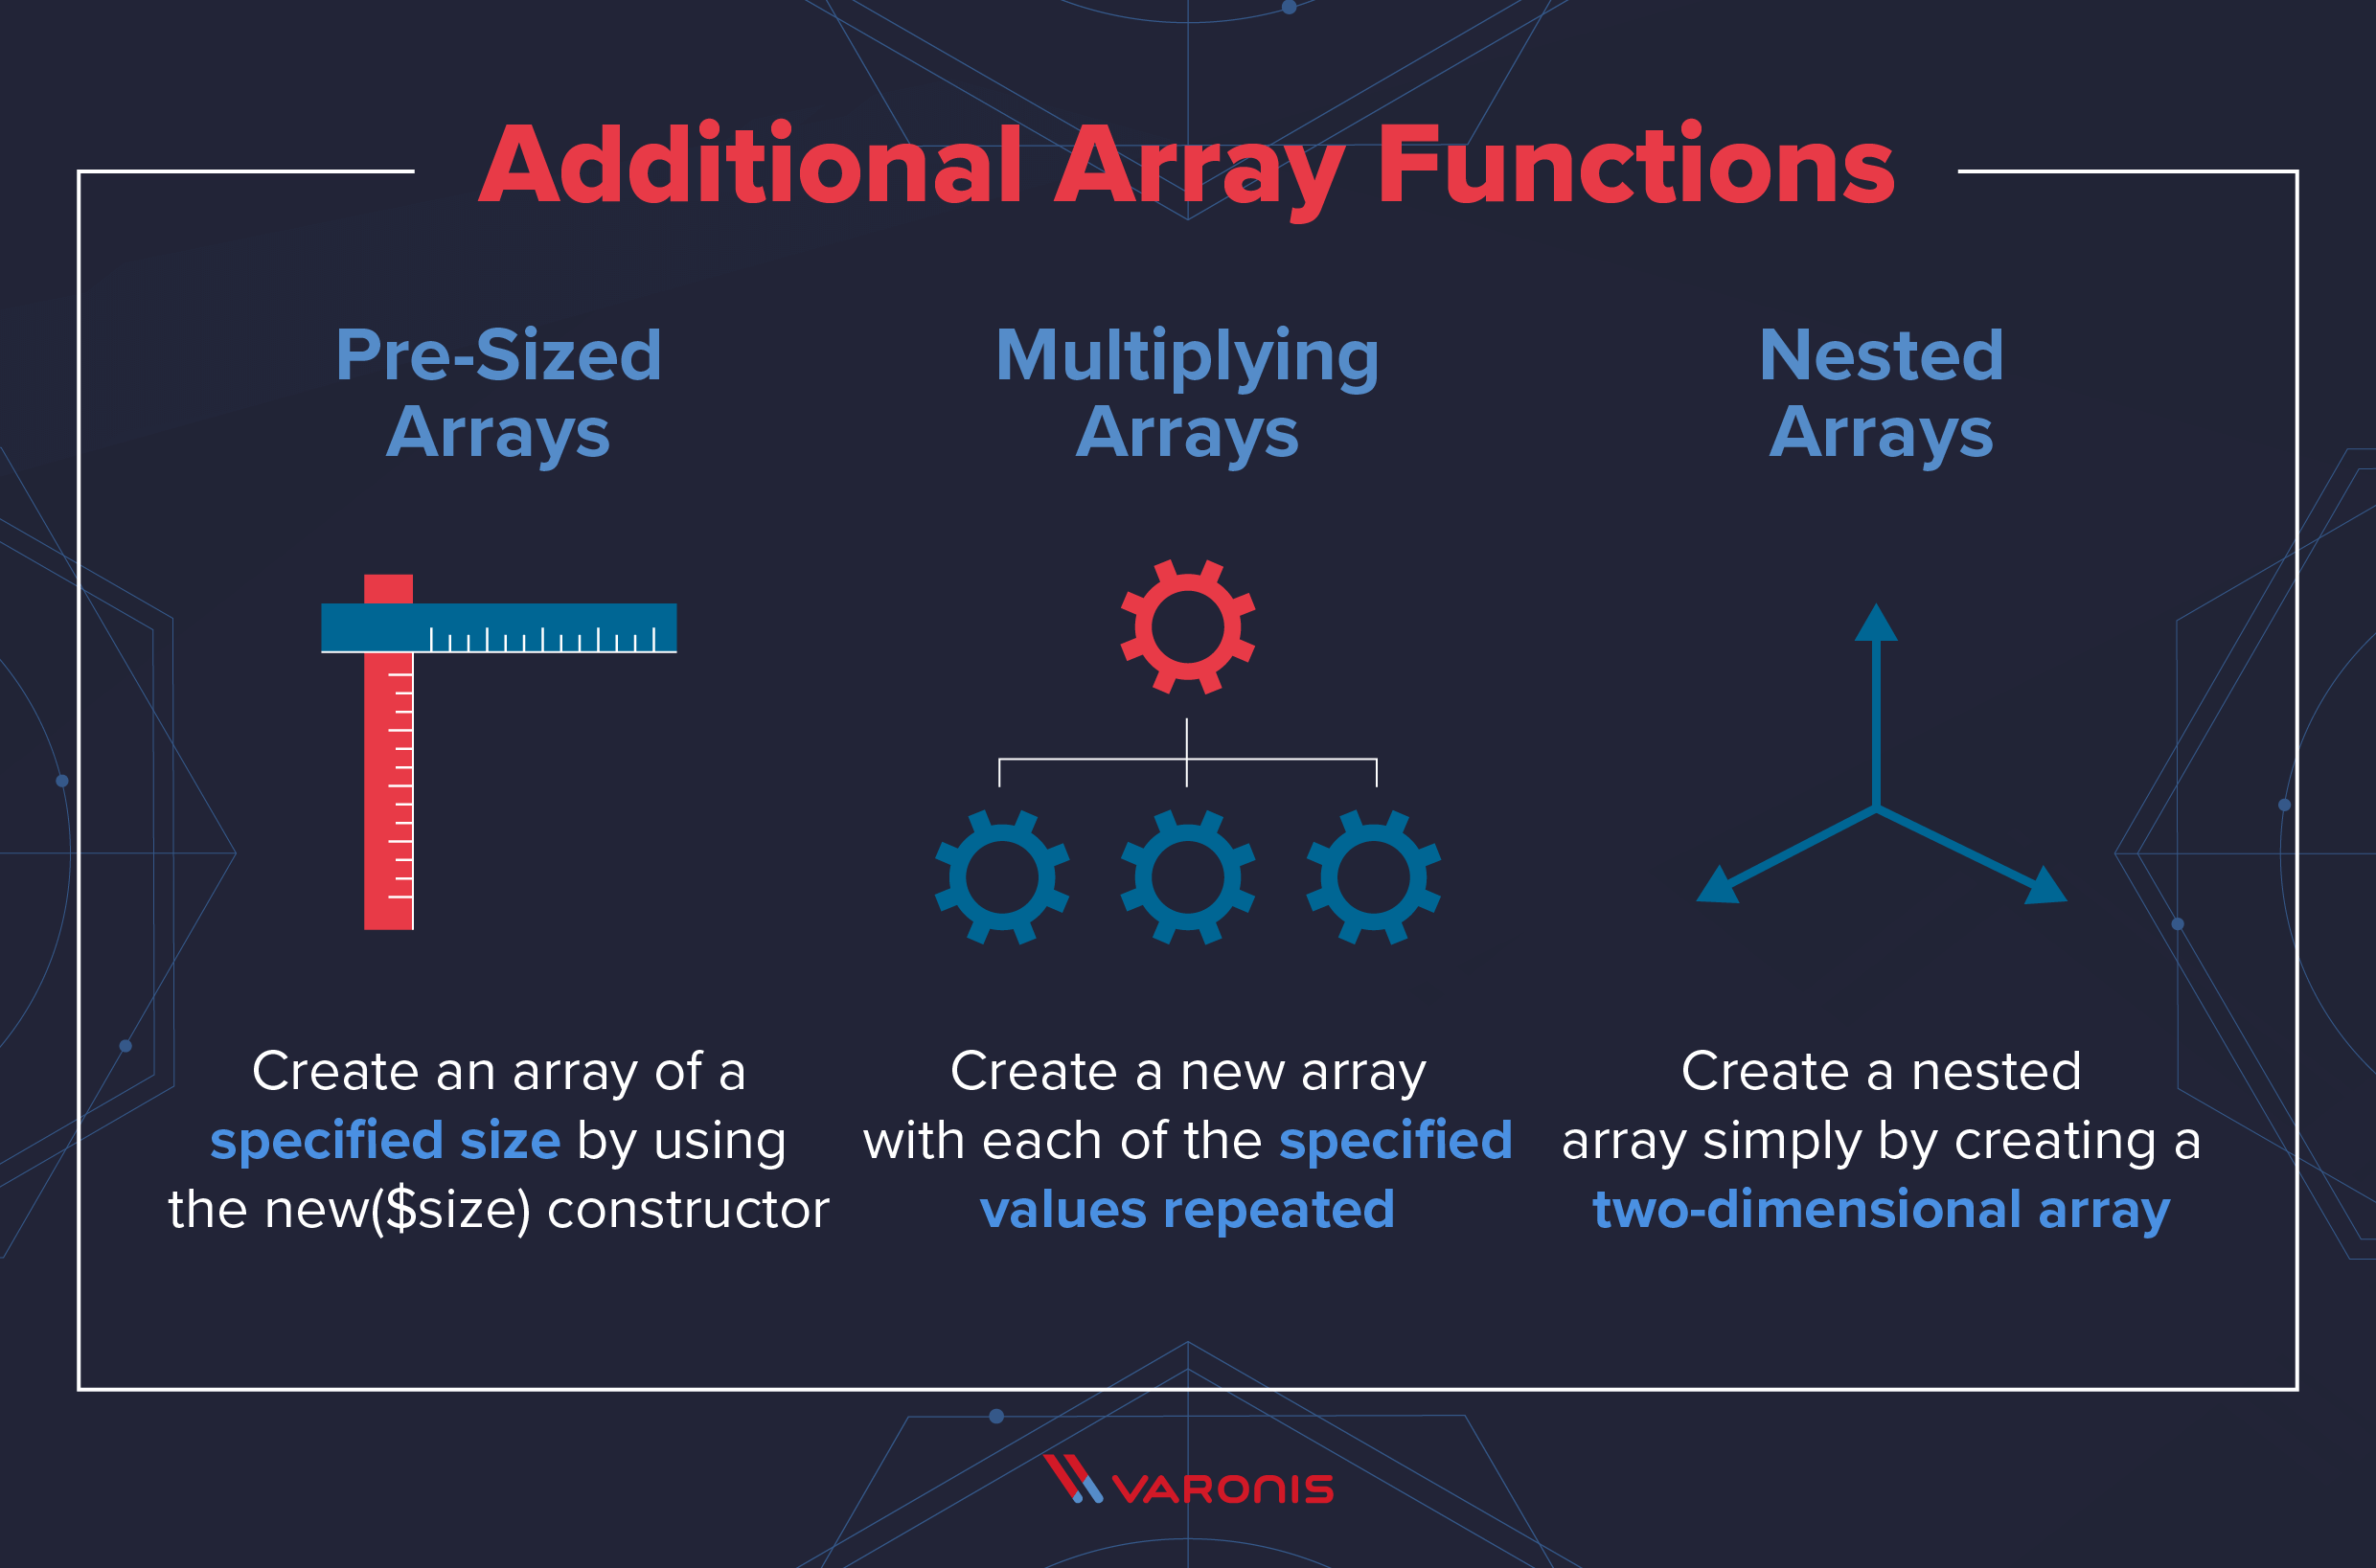
In addition to the basic functionality we’ve covered so far, there are also a number of more advanced array functions, and some extra features to note, as you start to use them more frequently.
Pre-Sized Arrays
The standard way of creating arrays above will create an array with a size determined by the number of items in it. However, you can create an array of a specified size by using the new($size) constructor.
You can do that like this:
$data = [Object[]]::new(4)
If you run a .count query on this array, it will return “4”, because even though it doesn’t have data in it, it will fill the space with 0. This is actually extremely useful if you need to initialize a new array that is filled with zeroes because a pre-sized array will initially be filled with 0.
Multiplying Arrays
Multiplying the objects in an array – and especially strings – is something that confuses most people when they first have to do it. We’ve seen extremely complicated if() scripts to achieve this outcome, but there is a much simpler way:
    PS> $data = @('red','green','blue')

    PS> $data * 3
Yep, that’s right. This will create a new array with each value repeated three times. You can also use this command as an alternative way to fill an array with zeros (or any other default value) by making an array with your chosen value, and then multiplying it as many times as you like.
Nested Arrays
Like many other programming languages, PowerShell supports nested arrays. The standard way of doing this in PowerShell is to use a multi-dimensional array. The simplest example of this is to create a two-dimensional array:
   $data = @(@(1,2,3),@(4,5,6),@(7,8,9))


    $data2 = @(

        @(1,2,3),

        @(4,5,6),

        @(7,8,9)

    )
The data structure you are making with this command is a classic matrix, and it can be worked with like those in other programming languages. For instance, to access a particular value from this array, you will need to specify two dimensions.
For instance, to access the value “3”, we would use this:
    PS> $outside = 0

    PS> $inside = 2

    PS> $data[$outside][$inside]

    3
This command can then be used to access any value, but you need to add nested brackets to get inside each level of the matrix.
A Final Word
All of the instructions above might be a lot for users who are first coming to PowerShell, but they have been carefully chosen as a way of learning the language. By combining the various techniques, you can build powerful scripts to automate many of the most frequent – and most time consuming – work you do with PowerShell.
These skills will also help you to go beyond PowerShell. Many of the most common languages used for managing cybersecurity, like NetCat and Nmap, use many of the same principles that PowerShell does. And so using PowerShell to improve your cybersecurity is a great way to learn how to secure your systems more generally.