
In previous tutorials, we covered topics like reverting a commit in Git using PowerShell and merging changes from remote and local repositories. Another key feature of Git is branching, which lets developers create separate lines of development. With branches, multiple contributors can work on the same project without interfering with the main codebase.
In this article, you will learn more about Git branching, multiple ways to create branches, and how to merge these branches to a local or remote repository.
To follow along with this Git tutorial and learn how to create branches, you will need:- The PowerShell Git client installed on your system (download and installation guide)
- A free GitHub account
- Connect to GitHub with SSH
What is Git branching?
Git branching lets developers work independently from the main production code, whether to fix bugs, add features, or experiment safely. When you create a branch, you're essentially working with a copy of the code, leaving the original untouched. This isolation allows you to test changes thoroughly before merging them back into the main branch.
The main branch itself isn’t inherently special; it's simply the default branch Git creates when you initialize a repository using the git init command.
Each time you commit, Git saves a snapshot of your files and tags it with a unique SHA-1 hash. When a new branch is created, Git sets a pointer to the same commit as the main branch. At that moment, both branches share an identical snapshot of the code.
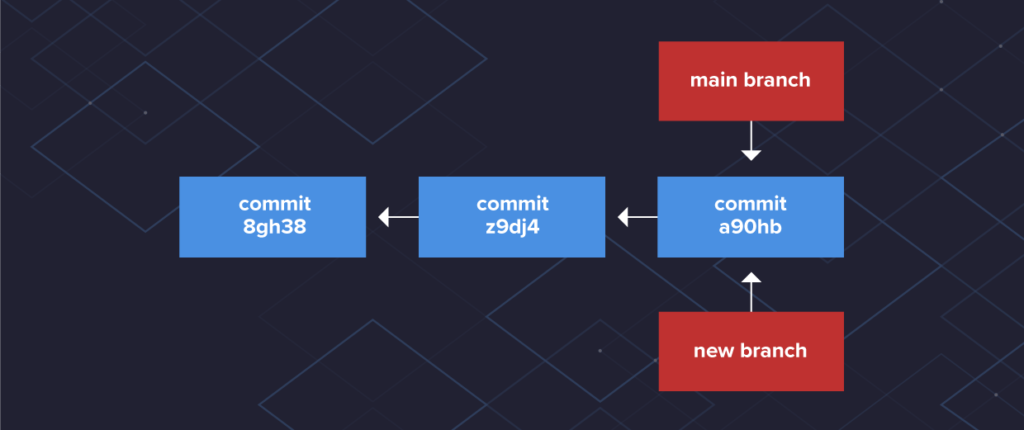
As you create commits in the new branch, Git creates new pointers to track the changes. The latest commits are now ahead of the main branch commits. As you continue to make commits, each branch keeps track of its version of files.
Git knows which branch you have checked out by using a special pointer called HEAD. When you create a new branch, Git doesn’t immediately change the HEAD pointer to the new branch. You’ll see HEAD in the tutorial when you create branches and view the commit log.
This branching function is what makes Git really powerful. Multiple people create separate branches to work on their code and merge their changes into the main branch. Branches are meant to be temporary and should be deleted when work is completed.
Branch naming strategies
Branch names can be anything you’d like. However, your organization or project may have standards outlined for branch naming. For example, naming the branch based on the person responsible for working on the branch and a description or work item:
- username / description
- username / workitem
You can name a branch to indicate the branch’s function, like a feature, bug fix, or hotfix:
- bugfix / description
- feature / feature-name
- hotfix / description
Another branching strategy is having branches dedicated to the different development cycles, like feature or hotfix. As work items come up, you create a branch for that item from its respective branch. Yes, you can create branches from branches!
You’re also not limited to branching from main; branches can come from other branches as well. Check out Option 4 below for an example.
How to create a branch in Git
Enough theory, let’s create some branches! These examples will be using PowerShell 7 on a Windows 10 system; however, you can use any terminal that supports Git commands.
Option 1: Creating a branch
To create a branch, use the git branch command followed by the name of the branch. After making the branch, use git branch again to view available branches.
Notice that creating a branch this way does not automatically switch to the new branch. Git uses an asterisk and a different colored font to identify which branch is active. This designation represents the HEAD pointer showing which branch is active.
git branch <branch name>

git branch

Option 2: Creating a branch using checkout
If you want to create a branch and checkout the branch simultaneously, use the git checkout command. The switch -b specifies the name of the branch. Note that after command completion, Git has moved HEAD to the new branch.
git checkout -b <branch name>

git branch

Option 3: Creating a branch from a commit
You can create a branch from a previous commit on an existing branch. Remember, a commit is just a snapshot in time of the files in a repository. You create a branch from a commit if you want to work on a specific snapshot of the files.
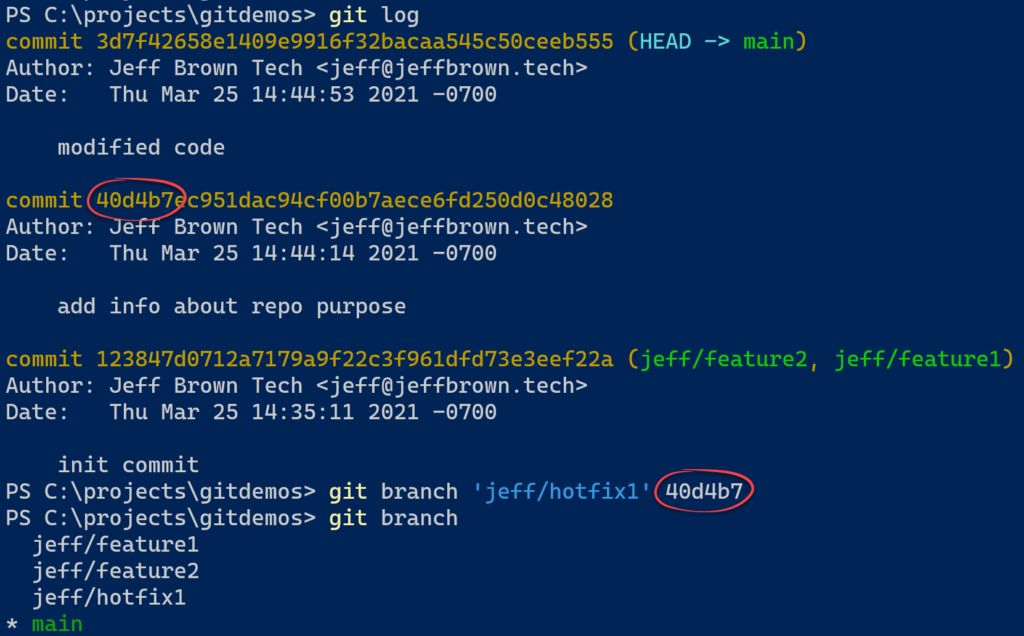
Before creating the branch, you need the SHA-1 identifier of the commit. To find the identifier, use the git log command to view previous commits. Each commit will have a complete SHA-1 hash as the identifier. However, you only need the first few characters to identify the commit.
Next, use the same git branch command from Option 1 but append the commit identifier at the end. This example is using 40b4d7 from the second commit as the identifier.
Note the HEAD designator is on the main branch, which is the active branch. The other branches jeff/feature1 and jeff/feature2 point to the same commit when you created them earlier. Both point to the same snapshot as each branch has not had additional commits made to each one since creation.
git log
git branch <branch name> <identifier>
Option 4: Creating a branch from another branch
If you use branches dedicated to hotfixes or features, you create branches from these other branches to work on the item. Creating a branch from another branch is no different from creating from the main branch. You just need to specify the name of the other branch as the starting point. This example shows creating the feature4 branch from the develop branch.
git checkout -b feature4 develop
Option 5: Download branch from remote repository
While you have a local copy of a repository to work with, so do other developers. These developers will have branches they are working on, and they can push their branches to a remote repository.
Along the way, you may need to work on another branch that isn’t local on your system. You can pull or download specific branches from a remote repository to use on your system.
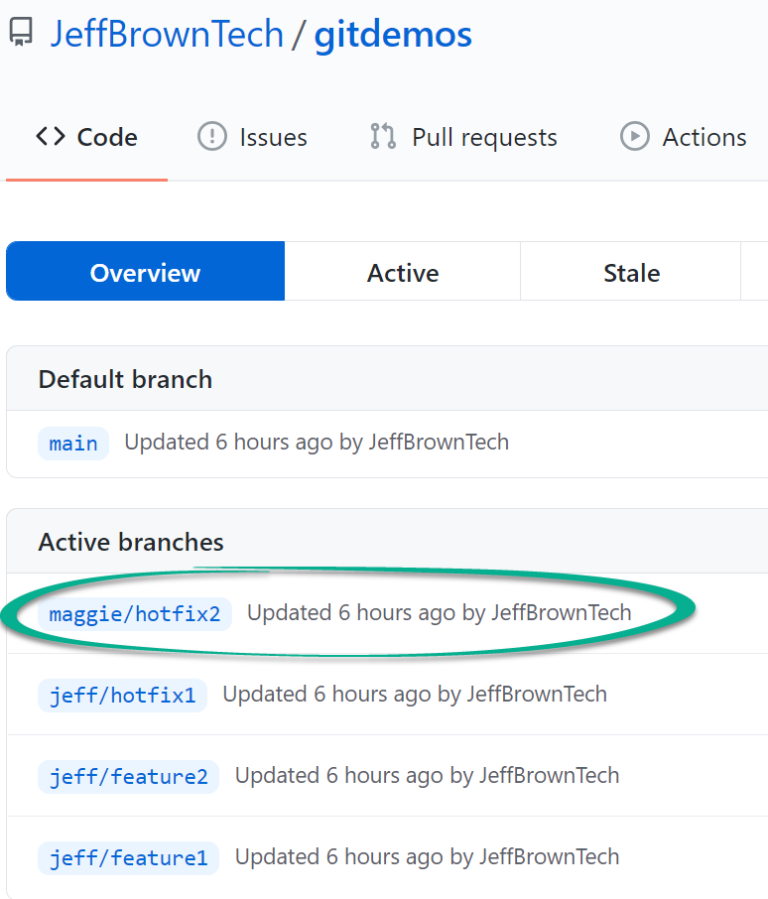
In a central repository hosted in GitHub, notice the branches available are the same ones on the local system (main, feature1, feature2, and hotfix1). However, another developer named Maggie has a branch for hotfix2 that is not on the local system. Maggie requests your assistance working on a hotfix, so you need to download this branch to your system.
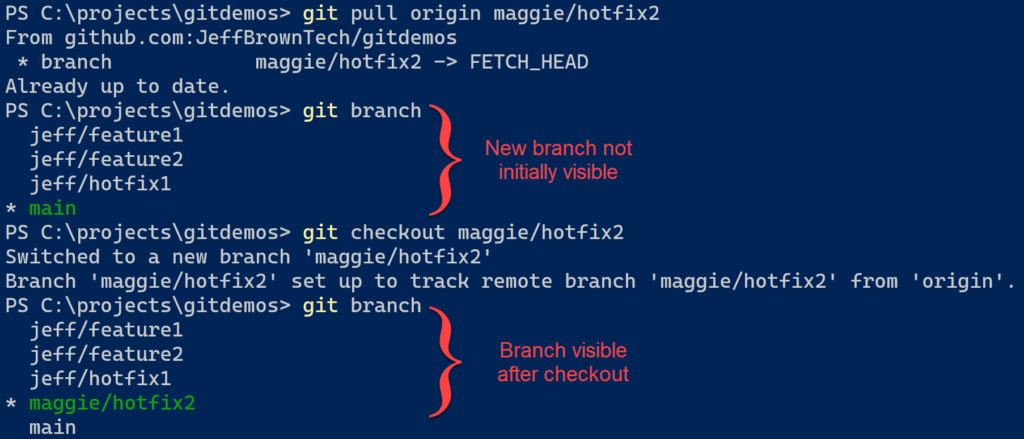
To retrieve the branch from the remote repository, use git pull against the origin and specify the name of the branch. If you check available local branches, the new branch doesn’t appear automatically. However, you can check out the branch and begin working on this new branch.
git pull origin <branch name>
git branch
git checkout <branch name>
git branch
Merging branches
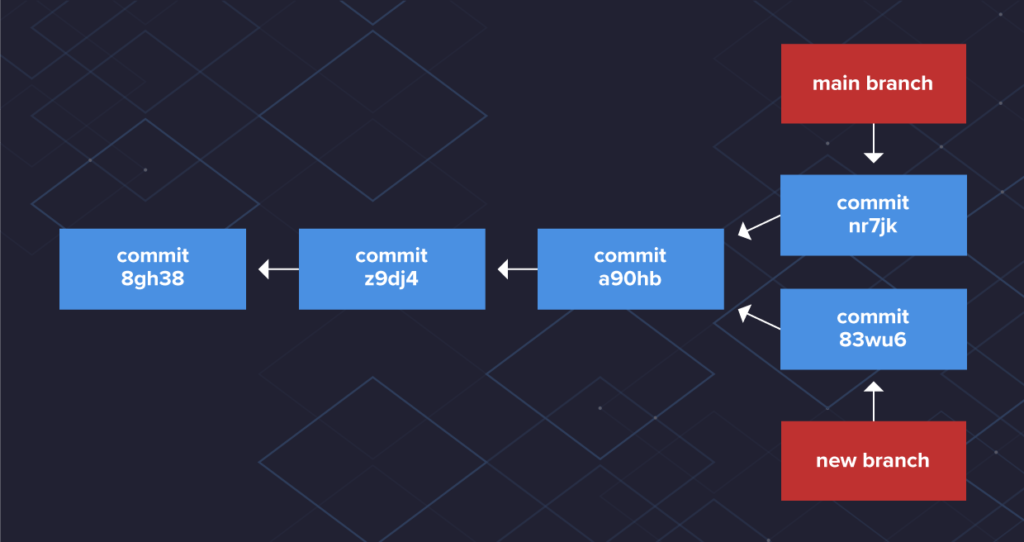
Once you’ve completed work on your branch, it's time to merge it into the main branch. Merging takes your branch changes and implements them into the main branch. Depending on the commit history, Git performs merges in two ways: fast-forward and three-way merge. Let’s examine both of these based on the branches and commit history in the following diagram.
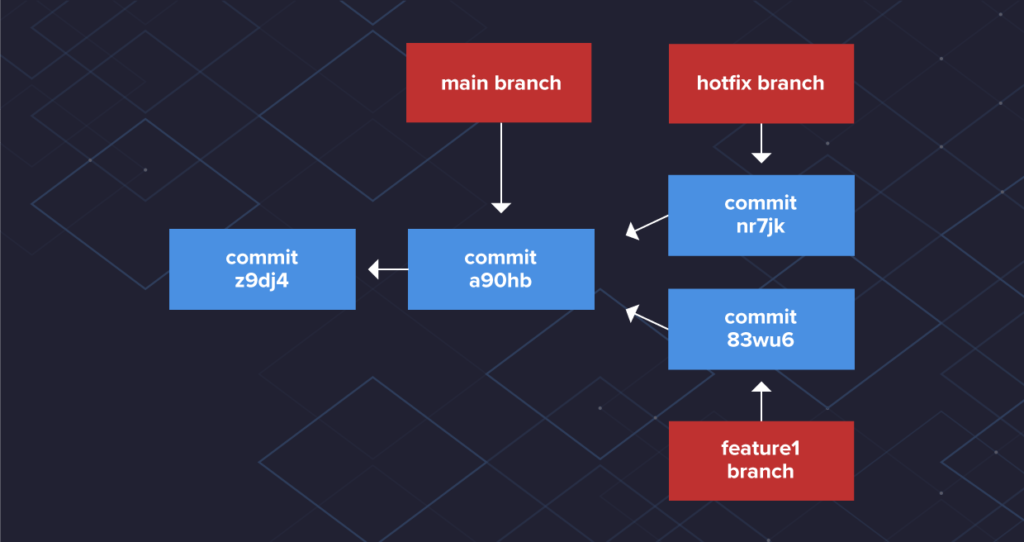
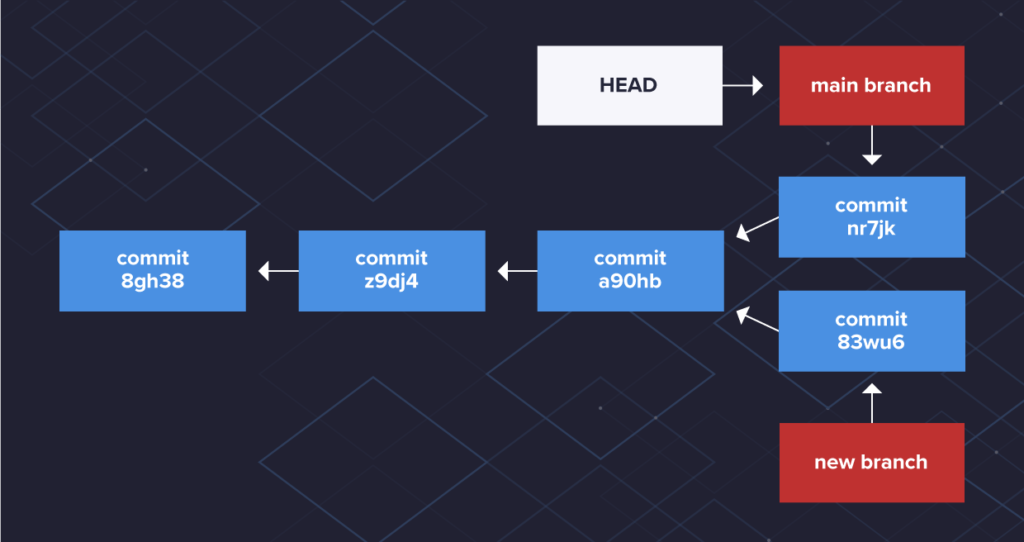
When you merge the hotfix branch into the main branch, Git will move the main branch pointer forward to commit nr7jk. Git does this because the hotfix branch shares a direct ancestor commit with the main branch and is directly ahead of its commit. This commit is a fast-forward merge.
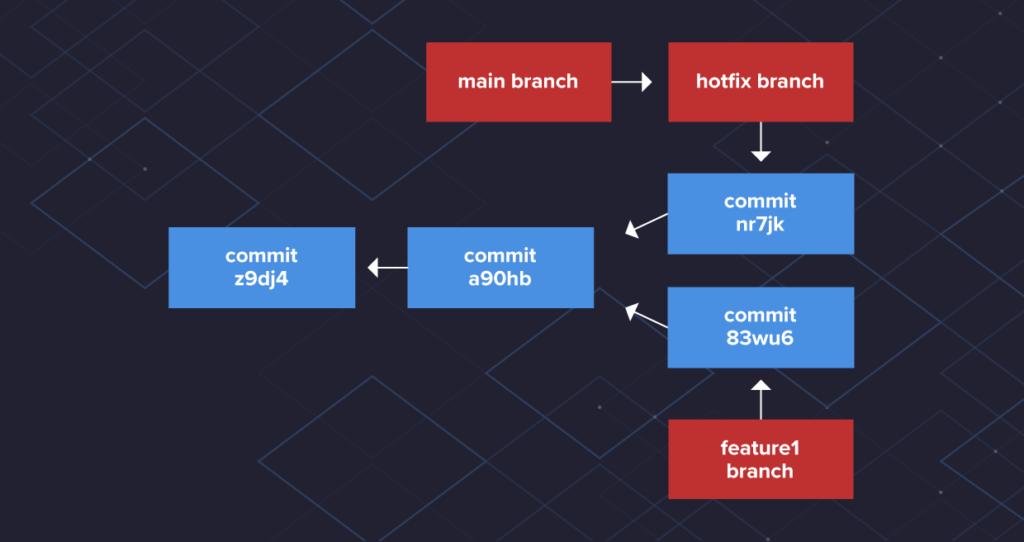
Once you merge the hotfix branch, continue working on the feature1 branch. As you continue making commits on the feature1 branch, the commit history diverges.
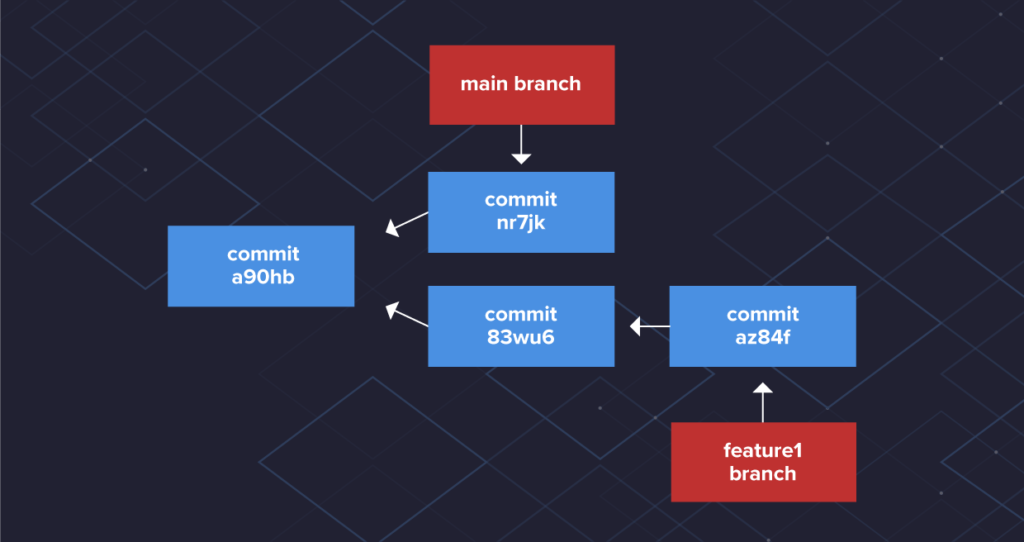
Git is unable to move the pointer to the latest commit like in a fast-forward commit. To bring the feature1 branch into the main branch, Git performs a three-way merge. Git takes a snapshot of three different commits to create a new one:
- The common commit both branches share (a90hb)
- The latest commit of the branch (az84f)
- The commit of the branch to merge into (nr7jk)
Merging branches in a local repository
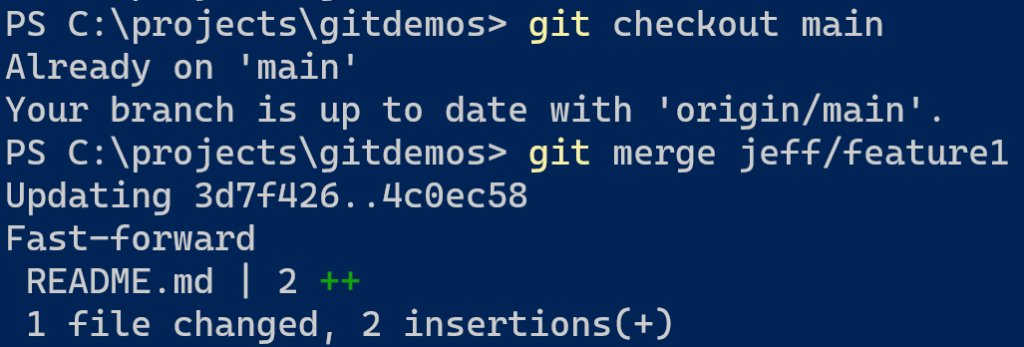
To merge branches locally, use git checkout to switch to the branch you want to merge into. This branch is typically the main branch. Next, use git merge and specify the name of the other branch to bring into this branch. This example merges the jeff/feature1 branch into the main branch. Note that this is a fast-forward merge.
git checkout main
git merge jeff/feature1
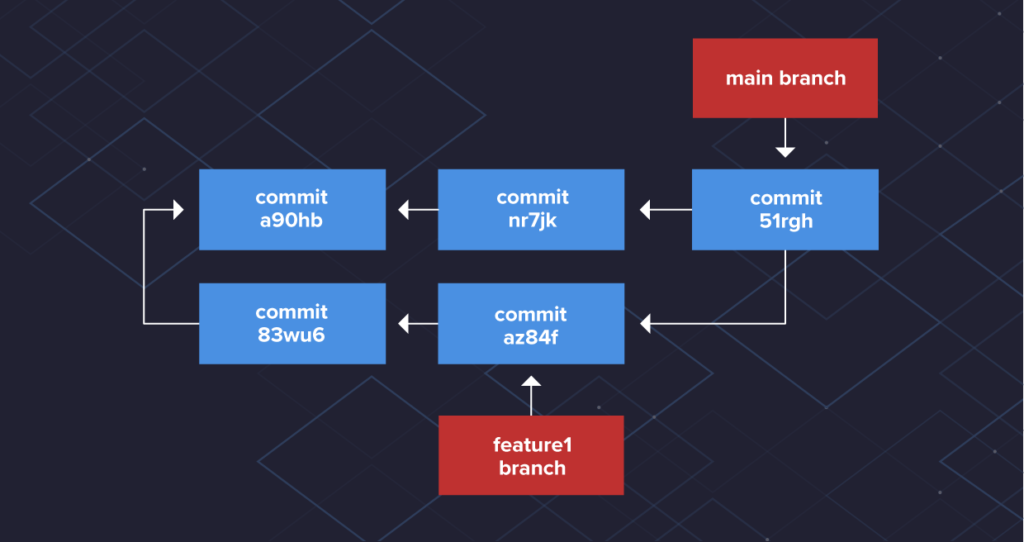
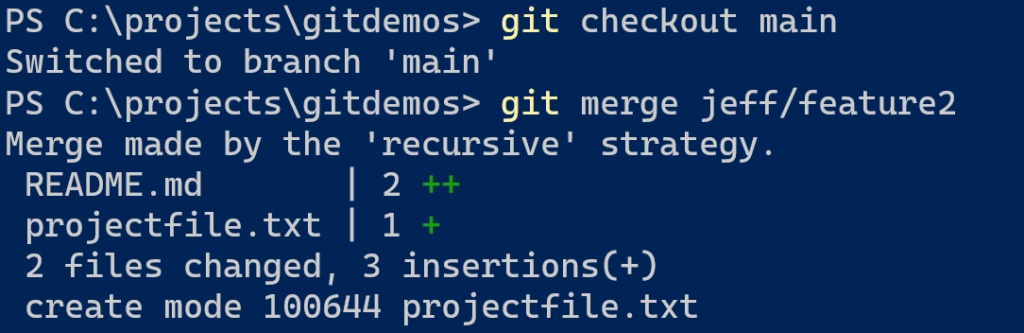
Work continues on the main and other branches, so they no longer share a common commit history. Now a developer wants to merge the jeff/feature2 branch into the main branch. Instead, Git performs a three-way (or recursive) merge commit.
git checkout main
git merge jeff/feature2
Merging branches to remote repository
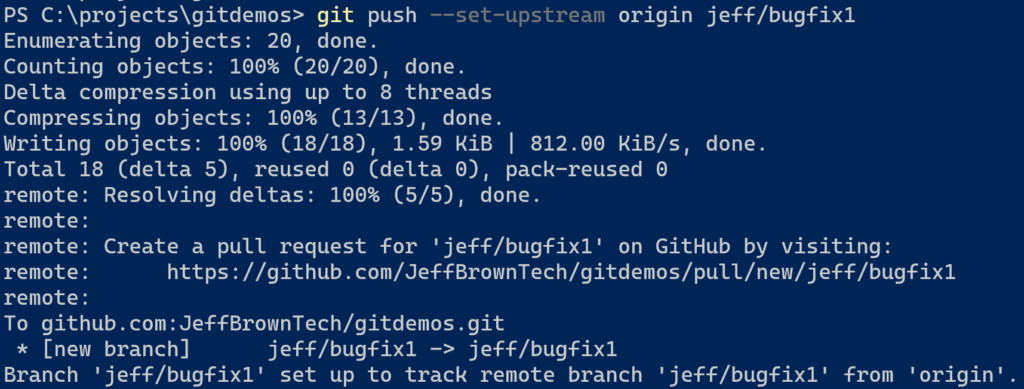
If you create a branch in your local repository, the remote repository is not aware of the branch’s existence. Before you can push the branch code in the remote repository, you set the remote repository as the upstream branch using the git push command. This command simultaneously sets the upstream branch and pushes the branch contents to the remote repository.
git push --set-upstream origin <branch name>
Merging main into a branch
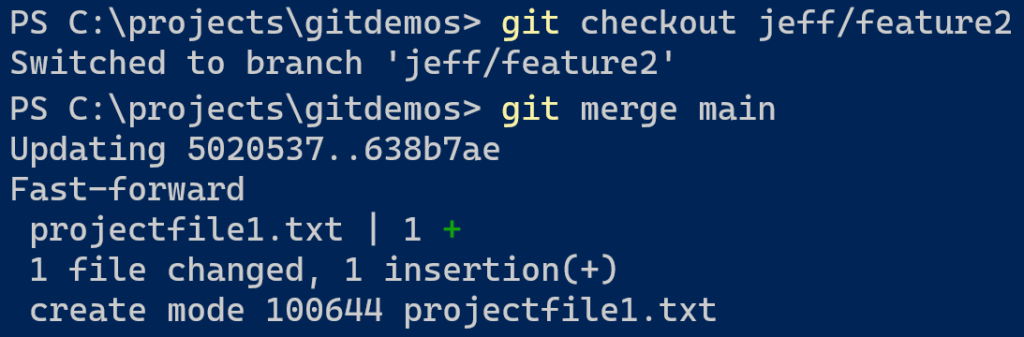
While you are working on your branch, other developers may update the main branch with their branch. This action means your branch is now out of date of the main branch and missing content. You can merge the main branch into your branch by checking out your branch and using the same git merge command.
git checkout <branch name>
git merge main
Git branching and merging: Key takeaways
- Branching promotes safe parallel development.
Git lets you work on bug fixes or new features without touching the main codebase by creating isolated branches from any branch, including feature or hotfix branches. - The default main branch is just a pointer.
When you rungit init, Git creates themainbranch as a pointer to the initial commit—it’s not inherently special. - Commits are immutable snapshots tracked by SHA‑1.
Every commit is identified by a unique SHA‑1 hash, and new branches simply point back to these snapshots. - Branch pointers and HEAD determine your workspace.
Git uses HEAD to keep track of which branch you’re currently editing; as you commit, branch pointers move forward accordingly. - Flexible strategies for naming and branching.
Whether you usefeature/,bugfix/, orhotfix/prefixes, or even branch off an existing branch, you can organize your workflow to fit your team’s needs. - Merge types depend on branch history.
If one branch directly continues from another, Git performs a fast-forward merge. Otherwise, it uses a three-way merge to combine divergent histories.
Git branching and merging: Frequently Asked Questions
What is creating a branch in Git?
Creating a branch takes a snapshot of the existing code so you can work on it independently of the main branch.
What is Git branching used for?
Git branching allows developers to work on separate features, fixes, or experiments in isolation from the main codebase. This enables safer development, easier collaboration, and better code management.
How do I create a new branch in Git?
Use the git branch command and specify the branch name, e.g., git branch feature1.
What is the difference between main and other branches in Git?
Technically, main is just a branch like any other. It's the default branch Git creates when initializing a repository, but it holds no special functionality beyond convention.
How can I view which branch is active?
Use git branch to view available branches and which one is active. Git typically designates the active branch with an asterisk and a different colored font.
How can I switch to working on another branch?
Use git checkout and the name of the branch to make it active.
Can I create a branch inside another branch?
Yes, specify the name of the branch to base the new branch, e.g., git branch feature-bug feature1.
My branch only exists locally. How can I add my branch to my remote Git repository?
Yes, use the git push command to set the upstream branch, e.g., git push –set-upstream origin <branch name>.
How can I update the main branch with my branch’s changes?
Switch to the main branch using the git checkout command, then merge the branch using the git merge command along with the branch name.
How can I delete a branch?
When you are done with a branch, delete it using the git branch command and the -d switch, e.g., git branch -d feature1.
What is a fast-forward merge in Git?
A fast-forward merge occurs when a feature branch has a linear history from the main branch. Git can simply move the pointer forward without needing to create a new merge commit.
How does Git track changes in branches?
Git uses commit hashes (SHA-1) to track snapshots of your files. Each branch is a pointer to a sequence of commits, and Git uses HEAD to determine which branch you’re working in.
Should I delete Git branches after merging?
Yes, it’s a best practice to delete feature or hotfix branches after merging. This helps keep your repository clean and prevents confusion over stale branches.
Can multiple developers work on the same Git branch?
They can, but it’s not ideal. Working on the same branch increases the risk of merge conflicts. Instead, each developer should create their own feature branch and merge later.