
As an Azure administrator or architect, you are sometimes asked the question: “How can we safely deploy internal business applications to Azure App Services?”
These applications characteristically are:
- Not accessible from the public internet.
- Accessible from within the on-premises corporate network
- Accessible via an authorized VPN client from outside the corporate network.
For such scenarios, we can use Azure Private Links, which enables private and secure access to Azure PaaS services over Azure Private Endpoints, along with the Site-to-Site VPN, Point-to-Site VPN, or the Express Route. Azure Private Endpoint is a read-only network interface service associated with the Azure PAAS Services. It allows you to bring deployed sites into your virtual network, limiting access to them at the network level.
It uses one of the private IP addresses from your Azure VNet and associates it with the Azure App Services. These services are called Private Link resources. They can be Azure Storage, Azure Cosmos DB, SQL, App Services Web App, your own / partner owned services, Azure Backups, Event Grids, Azure Service Bus, or Azure Automations.
In this article, we will cover the following:
- How are the services secured using Private Endpoints?
- Key Features
- Securing App Services WebApp with Private Endpoint
How are Services Secured Using Private Endpoints?
When using Private Endpoints for the services and applications in Azure, the incoming traffic is restricted to a specific Private Link resource.
Get the Free PowerShell and Active Directory Essentials Video Course
Network traffic travels in one direction, from the client to the resource on the Microsoft backbone network. The connection to the resource is validated by the platform for access control.
Using Private Endpoint provides additional security to the Azure resources by providing built-in exfiltration protection that prevents access to other resources hosted on the same Azure service.
Key Features of Azure Private Endpoints

Some of the key characteristics of Private Endpoints are as below:
- Secure Accessibility – Resources with Private Endpoints are accessible from the consumers within the same virtual network, regionally/globally peered virtual network, as well as on-premises networks using VPN or Express Route.
- Unidirectional Connectivity – Network connections are unidirectional and are initiated by the consumers for the Private Endpoint resource. Connections cannot be initiated from the Private Link resource to the consumers.
- Consistent IP Address – When a Private endpoint is created for a resource, a private IP address from the virtual network is dynamically allocated, which does not change and remains consistent throughout the lifecycle of the resource.
- Same Region Existence – The private endpoint must be deployed in the same region as the virtual network, whereas the private link resource can be deployed in a different region.
- Private Endpoint Limitations – Multiple Private Endpoints can be created within the same virtual network. There can be 1000 Private Endpoints per virtual network and have a maximum of 64000 Private Endpoints per subscription.
How to Secure App Services WebApp with Private Endpoint

In the following sections, we will configure a Private Endpoint for an App Services Web App.
We will follow the below steps:
- Create a Site-to-Site VPN
- Create Virtual Network in Azure
- Create a Resource Group
- Create a Virtual Network
- Create Virtual Network Gateway
- Create Local Network Gateway
- Create Connections
- Create Virtual Network in Azure
- Create App Services WebApp
- Create App Service Plan
- Create App Services WebApp
- Create Private Endpoint in WebApp
- Test Connection
1. Create a Site-to-Site VPN
One other important job that as an Azure administrator or as an Azure architect you may be tasked with, is to make a choice of the VPN client to be used. Organization might come to you for help asking for what VPN client should be used for their connectivity to Azure. This is in cases when the organizations do not have their own routers with public IP addresses. You have to make a choice based on your experience, availability, features, and pricing.
I recently came across one such question where I had to make the choice of the VPN client that should be used, and my choice was Perimeter-81 because it is cost effective, reliable and good for small to medium businesses. Perimeter-81 is a zero-trust cloud-based network as a service designed to simplify secure networks for the modern and distributed workforce. You can choose any other vendor as well that provides VPN services. One very important point that I would like to make here is Perimeter-81 is just a choice that I made after my research on the available list of vendors. Microsoft already has a comprehensive list of vendors and you are free to make any choice.
Create Virtual Network in Azure
The basic foundation of Infrastructure as a Service (IaaS) is a Virtual Network, within which all infrastructure deployments happen. It comprises subnets, which has a set of IP addresses to be allocated to the resources being deployed. We can have different subnets for different usage. For example – we can have one subnet for virtual machines, another one for Private Endpoints, and a dedicated subnet for Virtual Network Gateway.
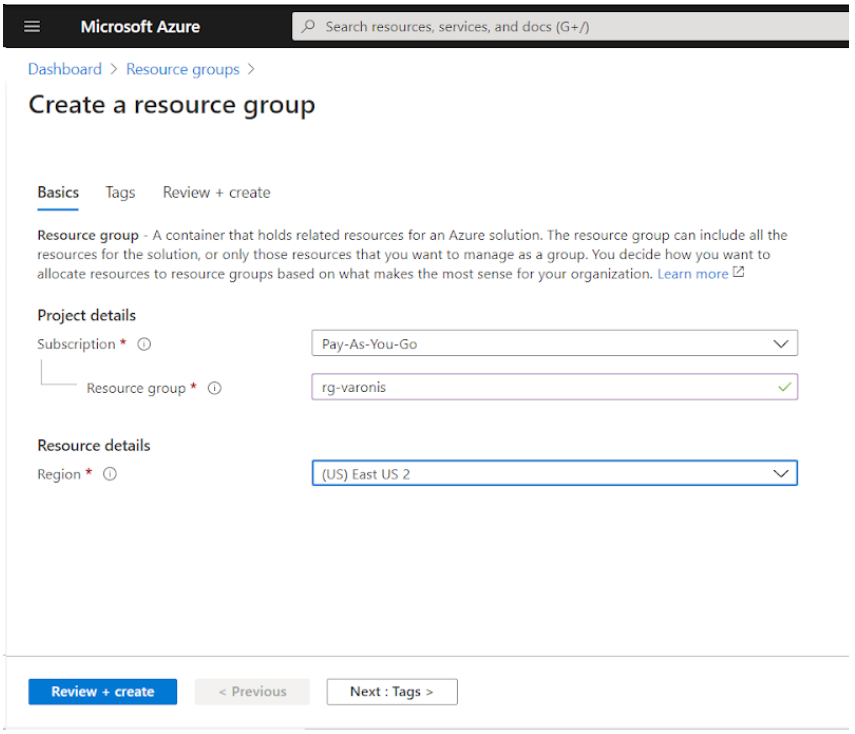
In Azure, the first step is to create a resource group. It is a logical container inside which all resources are created. We will create and deploy other resources after the resource group has been created, w Follow the below steps to create
Create a Resource Group
- Login to Azure Portal and go to “Resource Group” and click the “Add” button.
- On the “Create Resource Group” Page, choose subscription, enter resource group name and select a region based on your location.

- Click on Review + Create and after the validation is complete, click on the Create button.
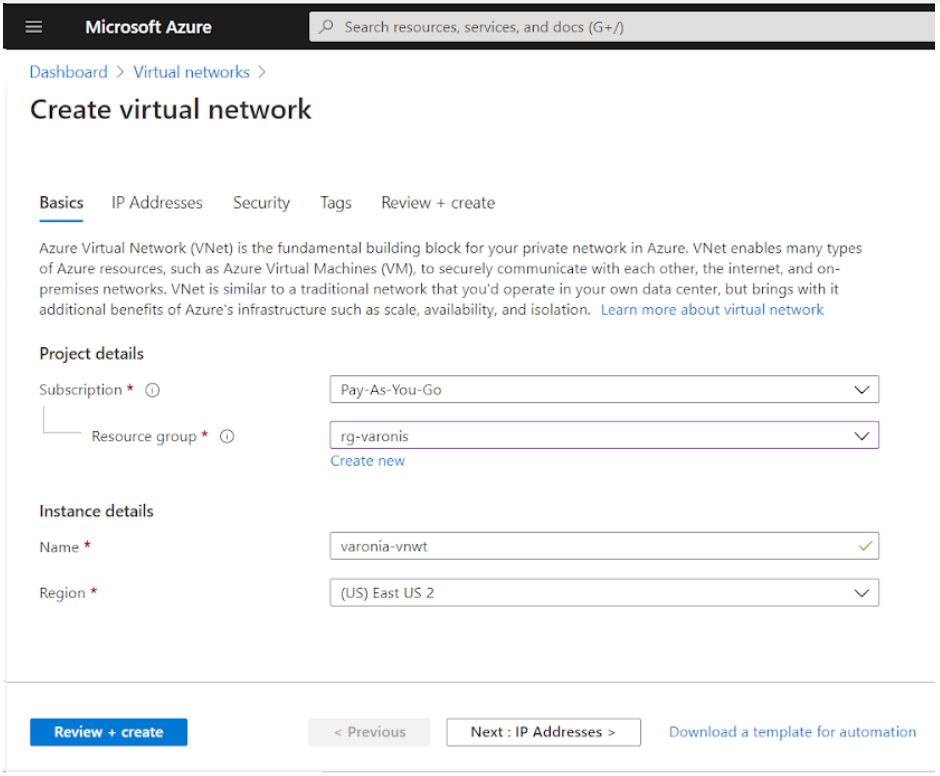
Create a Virtual Network
- Click on “Virtual Network” and then click on the “Add” button
- On Create Virtual Network page, perform the below actions
- Select subscription
- Choose the Resource Group name you just create above from the Resource Group dropdown
- Enter a name for the Virtual Network
- Select Region, where you wish to create your Virtual Network (it is ideally the same as your resource group)
- Click on the “Next: IP Addresses” button

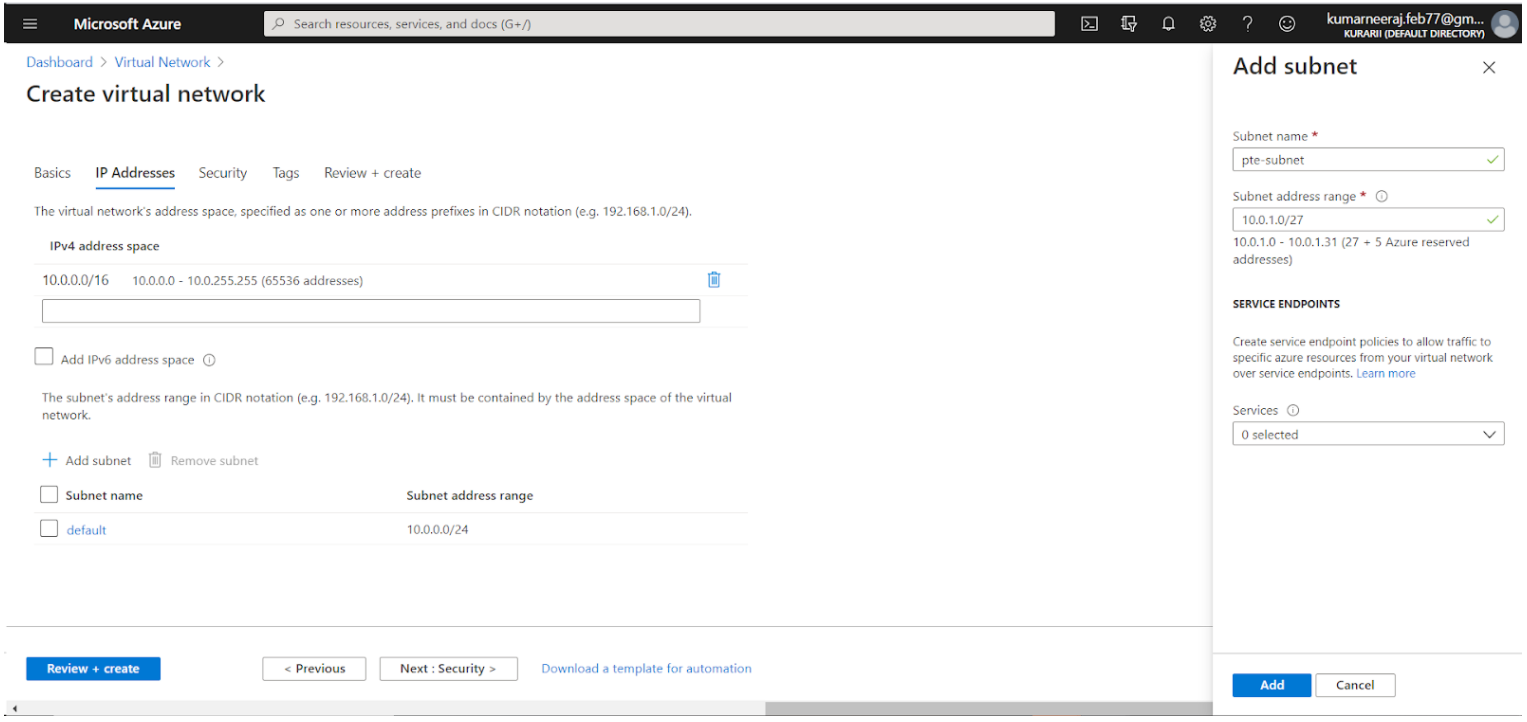
- On the IP Addresses tab, choose the IPv4 address you want for your VNet (By default an IP address of 10.0.0.0/16 is prepopulated). You can use the same.
- Under the subnets, choose the default subnet of 10.0.0.0/24
- Click on the Add Subnet button to add a subnet for the Private Endpoint.

- Provide a name (“pte-subnet”) for the subnet
- Give the IP address range for this subnet in the CIDR notation (10.0.1.0/27). The “/27” means that we will have 32 IP addresses, out of which we can use 27 IP addresses as 5 addresses are reserved.
-
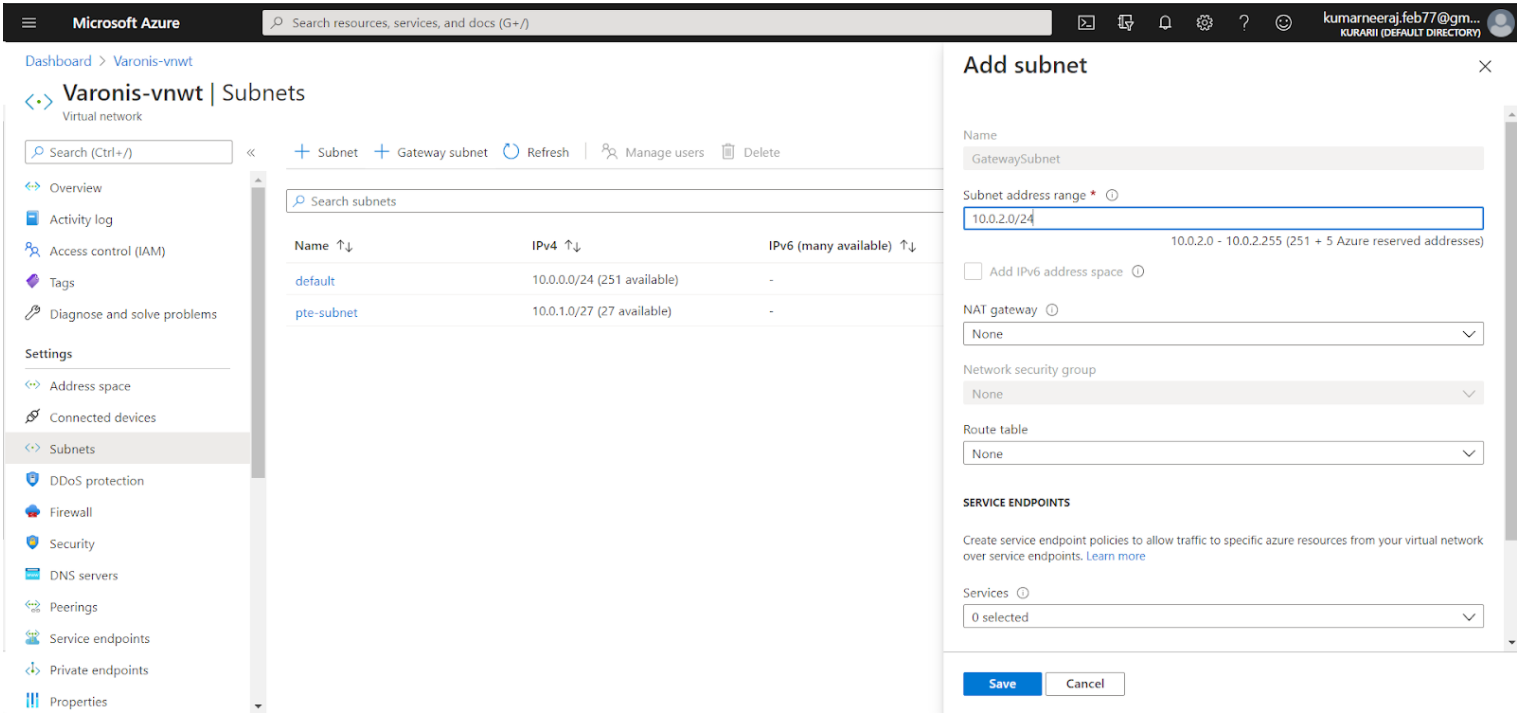
- Once the Virtual Network has been deployed, go to the resource.
- Click on Subnets under Settings from the left menu.
- Under Subnets, click on “Gateway Subnet” to add a subnet to be used for the creation of Virtual Network Gateway

Create Virtual Network Gateway
In order to connect the on-premises network with Azure virtual network, we will create the Virtual Network Gateway, abbreviated as VNG. It is used to send encrypted traffic between the source and the destination over the public internet. When trying to create the VNG in Azure, you will notice that the virtual network only allows for a single Gateway Subnet to be created. Therefore, each virtual network in Azure can have only one Virtual Network Gateway. Follow the steps below to create the Virtual Network Gateway.
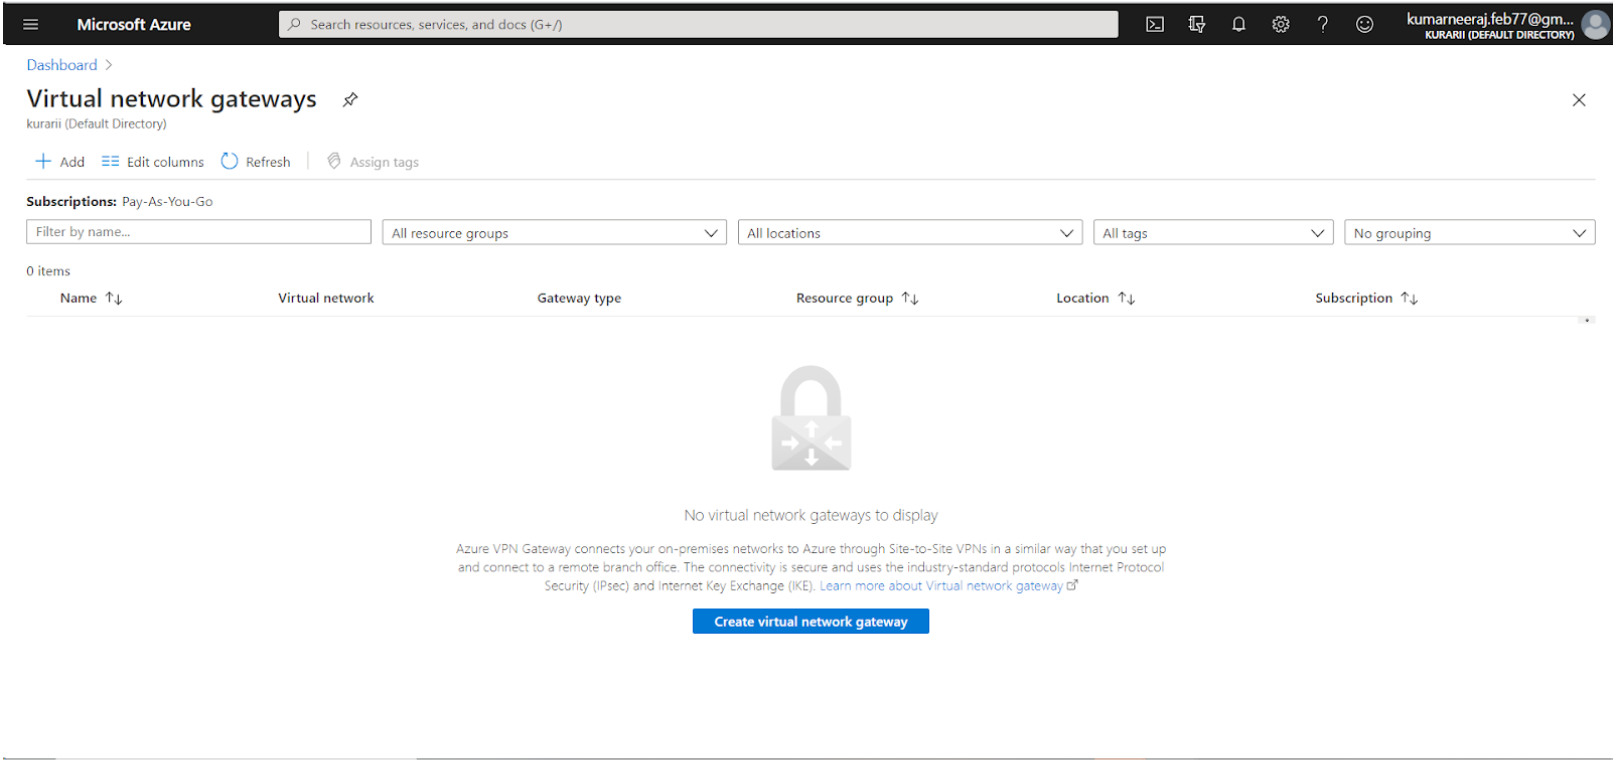
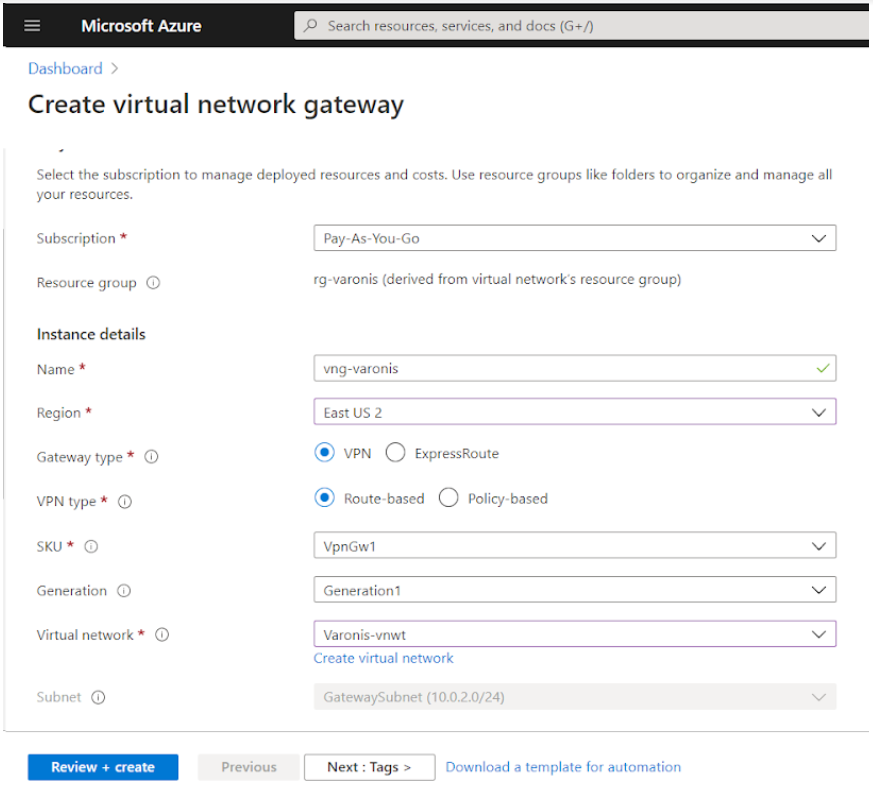
- Go to Azure Portal and search for Virtual Network Gateway. On the Virtual Network Gateway page, click on the Add button.

- On the Create Virtual Network Gateway page, select the subscription
- Give the name (vng-varonis) for virtual network gateway
- Select the region (East US 2)
- Select the Gateway type as VPN and VPN Type as Route Based
- The SKU for the demo purposes is “VPNGw1”. The generation is Generation1 by default
- Select the virtual network as “Varonis-vnet” from the drop down
- For the public IP address, select Create new and give the name for the IP address (pip-vng)
- The remaining options remain the same.
- Click on Review and create, and finally click on create

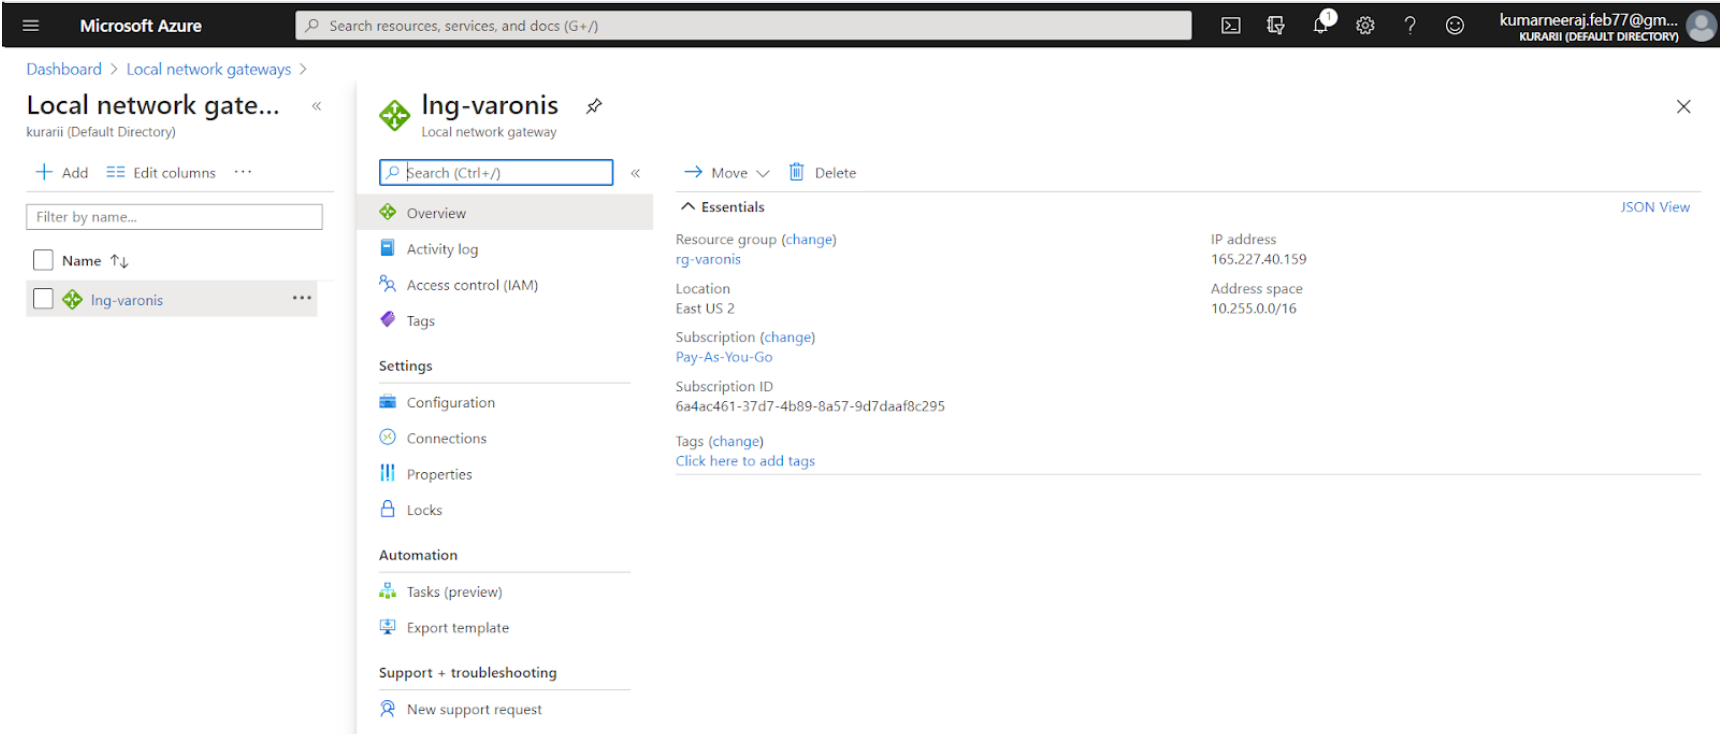
Create Local Network Gateway
To create the Site-to-Site VPN, we need to configure the Local Network Gateway and then create the connection between the local network gateway (LNG) and the virtual network gateway (VNG). As detailed earlier, we will setup Perimeter-81 for LNG, which is the VPN service provider. The VPN client can then be downloaded on the mobile devices or on to the systems and connect to the Azure network.
As already mentioned before, the choice of the VPN service provider is entirely dependent on organizational preferences. You will receive the public IP address as well as the private IP addresses from the VPN service provider.
The public IP address is used to create the connection tunnel between the on-premises network and the Azure network, whereas, the private IP addresses are allocated to the on-premises devices trying to connect to the Azure network using the VPN client.

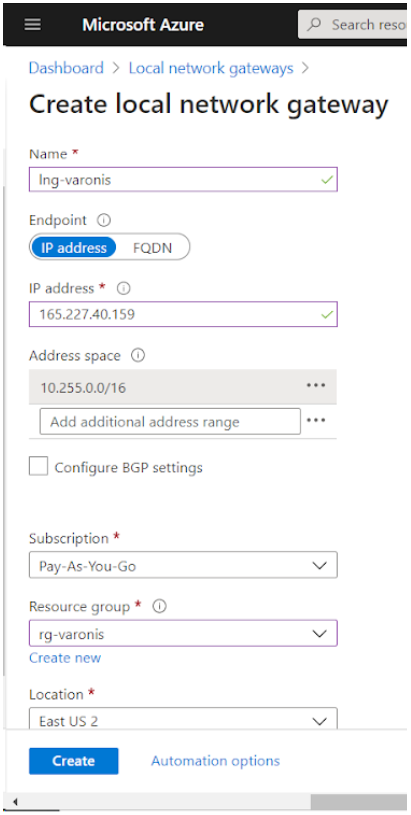
Below are the configuration details of the Local Network Gateway:
- Public IP address of the VPN Client – 165.227.40.159
- Private IP address Subnet (in CIDR) – 10.255.0.0/16
- Shared Secret / Shared Key. This can be any value that should match while configuring the connection with the Azure Virtual Network Gateway – xxxx12345xxx
Follow the steps below to configure Local Network Gateway (LNG) in Azure:
- Go to your Azure portal, search and open Local Network Gateway
- On the Local Network Gateway page, click on the Add button
- Enter the name for the local network gateway (lng-varonis)
- Enter the public IP address of the VPN client configured earlier from the VPN provider (165.227.40.15)
- For the address space, provide the private address from the VPN provider in the CIDR notation (10.255.0.0/16)
- Choose the subscription and the resource group
- For the location, enter the location, which is the same as the rest of the resources (East-US2)
Create Connections
After the local network gateway has been created, the final step is to create connections between the virtual network gateway and the local network gateway. This helps connect your on-premises network with your Azure network. Connections can be created either from within the virtual network gateway or the local network gateway. Follow below steps to create connections.
- On the local network gateway page, click on Connections under settings
- On the connections page, click on the Add button
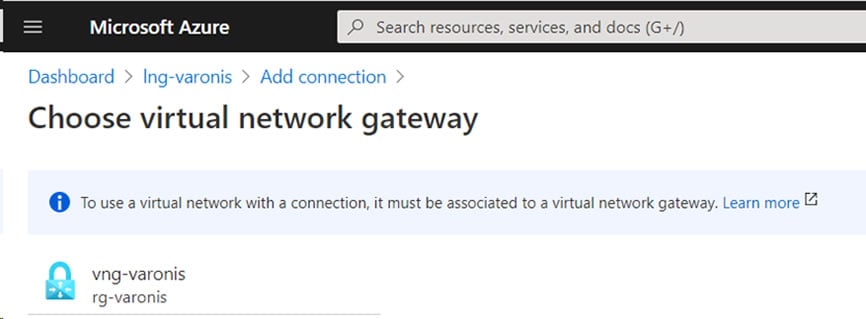
- On the Add Connection page, provide name for the connection (s2s-Connection)
- Click on Choose a Virtual Network Gateway, and select the virtual network gateway created earlier (vng-varonis)

- The local network gateway will automatically be selected for you (lng-varonis)
- The Shared Key (PSK) is the same as provided during the configuration of the VPN client (xxxx12345xxx)
- The IKE protocol is IKEv2 by default
- The rest of the options will be the default values.
- Click on the Create button to create connection

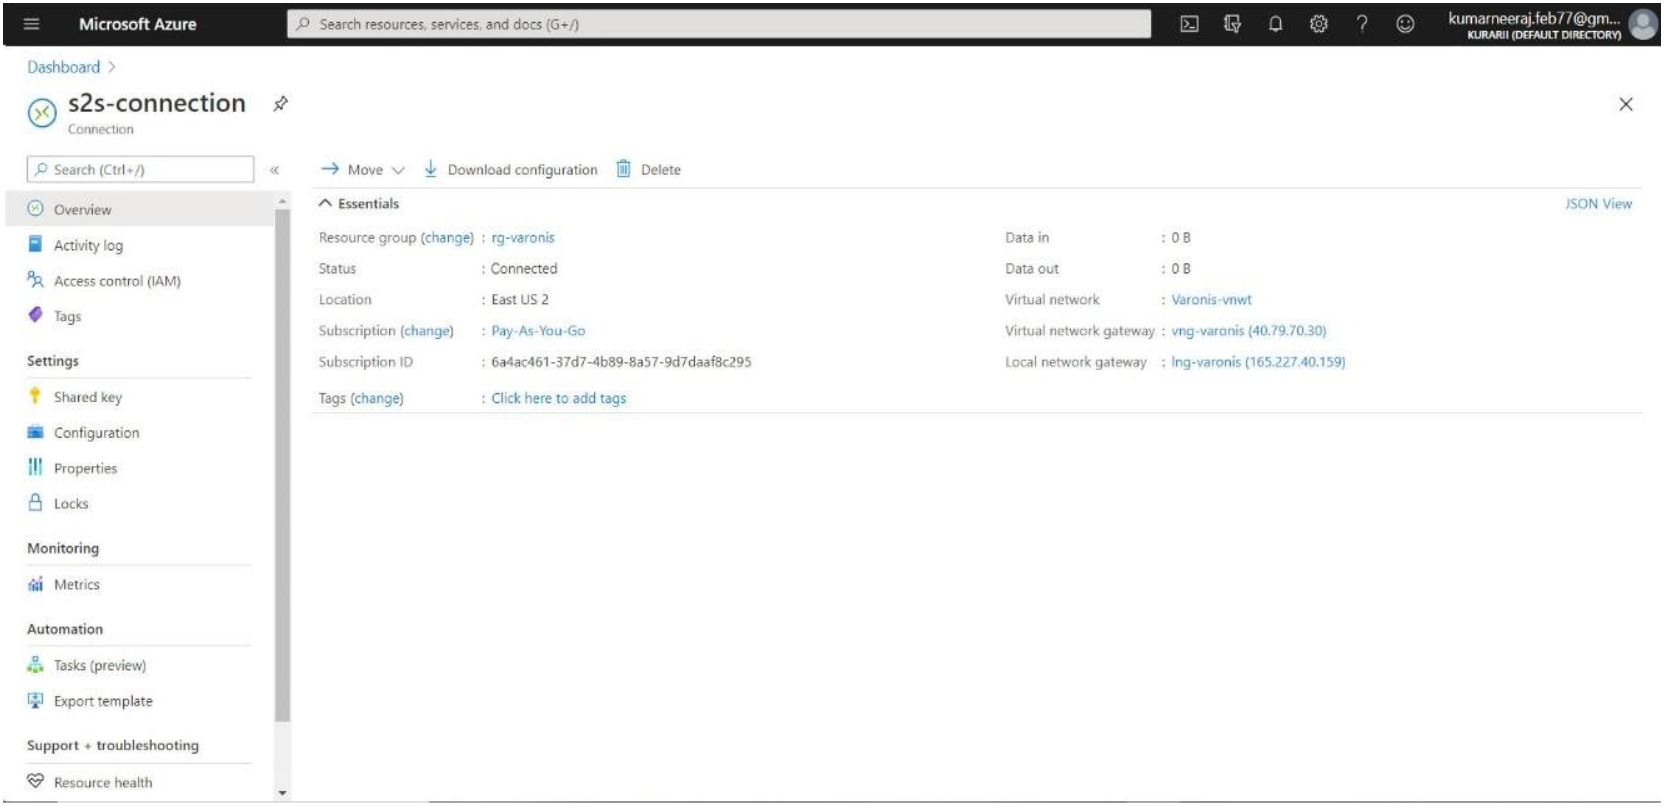
- You can click on the connection (s2s-connection) to see the current state of the configuration. After the connection has been established, you will see the below screen, which shows the connection status as “Connected”
2. Create App Services WebApp
Before we create the App Services WebApp, we need to create the App Service Plan. App Service Plan represents the collection of physical resources for the App Service. We can have multiple web apps in an app service plan. We can consider an App Service Plan as a single compute resource, i.e., a Virtual Machine. Therefore, for billing purposes, if we create more than one web app in a single App Service Plan, it will be charged only once.
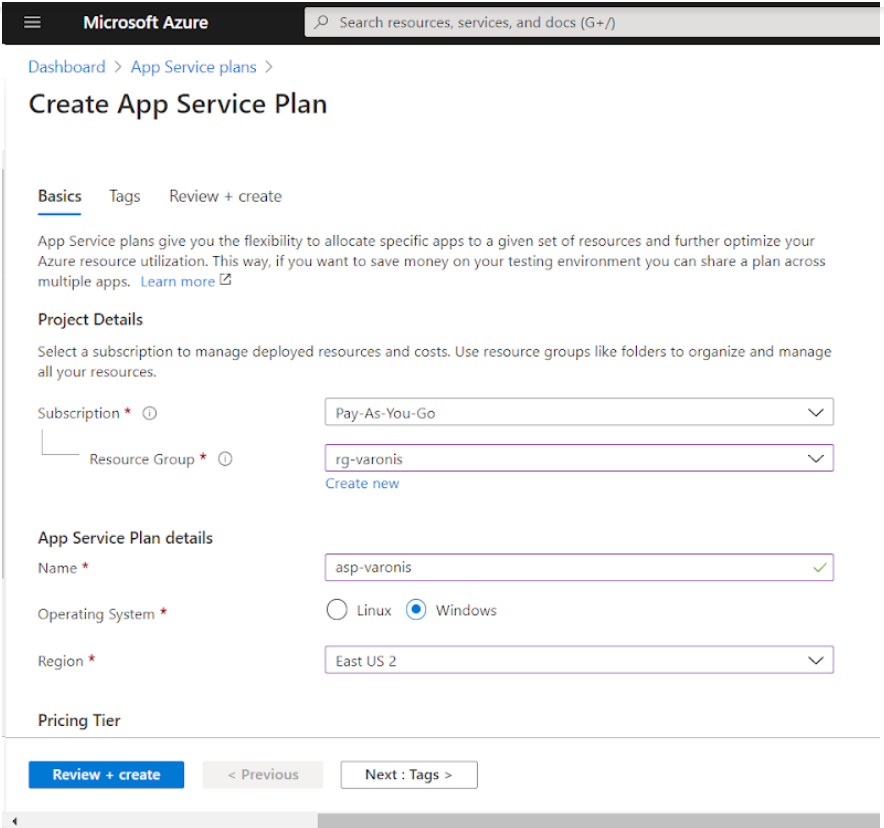
Create App Service Plan
On the contrary, there can be adverse effects on the performance of an application if the applications are using the same App Service Plan because they will be competing for the same resources. Follow the below steps to configure the App Service Plan.
- In the Azure Portal, search for App Service Plan and on the App Service Plans page, click on the Add button
- On Create App Service Plan page, Select the Subscription and the Resource Group under Project Details
- Under App Service Plan Details, enter the name for the App Service Plan (asp-varonis)
- For operating systems, choose Windows. This can be Linux and is a personal preference
- Select East US2 for Region

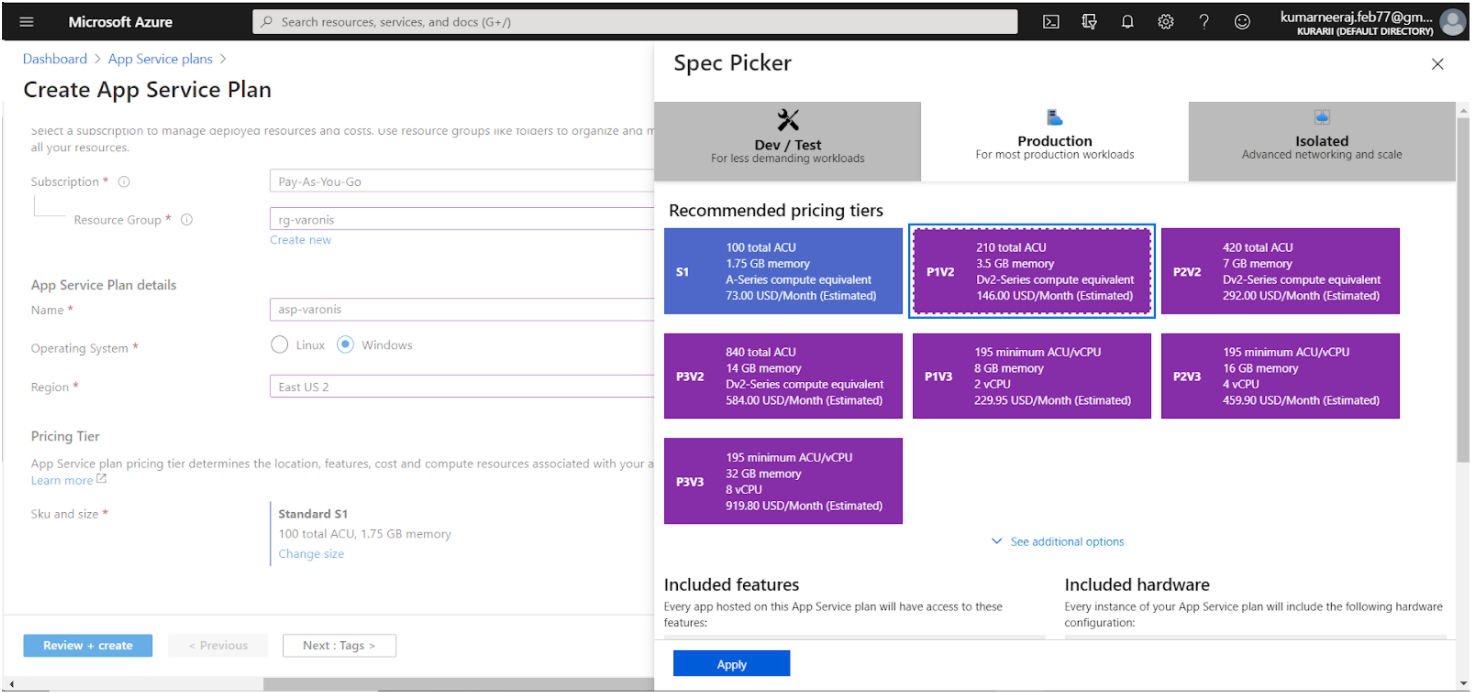
- For the pricing tier, select Premium P1V2 as that is the minimum you need to select for configuring Private Endpoint for the App Services WebApp

- Finally, click on Review and Create button and once validated, click on the Create button
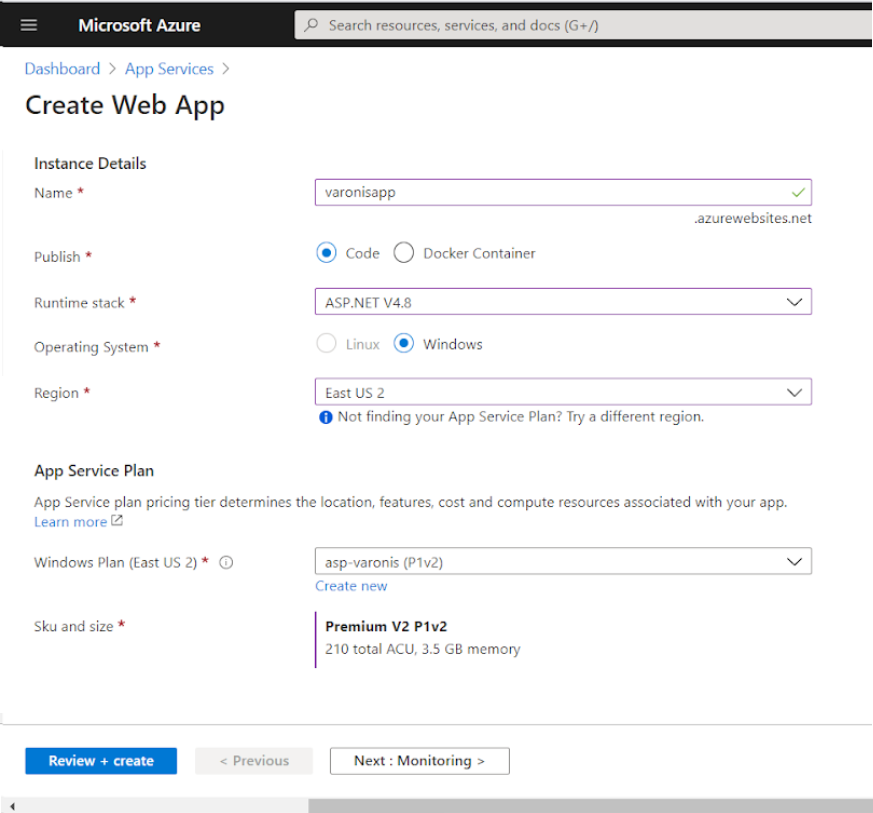
Create App Services WebApp
After the App Service Plan has been configured, the next step is to create the App Services WebApp. Perform the below steps to create a WebApp.
- On the search bar, search for App Services WebApp. Click to select.
- On the App Services page, click on the Add button
- On the Create Web App page, select Subscription and Resource Group
- Under Instance details, provide the name for the web app (varonisapp). The FQDN, therefore, will become <appname.azurewebsites.net> (varonisapp.azurewebsites.net)
- For Publish, select Code
- Select ASP.Net 4.8 under Runtime stack. This would be different, when you choose Linux as operating system while creating the App Service Plan
- Under the App Service Plan, the Windows Plan as well as the Sku and size will populate itself if you have the App Service Plan already created.
- Click on Review and create and after validation, click on Create button

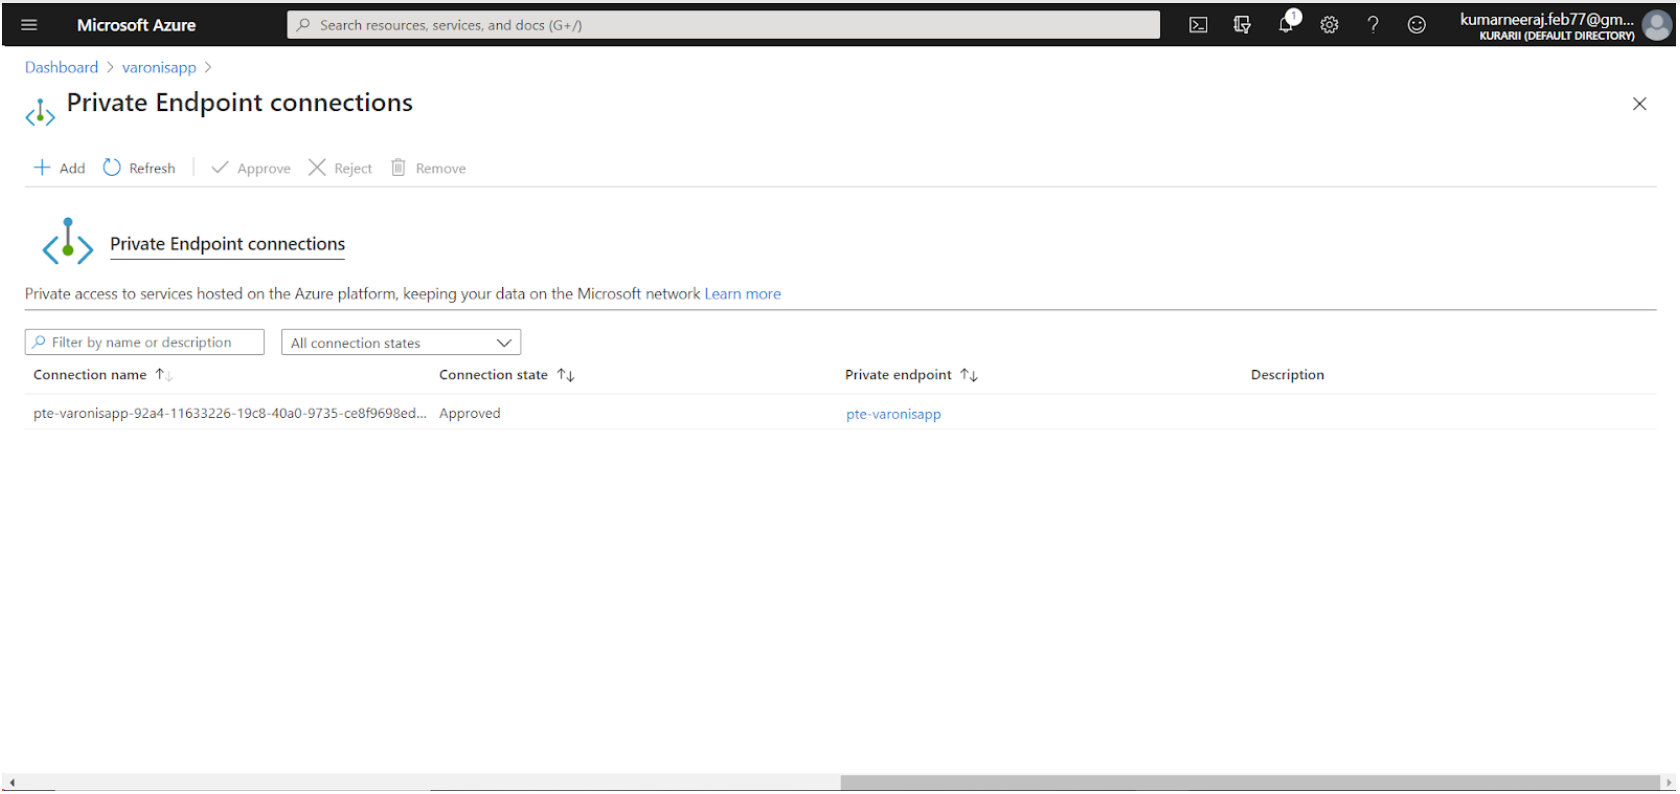
Create Private Endpoint in WebApp
After the Web App has been configured, it is finally time to create the Private Endpoint. Perform the below steps to configure Private Endpoint for the Web App.
- Go to the web app create above (varonisapp.azurewebsites.net)
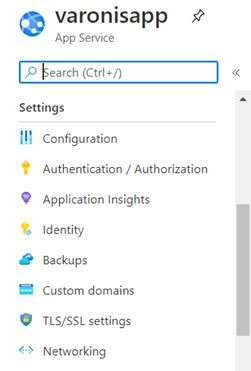
- On the left-hand navigation, click on Networking under Settings

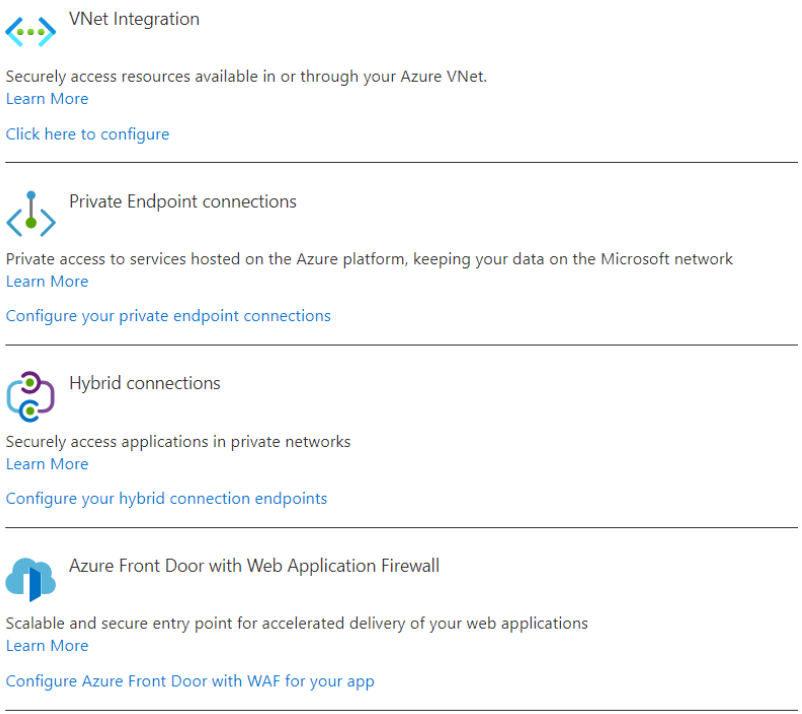
- On the Networking page for the Web App, click on “Configure your hybrid endpoint connections” under “Private Endpoint connections”

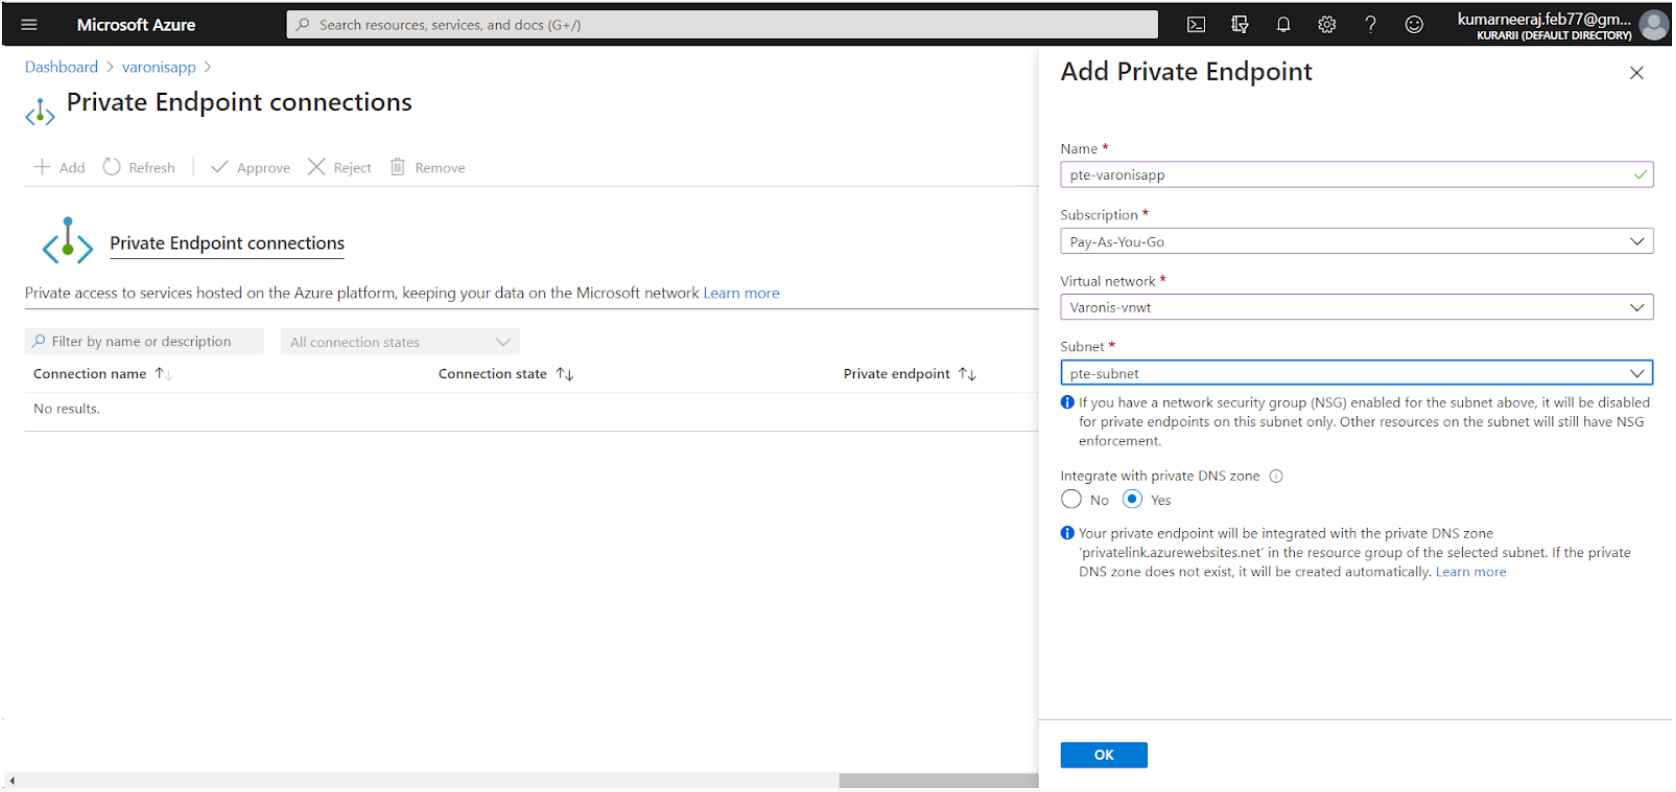
- On the Private Endpoint connections page, click on the Add button
- On the Add Private Endpoint popup, provide name for the Private Endpoint (pte-varonisapp)
- Choose the Subscription, Virtual network (Varonis-vnet) and the Subnet (pte-subnet)
- Choose Yes for Integrate with a Private DNS zone. Your private endpoint will be integrated with the private DNS zone ‘privatelink.azurewebsites.net’ in the resource group of the selected subnet. If the private DNS zone does not exist, it will be created automatically

- Click on OK to deploy Private Endpoint for the web app

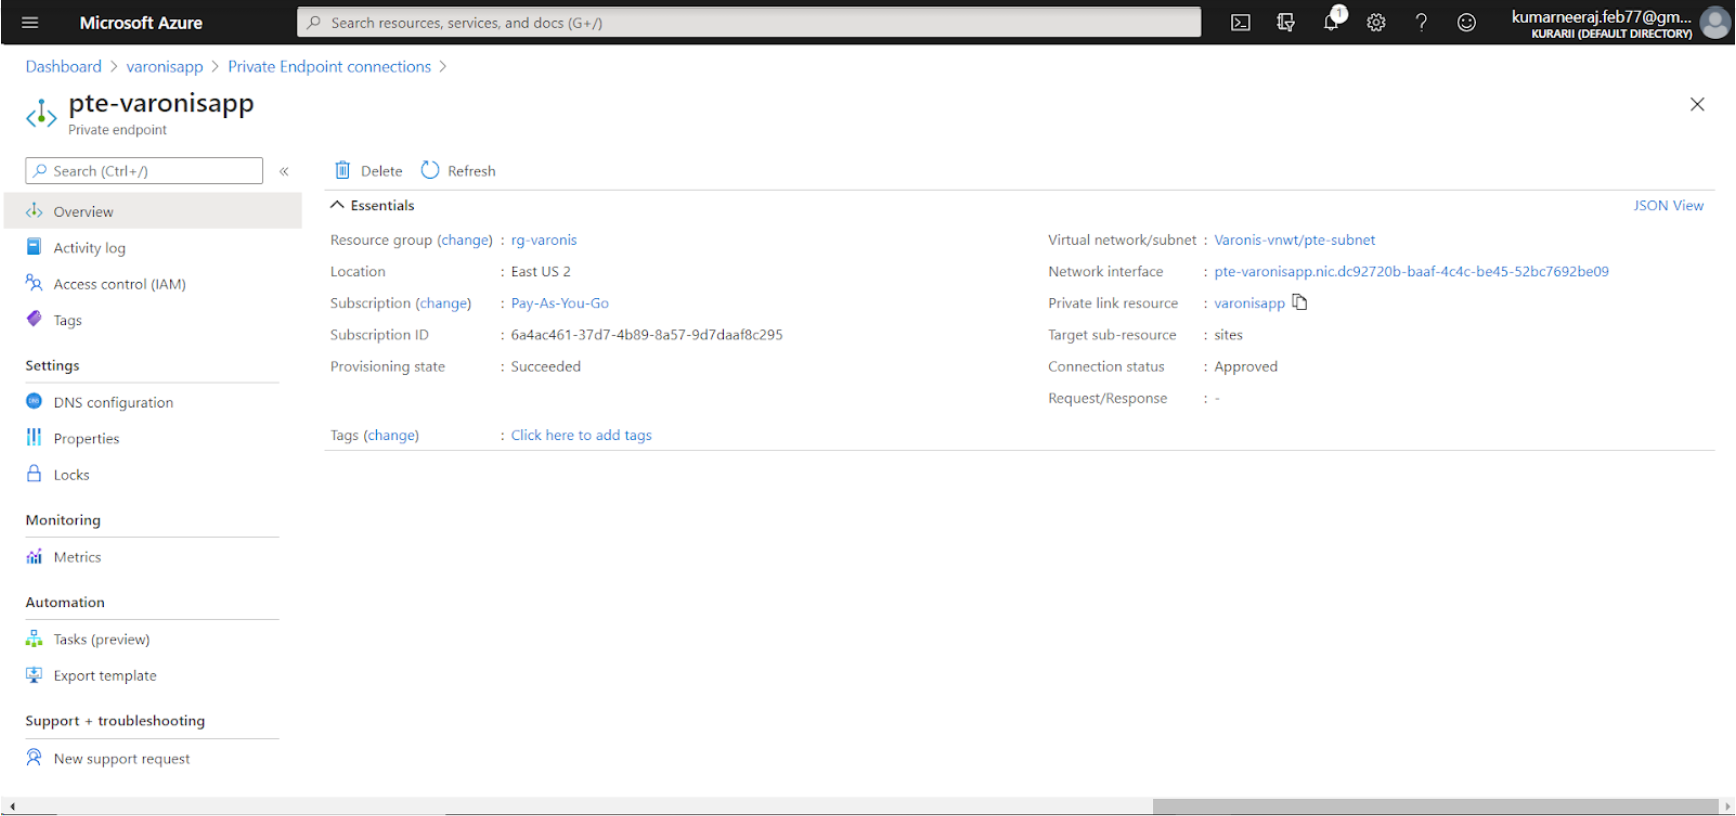
- After the Private Endpoint has been configured, click on the Private endpoint name to see the details

3. Test Connection
Now, that the Private Endpoint has been configured, it is time to test the connectivity. For the same, we will try to open the web app using the URL of the web app in a browser. There are two tests to perform, a negative test and a positive test.
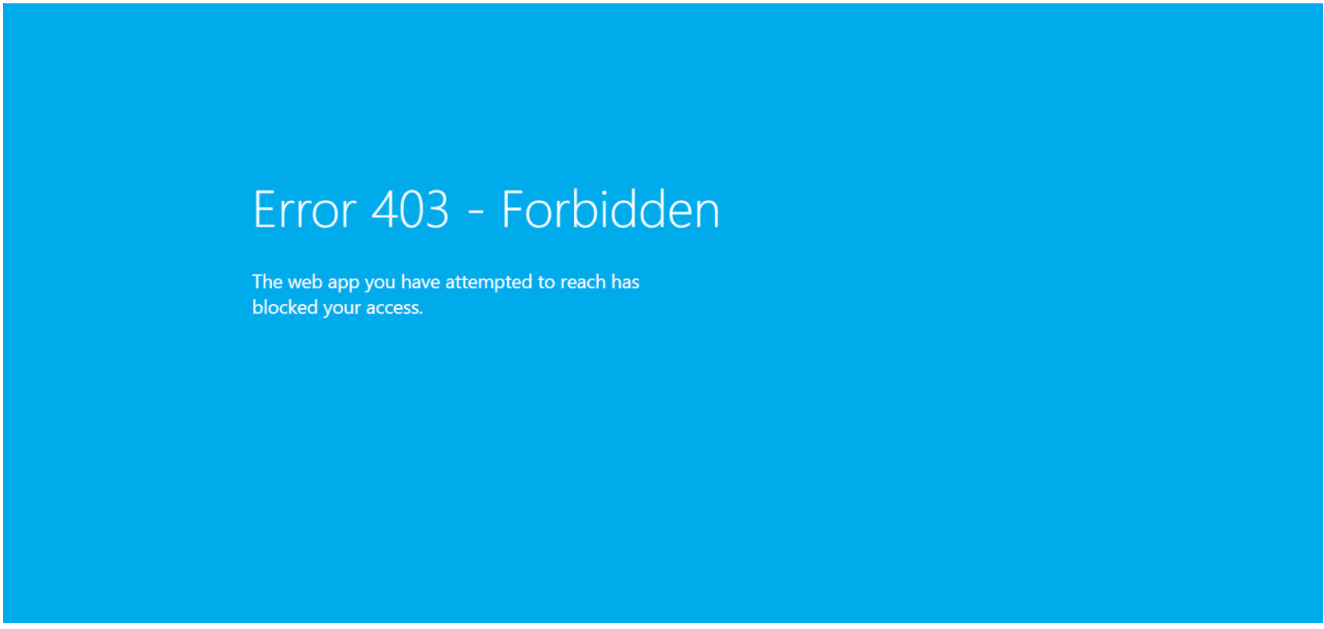
Negative Test
One for the negative test, which is to test the connectivity of the application without connecting to the Azure network using the VPN client.
- Go to the Web App and copy the URL of the application from the Overview page (https://varonisapp.azurewebsites.net)
- Open a browser, paste the URL and hit enter, you will receive an Error 403 – Forbidden page because you are not connected to the Azure network and it is considered to be a public internet.

Positive Test
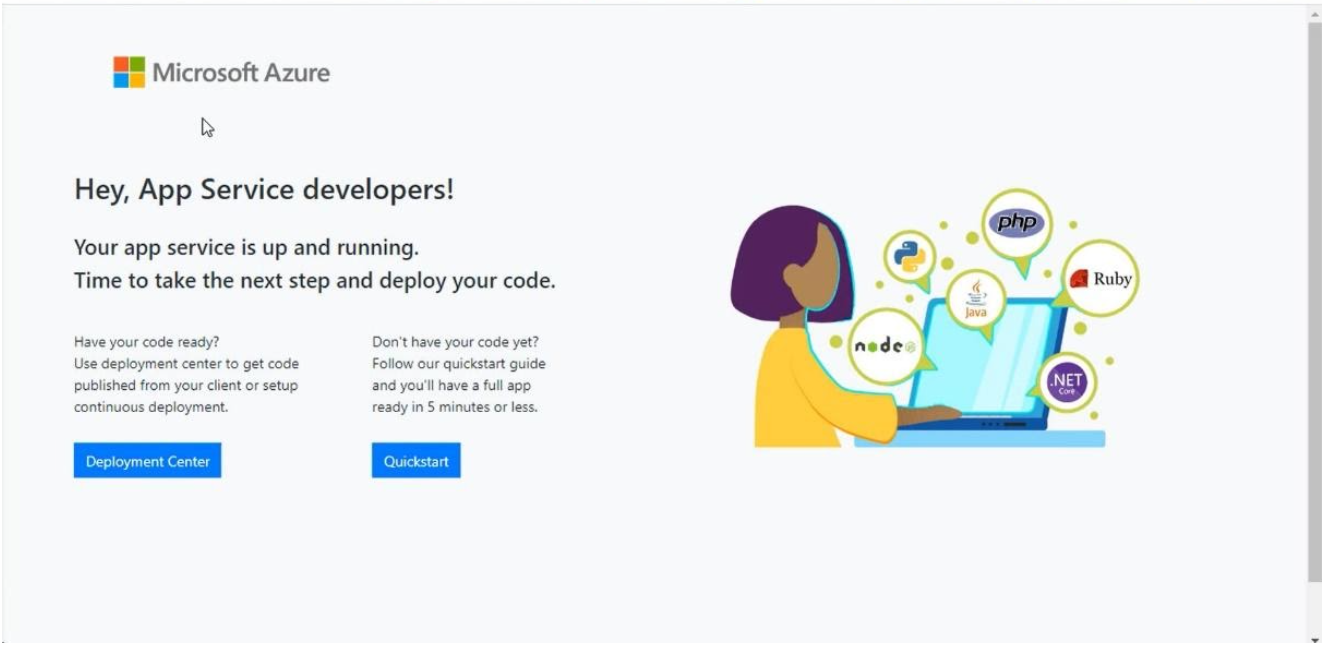
The second is the positive test, which is to test the connectivity after connecting to the Azure network using the on-premises VPN client.
- Go to the Web App and copy the URL of the application from the Overview page (https://varonisapp.azurewebsites.net)
- On your on-premises device, open the VPN client and click on the connect button.
- After you are connected to the Azure network, go to the Web App on the Azure portal and copy the URL of the application from the Overview page (https://varonisapp.azurewebsites.net)
- Open a browser, paste the URL and hit enter. This time you will see the web page open appropriately, which confirms the connectivity and working of the Private Endpoint

Private Endpoints and Access to WebApps
It is possible to lock down your workloads from being accessed from the public internet. Azure Private Endpoints can be considered as network interfaces, because a virtual network interface is created for the resource for which the Private Endpoint is created. Private Endpoints can be used to bring the resources to your own VNet. It can be used for Azure Storage, Cosmos DB, SQL, App Services WebApp, and other PaaS services.
Private Link and Private Endpoints became generally available (GA) February 2020. Private Endpoint connects you privately and securely using Azure Private Link. They provide an additional network security layer to the resources for which they have been configured. It is done using a built-in exfiltration protection.


-1.png)