
Malware has become a huge threat to organizations across the globe. Something as simple as opening an email attachment can end up costing a company millions of dollars if the appropriate controls are not in place. Thankfully, there are a plethora of malware analysis tools to help curb these cyber threats.
When responding to a security incident involving malware, a digital forensics or research team will typically gather and analyze a sample to better understand its capabilities and guide their investigation.
There are a number of tools that can help security analysts reverse engineer malware samples. The good news is that all the malware analysis tools I use are completely free and open source. In this article, I cover my top 11 favorite malware analysis tools (in no particular order) and what they are used for:
- PeStudio
- Process Hacker
- Process Monitor (ProcMon)
- ProcDot
- Autoruns
- Fiddler
- Wireshark
- x64dbg
- Ghidra
- Radare2/Cutter
- Cuckoo Sandbox
Get the Free Pentesting Active
Directory Environments e-book
Malware Analysis Tools and Techniques

Before running the malware to monitor its behavior, my first step is to perform some static analysis of the malware. The tools used for this type of analysis won’t execute the code, instead, they will attempt to pull out suspicious indicators such as hashes, strings, imports and attempt to identify if the malware is packed.
Once I have pulled out as much information as I can from my static tools and techniques, I then detonate the malware in a virtual machine specially built for running and analyzing malware.
While the malware is running I use a number of tools to record its activity, this is known as dynamic analysis. When dynamically analyzing a sample I look for any unique characteristics that I can attribute to this piece of malware. This may include looking for files created, changes to the registry which may be indicative of the malware building some persistence. or looking at network traffic to see what command and control (C2) infrastructure the malware calls out to.
- Disclaimer: The tools in this article should be used in a sandboxed environment such as a virtual machine designed for analyzing malware, do not attempt to analyze malware using these tools on your host operating system.

1. PeStudio
>
My first port of call for analyzing a Windows executable is always PeStudio. This is an excellent tool for conducting an initial triage of a malware sample and allows me to quickly pull out any suspicious artifacts.
Once a binary has been loaded it will quickly provide the user with hashes of the malware and any detections found in VirusTotal. A list of strings is also pulled however if the sample is packed this may not return any strong IOCs, unpacking the sample, and then reviewing the strings will often provide useful information such as malicious domains and IP addresses.
The screenshot above also shows the ‘entropy’ of the malware. This helps identify whether the malware is packed or not. When a sample is packed this means the malware author has effectively put a layer of code around the malware in order to obfuscate its true functionality and prevent analysis of the malware.
To assist with identifying packed malware PeStudio displays the level of entropy of the file. Entropy is measured on a scale of 0-8, with 8 being the highest level of entropy. The higher the entropy the more likely that a piece of malware is packed.
Another useful section is the ‘Imports’ tab, this contains functionality that is imported into the malware so it can perform certain tasks. For example, Windows contains various libraries called DLLs, this stands for dynamic link library. Each library contains a unique set of functions known as Windows APIs, these are used by legitimate programs to perform various functions. For example, the DLL Kerner32.dll contains the API CreateProcessW, this can be used by a piece of software to create a new running process. However, malware will use the same methodology to import its own functionality. If the malware needs to create a new file on disk, the malware author doesn’t need to write a piece of code to do that they can just import the API CreateFileW into the malware. By looking at the imports a malware analyst may be able to predict the potential behavior of the malware.
2. Process Hacker

Process Hacker allows a malware analyst to see what processes are running on a device. This can be useful when detonating a piece of malware to see what new processes are created by the malware and where these are being run from on disk. Malware will often try to hide by copying itself to a new location and then renaming itself, Process Hacker will display this activity occurring making it easy to identify how the malware is attempting to hide.
This tool is also useful for pulling information from the memory of a process. This means that if a piece of malware is detonated then Process Hacker can be used to inspect the memory for strings, the strings found in memory will often return useful information such as IP addresses, domains, and user agents that are being used by the malware.
3. Process Monitor (ProcMon)

ProcMon is a powerful tool from Microsoft which records live filesystem activity such as process creations and registry changes. This is really handy when used in tandem with Process Hacker as a new process may be created and then quickly killed, this process can then be reviewed in the ProcMon capture. Using the prebuilt filters or process tree an analyst can quickly identify what processes were created, where the executable was run from, and the parent/child dependencies.
ProcMon can be particularly useful when analyzing malicious documents. The threat actors behind Emotet often use malicious Word documents as an attack vector. The Word document will contain macros which when enabled will call out to the attackers C2 infrastructure and download the Emotet payload. None of this activity is visible to the user of the compromised device. By using ProcMon you are able to capture the Word Document being opened, view the hidden PowerShell process being launched and the base64 encoded command being run.
One issue with ProcMon is that in a matter of seconds it can quickly record over 100,000 events. Although the filters in ProcMon are excellent there is always a risk an event of interest could be missed, however, this data can be exported as a CSV and imported into the next tool in my list.
4. ProcDot

ProcDot allows a malware analyst to ingest the output from ProcMon and automatically generate a graphical representation of the captured data. Simply upload the csv into ProcDot and select the process name of the malware. Rather than creating filters and navigating hundreds of thousands of events you are now able to navigate a visual diagram of what recorded malware activity.
ProcMon data can also be enriched by ingesting a pcap from a tool such as Wireshark into ProcDot.
5. Autoruns
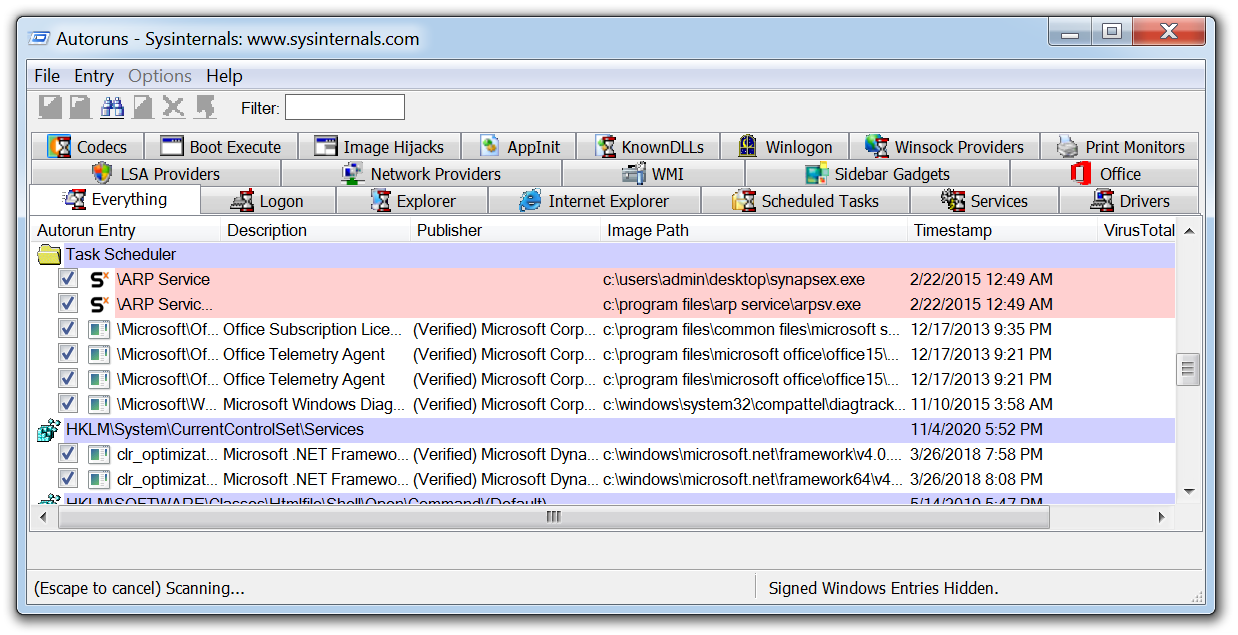
Autoruns is another Microsoft tool that will display any installed software on a device that is set to launch when a machine is powered on. Malware can hide but ultimately it has to run and in order to survive a reboot a piece of malware must create a persistence mechanism.
There are a few techniques that can be employed to achieve this objective such as creating a scheduled task or creating specific run keys within the registry. After running a piece of malware in a VM running Autoruns will detect and highlight any new persistent software and the technique it has implemented making it ideal for malware analysis.
6. Fiddler

Malware will often use HTTP/HTTPS to contact its C2 servers and download additional malware or exfiltrate data. Using a tool such as Fiddler which acts as a web proxy allows this traffic to be captured and analyzed. This can prove useful when analysing a malicious document which incorporates macros to download a malicious payload, running fiddler allows a malware analyst to identify the domains that are hardcoded into the document and will be used to download the hosted malware.
In the example above, you can see how Fiddler was able to record a malicious Word document attempting to download Emotet from multiple websites hosting the malware, if the first attempt is unsuccessful it then moves on to the next hardcoded domain.
7. Wireshark

Wireshark is the de facto tool for capturing and analysing network traffic. Whereas a web proxy such as Fiddler is focused on HTTP/HTTPS traffic, Wireshark allows deep packet inspection of multiple protocols at multiple layers. While analysing packet captures in Wireshark it is even possible to extract files from the pcap that have been downloaded by the malware.
8. x64dbg

The tools we have discussed so far can all be used by beginners making their first foray into the world of malware analysis. x64dbg is where the learning curve for malware analysis takes a steep incline.
This tool is for manually debugging and reverse engineering malware samples, you need to have an understanding of assembly code to use this tool however once that learning curve has plateaued it allows a malware analyst to manually unpack and take apart malware samples like a surgeon with a scalpel.
Understanding how to use x64dbg means you can focus on specific functions and imported API calls of a sample and begin to dissect how the malware truly operates.
9. Ghidra

Ghidra was developed by the National Security Agency (NSA) and is what’s known as a disassembler rather than a debugger. Using Ghidra you are able to navigate the assembly code functions like in x64dbg, however, the key difference is that the code is not executed, it is disassembled so that it can be statically analyzed.
Another key difference from x64dbg is that Ghidra will attempt to decompile the code into a human-readable output that is close to what the malware author will have written when creating the malware. This can often make it easier for a malware analyst to reverse engineer the malware as they are presented with the variables and instructions which make up each function.
10. Radare2/Cutter

Radare2 is a command-line debugger that can be used on Windows and Linux, what I really like about Radare2 is that unlike x64dbg it has the capability to analyze Linux executables. To make Radare2 more user-friendly for those who may be put off by the command line interface. It also has a GUI front end known as Cutter.
11. Cuckoo Sandbox

A Cuckoo Sandbox is a tool for automating malware analysis. The Cuckoo Sandboxes I have built in the past have all been built on a Ubuntu host that runs the main Cuckoo application. Within the host is a Windows 7 VM which is nested within Virtualbox. The VM has a Cuckoo agent installed which allows it to feed data back to the Ubuntu host running Cuckoo. The malware is submitted to the VM and the Cuckoo agent records the activity of the malware, once the analysis is complete a detailed report of the malware is generated.
A Cuckoo Sandbox is a great tool to have within an organization when you have an incident that involves malware, I will often run the malware through Cuckoo while I am performing my own analysis as this allows me to gather as much information as possible from a malware sample.
Personally, I find malware analysis fascinating and always see it as a personal challenge to pull out as much information as I can. It’s not always easy, but the tools outlined in this article should hopefully provide you with an understanding of what is involved in analyzing malware and some of the tools that are available to start building out your own malware analysis lab.
If you are interested in learning more about malware analysis then be sure to read the following articles from Varonis which cover the techniques employed by fileless malware and also some great content that will teach you some malware coding on how to write a keylogger.