
Are you ready to move your data center to the cloud? You might be planning for things like identity, governance, and security, but one major topic is networking. How are you going to connect to the resources in the cloud? You’re going to need Azure Virtual Networks!
Discover your weak points and strengthen your resilience: Run a Free Ransomware Readiness Test
Networking is a fundamental concept when moving compute workloads to the cloud. Your resources need to communicate with each other but also protected against outside threats.
In this article, you will learn the fundamentals of Azure Virtual Networks, followed by creating Virtual Networks using three methods: the Azure Portal. Azure PowerShell, and Azure CLI.
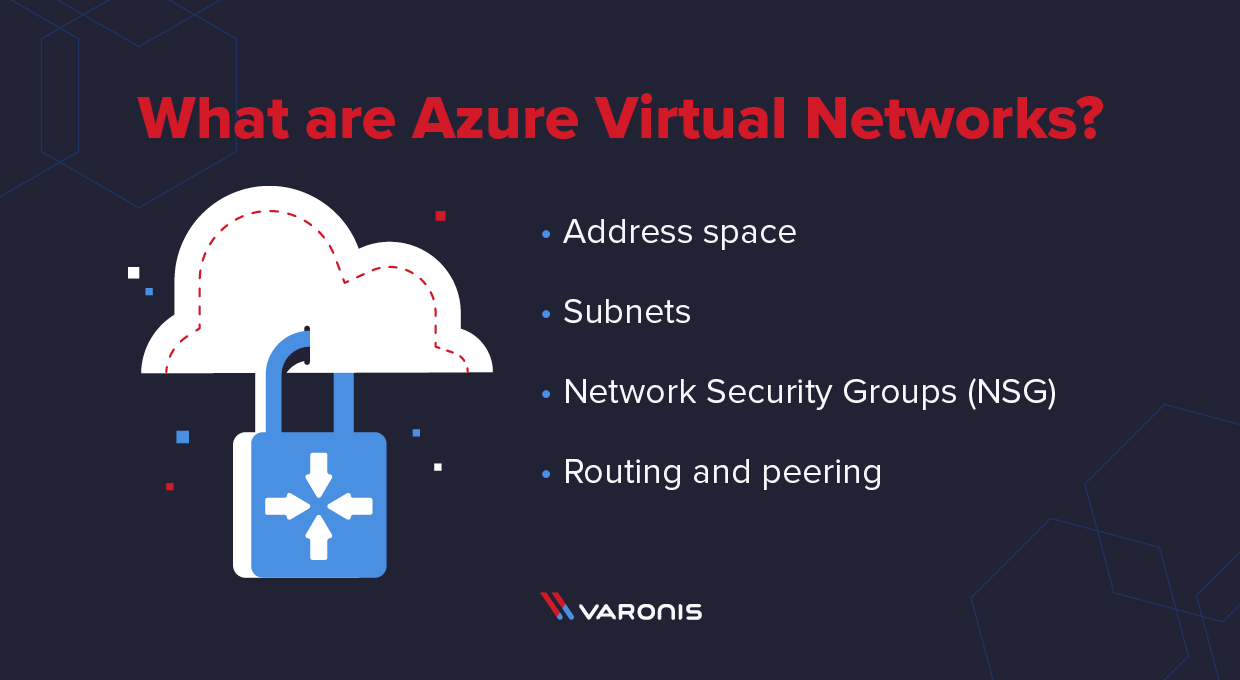
Quick Review: What are Azure Virtual Networks?
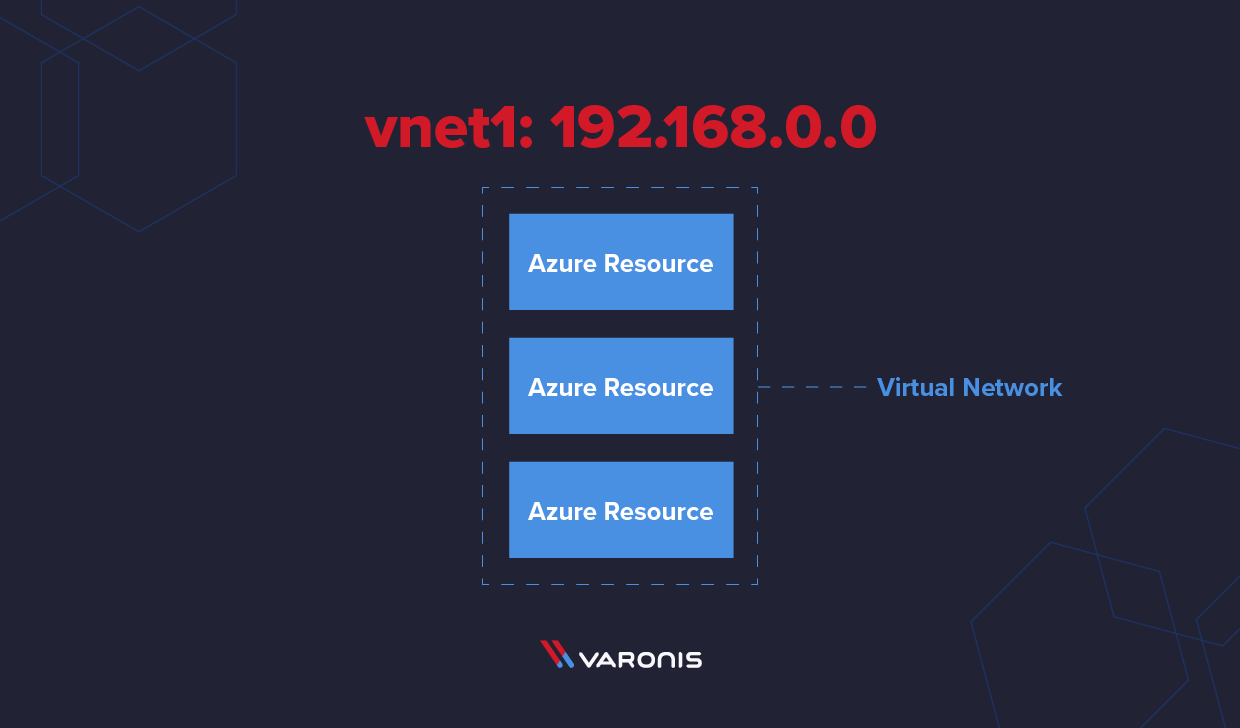
Azure Virtual Network is your private network within Azure. Azure Virtual Network is commonly abbreviated as “vnet.” Like on-premises servers, Azure virtual machines need networking for communication to other resources, like other virtual machines or storage accounts.
While you define VNets in the Azure cloud, VNets can also communicate with the Internet and on-premises resources. By default, all VNet resources can communicate outbound to the Internet. To allow inbound communication from the Internet, you can create rules to allow Internet traffic or add a public IP or Load Balancer.
You can create a point-to-site VPN, where your individual computer can connect to the network. If you need to configure a connection to your on-premises network, you can deploy a site-to-site VPN solution, and the Azure VNet becomes an extension of your on-premises datacenter. If you require a more private connection to the Azure cloud, consider implementing ExpressRoute so your traffic does not traverse the Internet.
Elements of Azure Virtual Networks
Azure VNets provide multiple services and functionalities for connecting Azure resources. Microsoft designs these services so organizations have all the tools to meet their cloud deployment requirements. The following sections describe some of the key concepts for deploying Azure Virtual Networks.
Address Space
When you create a VNet, you first need to specify a private IP address space in the RFC 1918 range. This IP address space contains familiar IP addresses, such as 10.0.0.0, 192.168.0.0, and 172.16.0.0. A virtual network contains one or more of these address ranges where you create additional subnets.
Azure Virtual Network address spaces cannot overlap with each other. Azure will display a warning message if you try to create a virtual network using an existing address space. You can continue past this warning if you do not plan to peer the two virtual networks. As a best practice, you should not use overlapping network spaces with your on-premises data center if you intended on creating a hybrid network.
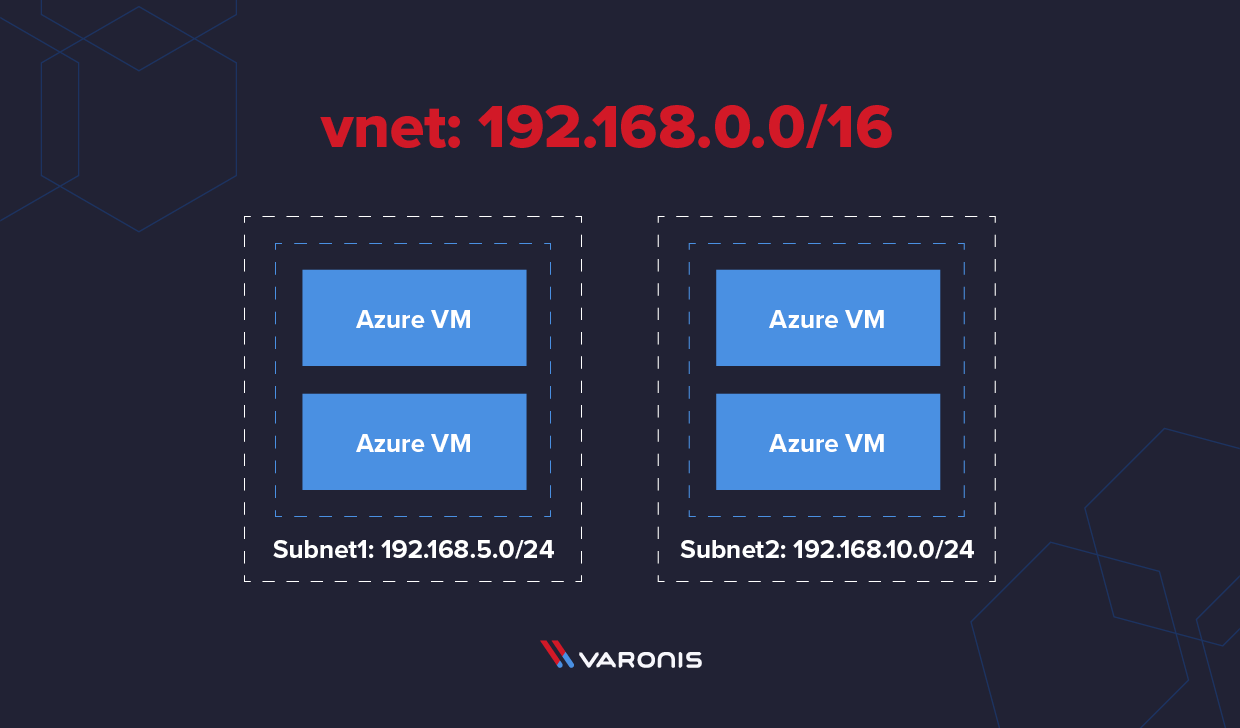
Subnets
Subnets are smaller segmentations of the virtual network. Subnetting allows you to allocate a smaller portion of the VNet’s address space to specific resources. Subnets improve IP address allocation by defining fewer IP addresses in the virtual network’s usable space.
Network Security Groups
Within a virtual network, Network Security Groups (NSG) protect each subnet. You use NSGs to filter traffic in and out of a virtual network. For each rule, you define the source and destination, port, and protocol to identify the traffic. An NSG contains default security rules that automatically secure resources by blocking Internet traffic but allowing traffic from other virtual networks.
Routing and Peering
Azure automatically creates routes between subnets, virtual networks, on-premises networks, and the Internet. However, you can implement route tables to control where Azure routes traffic for each subnet. For example, you can deploy a hub-and-spoke network and force all subnet traffic to go to a central hub first.
You can also use your on-premises BGP routes to your Azure virtual networks. You use these when you connect your on-premises data center to the Azure cloud through an Azure VPN Gateway or ExpressRoute connection.
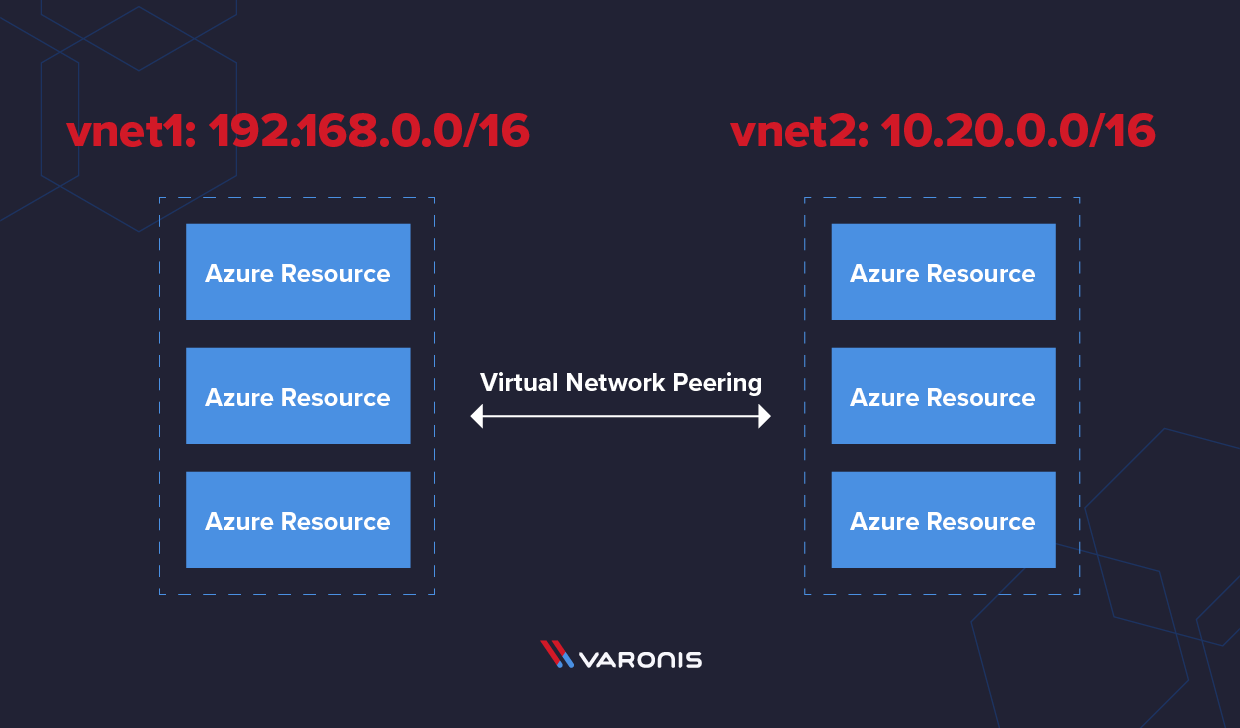
While Azure automatically connects subnets in the same virtual network together, routing between different virtual networks requires network peering. Virtual network peering connects multiple VNets together, and the virtual networks appear as one for connectivity purposes. The traffic between the virtual networks traverses the Microsoft backbone infrastructure, not the Internet.
How to Create Azure Virtual Networks
Microsoft provides multiple ways to create Azure Virtual Networks. This tutorial covers three ways:
This tutorial uses a resource group named virtualNetworks-rg to host each virtual network. You will create each virtual network in a different region. To follow along with this tutorial, you will need:
- An Azure subscription with sufficient permissions to create resources, such as Owner or Contributor
- Install the Azure Az PowerShell module and connect to your tenant using the Connect-AzAccount command
- Install the Azure CLI and connect to your tenant using the az login command
Azure Portal
To create an Azure Virtual Network using the Azure Portal:
- Navigate and sign in to the Azure portal.
- Select Create a resource on the Azure Portal homepage.
- On the Create a resource page, search the marketplace for virtual network and select it from the results.
- On the Virtual Network page, select Create.
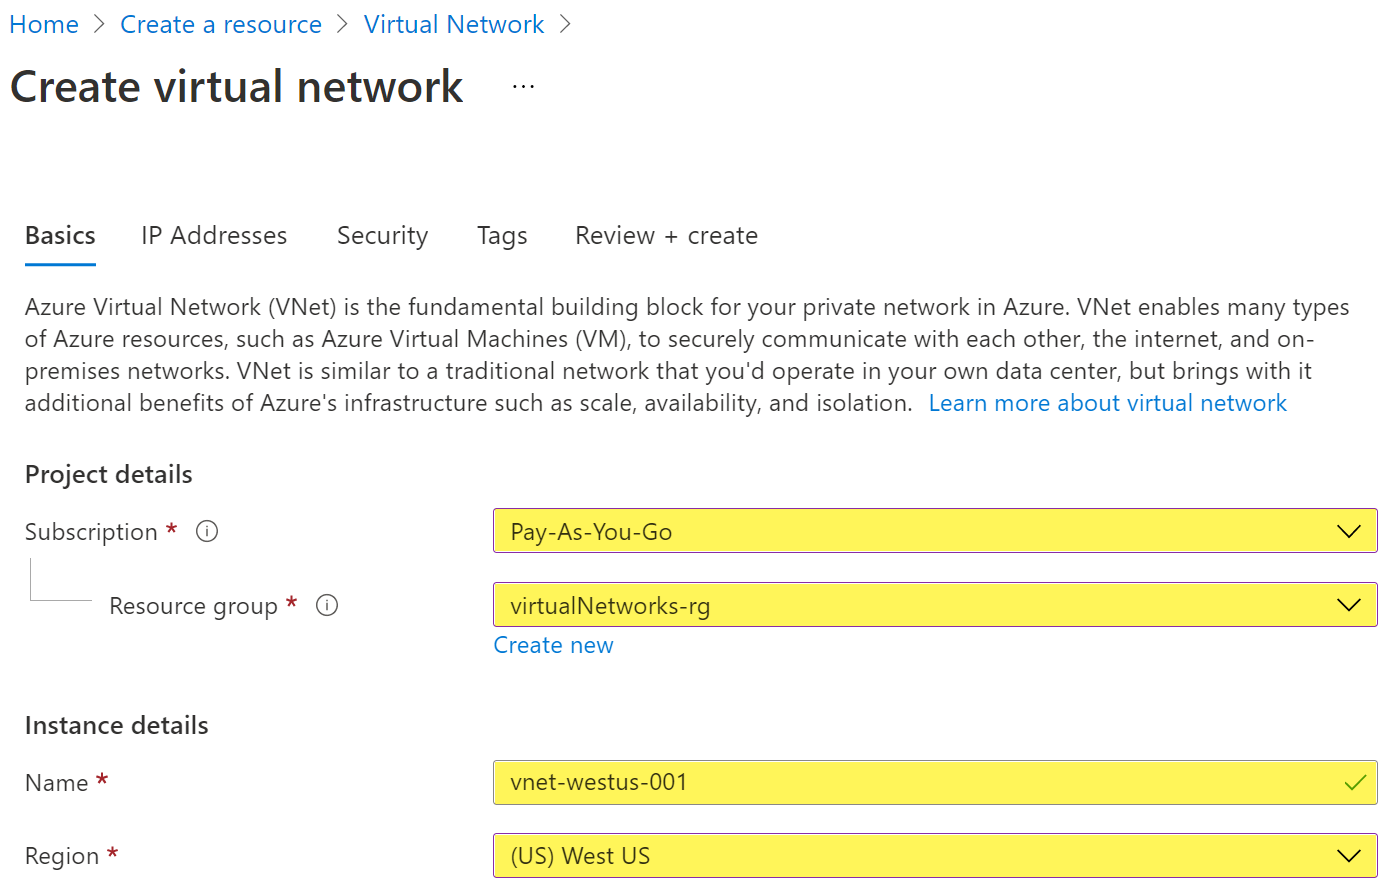
- On the Create virtual network page, configure the information in the Basics tab.
- Subscription: select the subscription to bill the resource against
- Resource group: create a new resource group or choose an existing one
- Name: enter vnet-westus-001
- Region: select the West US region
- Select Next: IP Addresses button at the bottom of the page.
- In the IPv4 address space section, Azure has pre-populated the address space 10.1.0.0/16. Select this existing address space and change it to 10.100.0.0/16.
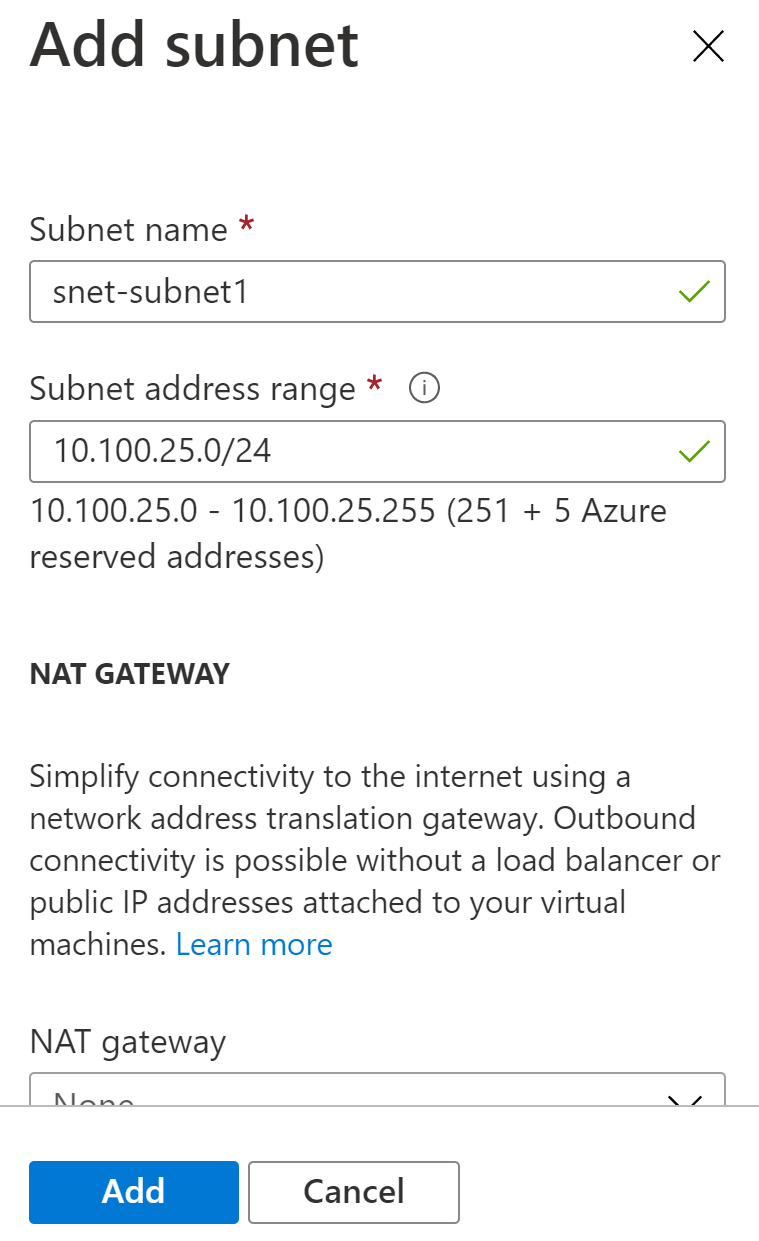
- If you want to add subnets now, select + Add subnet, then enter the subnet name snet-subnet1 and an address range of 10.50.25.0/24.
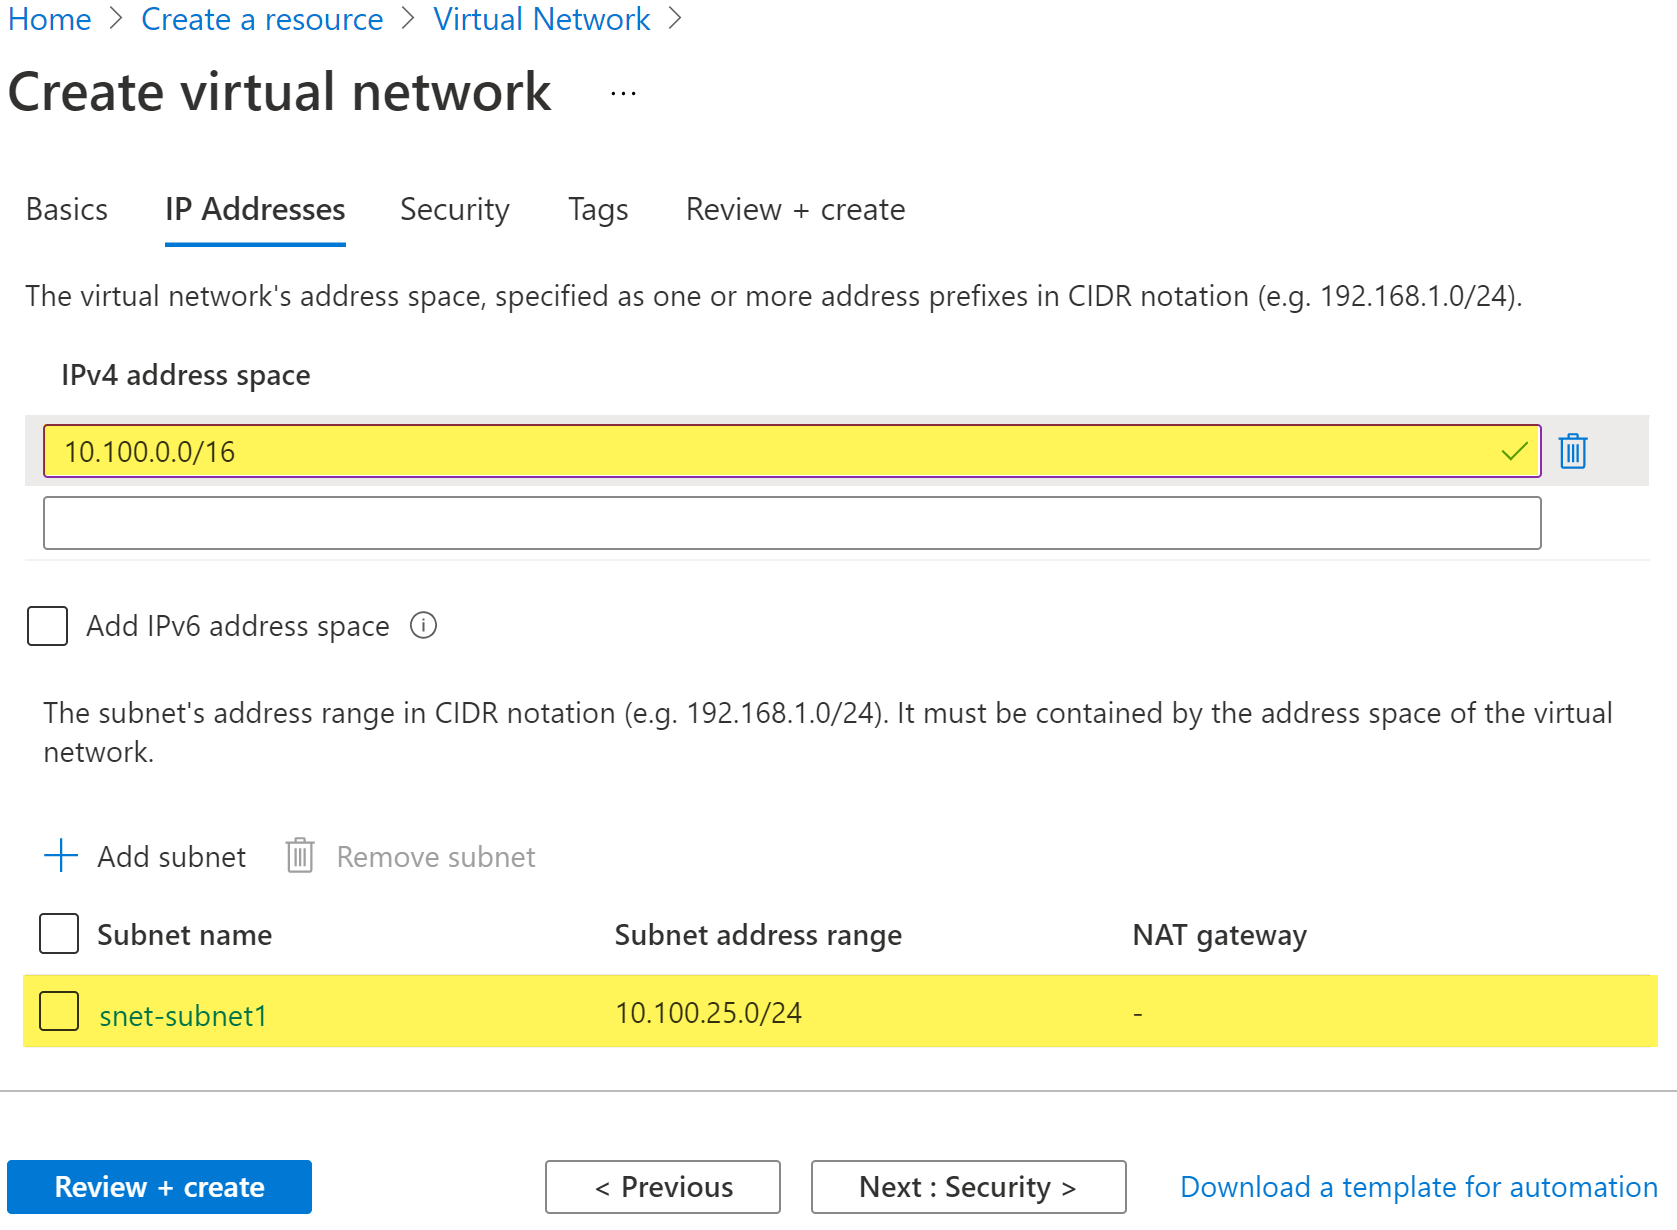
- Review the address space and subnets, then select Review + create, then Create after the portal validates the configuration.
Azure PowerShell
To create a virtual network and subnets using Azure PowerShell:
- Create a virtual network using the New-AzVirtualNetwork command, specifying:
- The virtual network name (vnet-eastus-001)
- Resource group (virtualNetworks-rg)
- Location (eastus)
- Address prefix (172.16.0.0/16).
Save the new virtual network to a variable named $vnet.
- $vnet = New-AzVirtualNetwork `
- -Name 'vnet-eastus-001' `
- -AddressPrefix 172.16.0.0/16 `
- -Location eastus `
- -ResourceGroupName 'virtualNetworks-rg'
- Create a subnet for the new virtual network using the Add-AzVirtualNetworkSubnetConfig. You will need to specify:
- Subnet name (subnet1)
- Subnet address prefix (172.16.20.0/24)
- The virtual network using the $vnet variable
Save the new subnet to a variable named $subnet1.
- $subnet1 = Add-AzVirtualNetworkSubnetConfig `
- -Name 'subnet1' `
- -AddressPrefix 172.16.20.0/24 `
- -VirtualNetwork $vnet
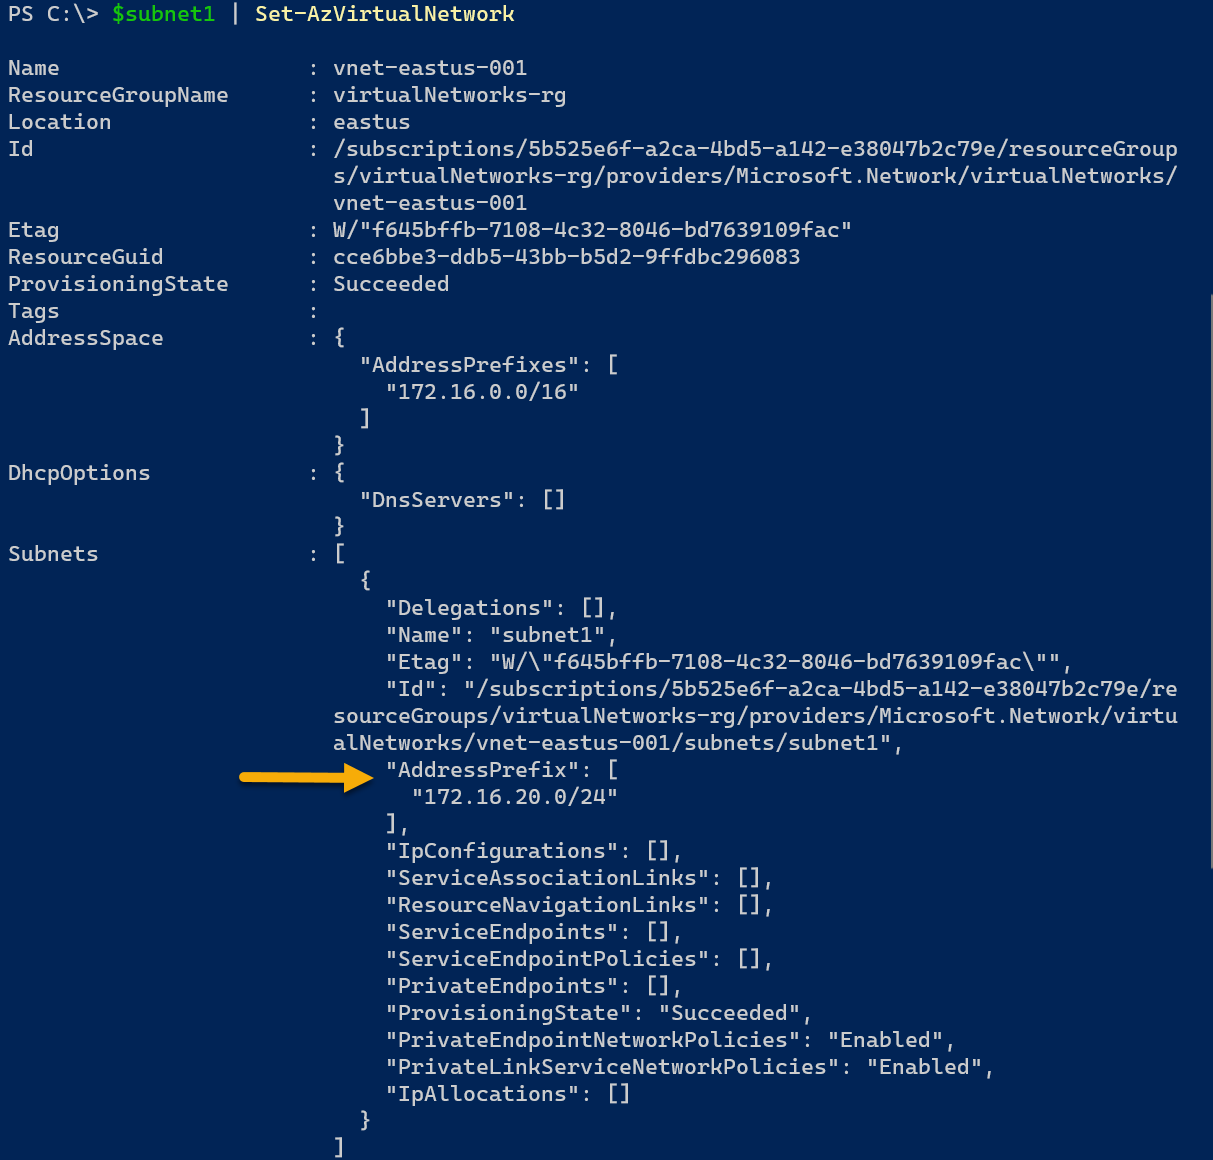
- Associate the new subnet to the virtual network by piping the $subnet1 variable to the Set-AzVirtualNetwork command. PowerShell will output the updated network object with the subnet information.
- $subnet1 | Set-AzVirtualNetwork
If you want to create a virtual network and subnets simultaneously, you need to create the subnet object first. When you create the virtual network, you specify the subnet objects.
- Create a new subnet configuration using the New-AzVirtualNetworkSubnetConfig specifying:
- The subnet name (subnet1)
- The address prefix (172.16.20.0/24)
- $subnet1 = New-AzVirtualNetworkSubnetConfig `
- -Name 'subnet1' `
- -AddressPrefix 172.16.20.0/24
- Repeat step 1 with a new variable name, subnet name, and address prefix for each subnet to add to the virtual network.
- Use the New-AzVirtualNetwork command to create a virtual network. Use the -Subnet parameter to specify each saved subnet variable separate by commas. This example uses three subnets.
- $vnet = New-AzVirtualNetwork `
- -Name 'vnet-eastus-001' `
- -ResourceGroupName 'virtualNetworks-rg' `
- -Location 'eastus' `
- -AddressPrefix 172.16.0.0/16 `
- -Subnet $subnet1,$subnet2,$subnet3
Azure CLI
To create a virtual network and subnets using the Azure CLI:
- Use the az network vnet create command and specify the virtual network properties, including one subnet:
- Name (vnet-centralus-001)
- Resource group (virtualNetworks-rg)
- Location (centralus)
- Address prefix (192.168.0.0/16)
- Subnet name (subnet1)
- Subnet address prefix (192.168.10.0/24)
- az network vnet create \
- --name 'vnet-centralus-001' \
- --resource-group 'virtualNetworks-rg' \
- --location 'centralus' \
- --address-prefixes 192.168.0.0/16 \
- --subnet-name 'subnet1' \
- --subnet-prefixes 192.168.10.0/24
- To add more subnets to the virtual network, use the az network vnet subnet create command, specifying:
- Address prefix (192.168.20.0/24)
- Subnet name (subnet2)
- Resource group (virtualNetworks-rg)
- VNet name (vnet-centralus-001)
- az network vnet subnet create \
- --address-prefixes 192.168.20.0/24 \
- --name 'subnet2' \
- --resource-group 'virtualNetworks-rg' \
- --vnet-name 'vnet-centralus-001'
More Azure Virtual Network Information
Now that you have created your first Azure Virtual Networks, here is some additional Azure networking information to consider. Azure Virtual Networks provide many more advanced capabilities outside the core networking services.
Pricing
Unlike a virtual machine or other Azure resources, creating virtual networks is free of charge. Creating a virtual network does not incur costs for the resource, and you can create up to 50 virtual networks per subscription. However, if you create a peering connection between different virtual networks, Azure charges for the inbound and outbound data transfers.
For example, peering between two virtual networks in the East US region charges $0.01 per GB for inbound and outbound data transfers. Creating a peering connection between networks in different regions incurs an extra charge. You can view more pricing information for your specific regions here on the virtual network pricing page.
Protecting Resources
Azure also provides several capabilities for protecting your network resources. One is Azure Firewall, which is a cloud-based network security service. Azure Firewall protects resources by enforcing application and network connectivity policies. Azure Firewall has built-in high availability and unrestricted cloud scalability.
In addition to the Azure Firewall, the Azure Web Application Firewall (WAF) is purposefully built for protecting web applications. WAF protects against common exploits and vulnerabilities found in web applications, including those in the OWASP Top Ten list.
Azure also includes basic distributed denial-of-service (DDoS) attack protection at no additional cost. The basic service provides traffic monitoring and automatic attack mitigation. You can also scale up to standard protection, including rapid response support, mitigation policies, and metrics and alerts.
Azure Virtual Network FAQs
What is a virtual network in Azure?
An Azure Virtual Network is a private IP address space for you to deploy resources to, like virtual machines. It uses IP ranges in the RFC 1918 range.
What is the difference between a VNet and a subnet?
A virtual network (vnet) encompasses a larger IP address space, like 10.10.0.0/16. A subnet represents a smaller subset of that IP address range, like 10.10.5.0/24. Subnets allow for separating resources on the network into logical groupings, like a group of Web or database servers.
How do I make an Azure Virtual Network?
You can make Azure Virtual Networks through the Azure portal, Azure PowerShell, or Azure CLI. Many infrastructure as code languages can make virtual networks, such as ARM templates, Ansible, Terraform, and Azure Bicep.
How much do Azure Virtual Networks cost?
Creating Azure Virtual Networks is free. However, if you peer virtual networks, you are charged based on traffic ingressing and egressing the network. Additional options, like virtual network gateways and firewalls, incur an additional charge.
Closing
Now that you’ve created your first Azure Virtual Network, you should start planning on securing and protecting resources placed in the networks. Whether everything is cloud-only or a hybrid approach with an on-premises data center, the same networking concepts still apply. You need to determine and secure which resources can access other resources and protect against outside threats.
To learn more about how to monitor and troubleshoot virtual networks, check out How to Create and Manage the Azure Network Watcher Resource.


-1.png)