
If you are just learning about Azure, most likely you are working in the Azure Portal. You have probably created resources like virtual machines and storage accounts by using the deployment wizards. However, this process is tedious and doesn’t scale when you need to create lots of resources. If you want to take your Azure resource deployment to the next level, it is time to look at the Azure CLI!
In this tutorial, you will learn what the Azure CLI is, how to connect to your Azure tenant, and how to deploy your first resources. If you are more familiar with Azure PowerShell, you will also learn some differences between the two languages.
What is Azure CLI?

Azure CLI is a command-line tool to create and manage resources. You interact with Azure by running commands in a terminal or writing scripts to automate tasks. Azure CLI interacts with the Azure Resource Manager (ARM) service, which is the management layer to interact with resources in your account.
Azure CLI Features
The Azure CLI offers many great features for managing Azure resources.
- Cross-Platform: You can install Azure CLI on Linux, Mac, or Windows computers. You can even run Azure CLI from inside a Docker container.
- Multiple Shell Environments: Azure CLI works in multiple shell environments, such as Windows Command prompt, Bash, and PowerShell.
- Bash-like Syntax: If you are a Linux administrator, the Azure CLI syntax is similar to Bash scripting. This similarity helps Azure CLI feel more natural and easy to learn.
- Automation: You can automate Azure management tasks by writing scripts with Azure CLI, such as creating, modifying, or deleting resources.
- Open-Source: Microsoft hosts the source code for Azure CLI in GitHub, and community members can contribute to the project.
Azure CLI can also work with infrastructure as code languages like ARM templates and Azure Bicep. To learn more about these infrastructure as code formats, check out the articles below!
Exploring ARM Templates: Azure Resource Manager Tutorial
Azure Bicep: Getting Started and How-To Guide
How to Install Azure CLI
Now that you understand a bit more about the Azure CLI, it’s time to get it installed! As mentioned above, Azure CLI is cross-platform, meaning you can install it on most platforms. Check out the following sections on how to install the Azure CLI on the platform of your choice.
Windows
For Windows-based systems, Microsoft provides an MSI installer for the Azure CLI. The MSI is for new installations and upgrades to existing versions. You can find the current release of the Azure CLI here.
As an alternative, you can use PowerShell commands to download and install the latest version of Azure CLI. The example code below shows how to download and install Azure CLI. Be sure to run the following steps from PowerShell started as an administrator. Once the installation is successful, restart the PowerShell console to use the Azure CLI commands.
- # Download the latest MSI installer and save as AzureCLI.msi
- Invoke-WebRequest -Uri https://aka.ms/installazurecliwindows -OutFile .\AzureCLI.msi
- # Start the installation and wait for completion
- Start-Process msiexec.exe -Wait -ArgumentList '/I AzureCLI.msi /quiet'
- # Remove the downloaded MSI installer
- Remove-Item .\AzureCLI.msi
Linux
The Azure CLI is available for multiple Linux distributions such as Ubuntu, Debian, Red Hat, CentOS, and more. Microsoft recommends installing the Azure CLI using your Linux distribution’s preferred package manager so you can make sure to always get the latest updates.
If you don’t have any of the above package managers available, you can manually install Azure CLI across all Linux platforms. To manually install Azure CLI, your system requires the following software:
- Python
- Currently support 3.6.x, 3.7.x, or 3.8.x
- Check Microsoft’s documentation to verify supported versions
- libffi
- OpenSSL
To install or update Azure CLI, run the following script:
- curl -L https://aka.ms/InstallAzureCli | bash
Mac
You install Azure CLI on the macOS platform using the homebrew package manager. Homebrew is an easy way to keep your Azure CLI installation up to date. Azure CLI currently supports macOS version 10.9 and later.
To install Azure CLI on your macOS system, update your brew repository information and run the install command, like this:
- brew update && brew install azure-cli
Azure Cloud Shell
If you don’t want to manage Azure CLI on your local system, you can use the Azure Cloud Shell. The Azure Cloud Shell is an interactive shell environment that runs in your browser. It automatically authenticates to your Azure tenant so you can quickly start managing resources.
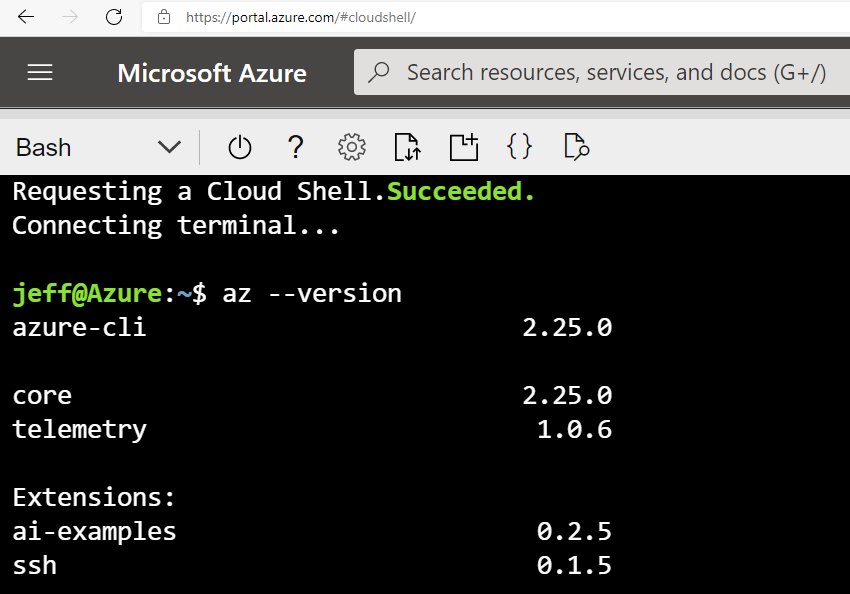
The Azure Cloud Shell provides both Bash and PowerShell experiences so you can pick your favorite. Each environment automatically includes the latest version of the Azure CLI. Below is a screenshot showing the Bash shell and running az --versionto display the Azure CLI version.
To access the Azure Cloud Shell, navigate to https://shell.azure.com. If you’ve never accessed the shell before, you are prompted to create a storage account for persisting files across sessions. To read more about this process, checkout persisting files in Azure Cloud Shell.
Azure CLI vs. Azure PowerShell
Azure CLI and Azure PowerShell are command-line tools that allow you to manage your Azure resources and environment. Both tools support installation on Windows, macOS, and Linux. However, Azure CLI supports more shell environments, like Windows Command prompt and Bash, whereas Azure PowerShell is only supported in PowerShell.
Check out the table below for a comparison of support shell environments.

When choosing which command-line tool is right for you, consider your past experience and what type of environment you work in. If you are primarily a Linux administrator, the Azure CLI syntax is similar to Bash scripting. Learning Azure CLI may feel more natural than learning Azure PowerShell.
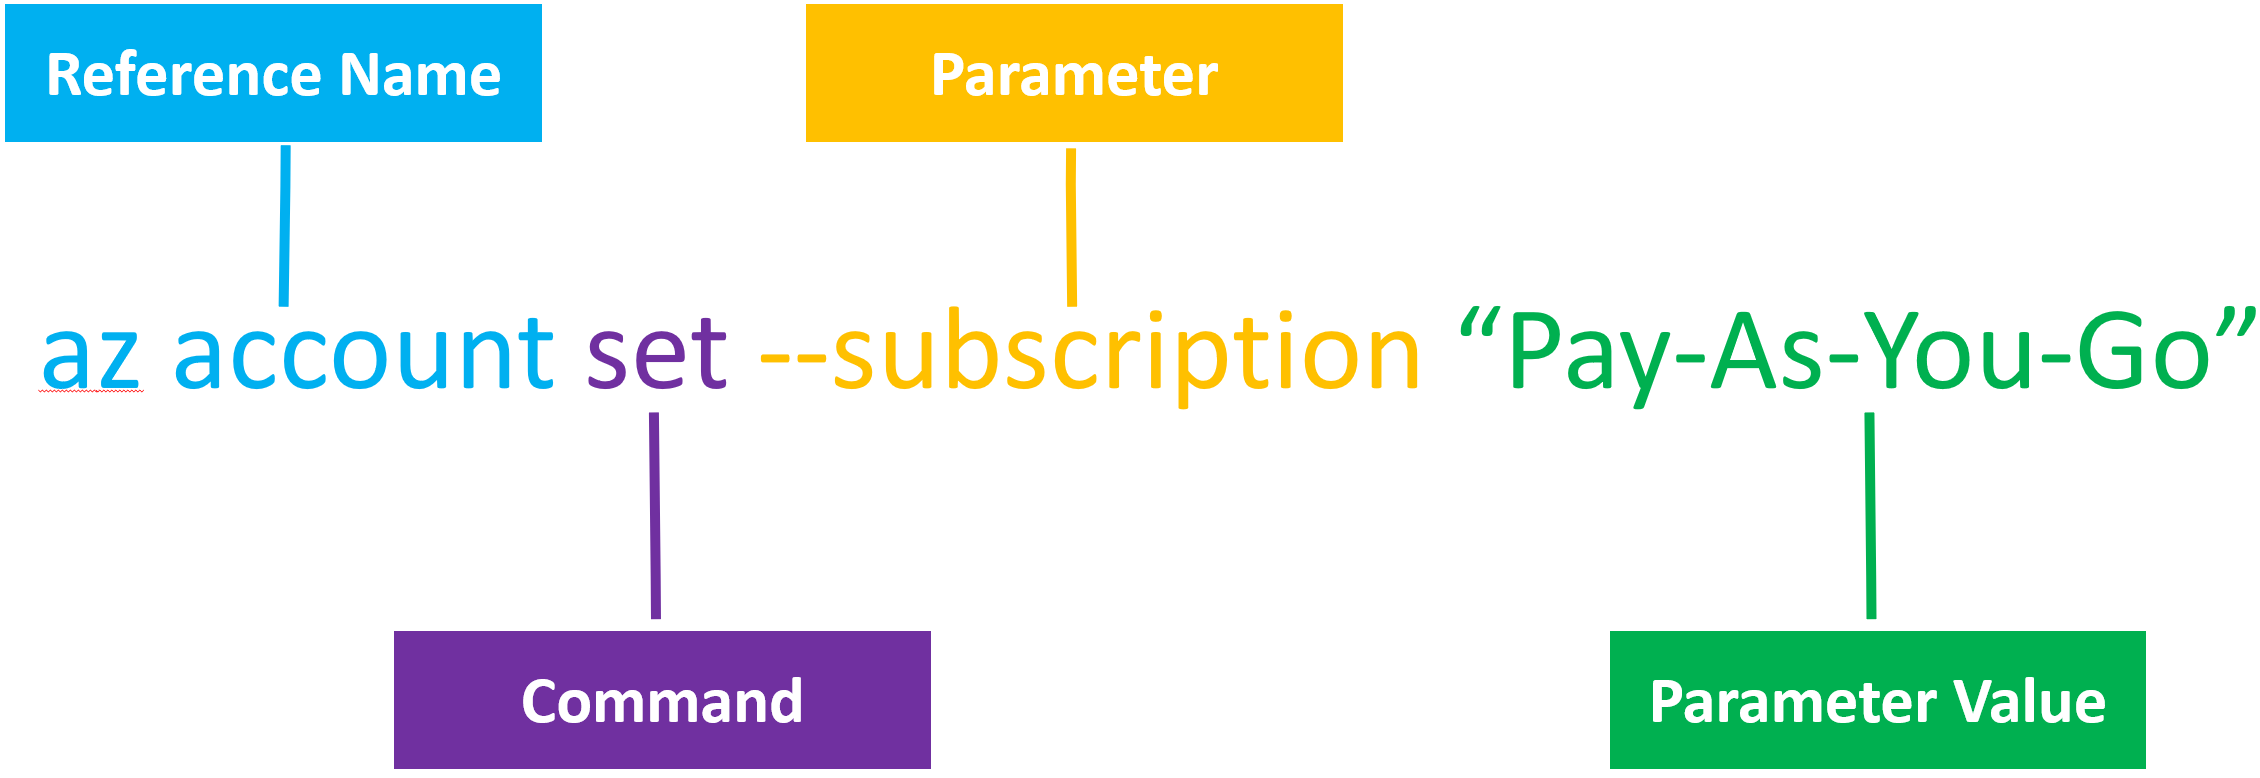
The Azure CLI follows a syntax where each commands begins with the reference name azfollowed by the name of a resource. After the reference name is the command name, which designates which resource you are working with. Finally, many commands also have parameters for passing values, such as a resource group name.
Below is an image that shows an example command to set the Azure subscription. Setting the Azure subscription tells Azure CLI where to create or find resources to manage. The example command shows the reference name (az account), the command (set), the parameter name (--subscription), and the parameter value (Pay-As-You-Go).
If you primarily work in a Windows environment, Azure PowerShell may be the better choice. All Windows operating systems come with PowerShell already installed. Azure PowerShell is a PowerShell module you install from the PowerShell Gallery.
While you may develop a preference for a command-line tool, it is important to be familiar with both. Both tools do not have full feature parity for Azure services, so you may need to use one tool when the other doesn’t support a service or command.
To learn more about managing Azure and Office 365 using PowerShell, check out How to Connect to Office 365 PowerShell: Azure AD Modules.
Managing Resources with Azure CLI
Now that you understand the Azure CLI a bit more, it is time to see it in action! The following sections demonstrate how to access your tenant, view your subscriptions, and create a few Azure resources.
Signing in to Azure
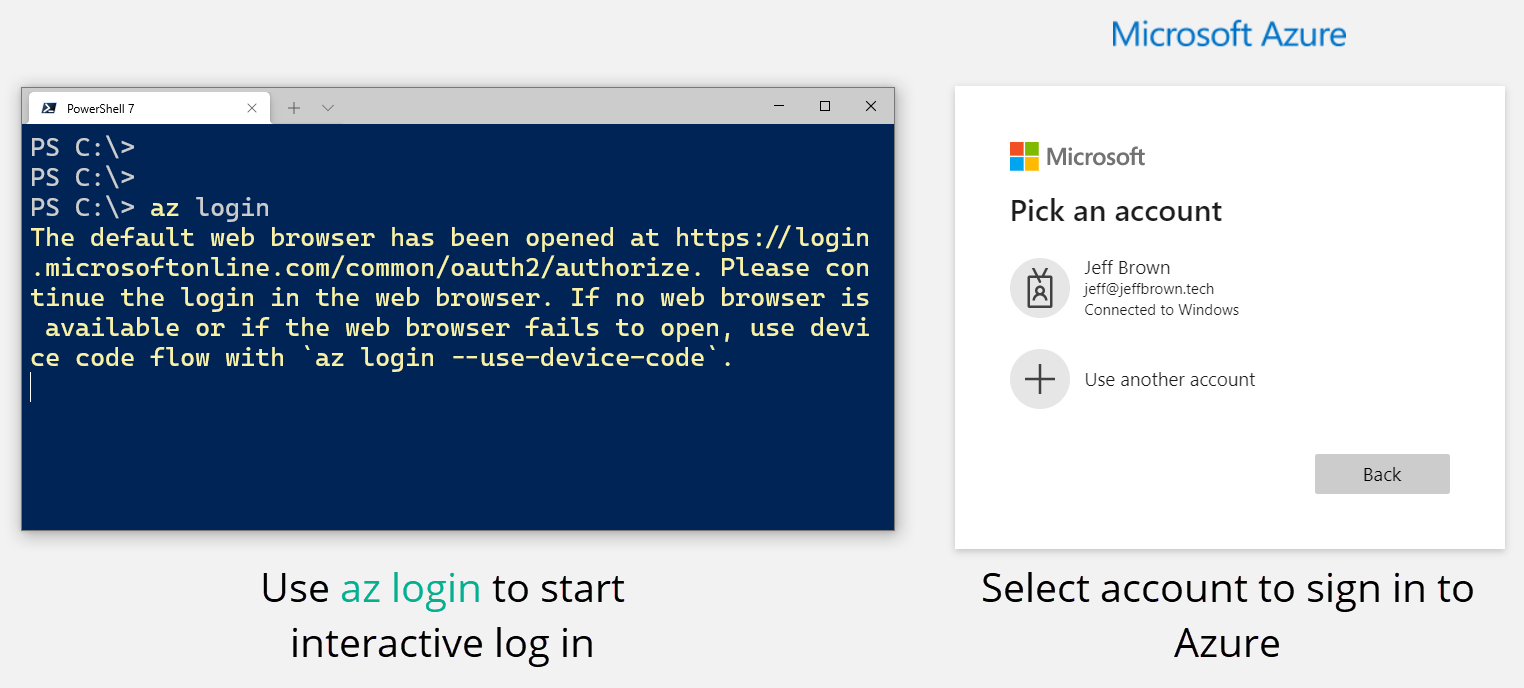
Azure CLI supports multiple authentication methods to sign in to your Azure environment. The default authentication method uses an interactive log-in through a web browser. Run the az logincommand to get started, and the CLI will open your default browser to an Azure sign-in page. Enter your credentials or select an already signed-in account to complete the sign-in process.
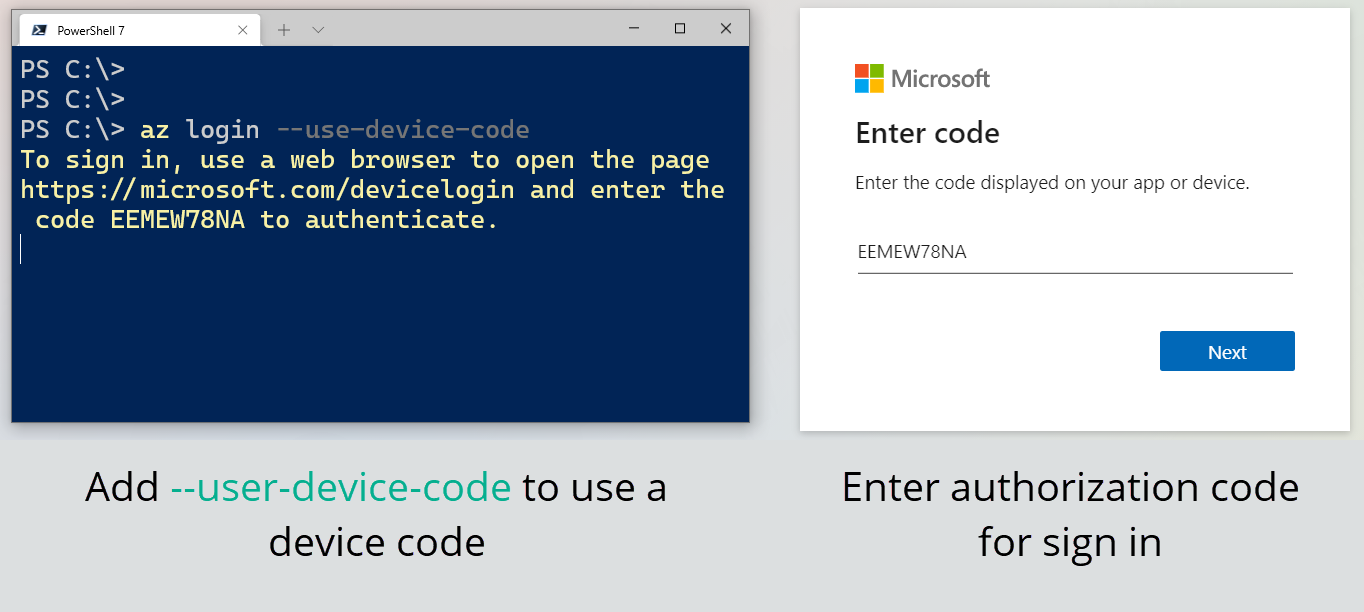
If a browser doesn’t open automatically, you can use an authorization code to sign in to Azure. Add the --use-device-codeparameter to the same log-in command. Navigate to the URL (https://microsoft.com/devicelogin) and enter the authorization code. Once Azure verifies the authorization code, you then enter your user name and password.
Selecting an Azure Subscription
When you sign in to your Azure tenant, the Azure CLI displays a list of subscriptions you have access to. Azure subscriptions are a logical grouping of resources for billing and management purposes. If you don’t make any changes, Azure CLI uses the default subscription when you start creating resources.
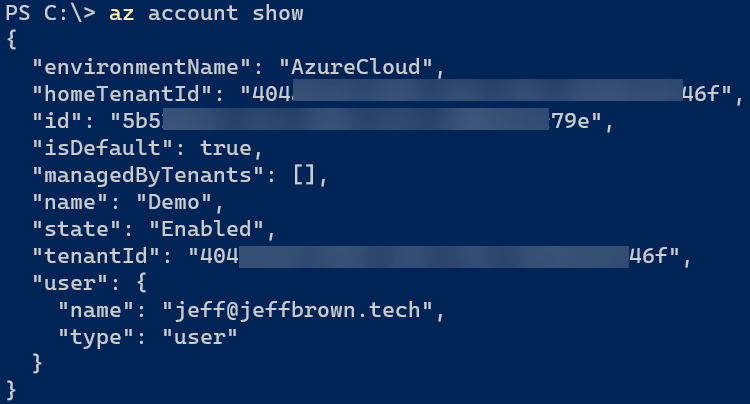
Use the az account showcommand to view the default subscription. In the example screenshot below, the default subscription is named Demo and has a unique ID starting with 5b5.
If you need to view all subscriptions later in your session, use the az account listcommand. Azure CLI displays information about each subscription, such as the unique ID and name. Find the subscription you want to work with and note either the ID or name.
In the example screenshot below, the subscription name starts with 7458, and the name is Production.

If you need to switch subscriptions before creating new resources, use the az account set command. The example below sets the subscription to Production. When selecting another subscription, you can use the subscription ID or display name.
- # Set the subscription using the display name
- az account set --subscription “Production”
- # Set the subscription using the unique ID
- az account set --subscription 7458ed71-ed9d-45f4-b34e-793a2472800f
Creating Resources using Azure CLI
Now that you are logged into Azure and selected your subscription, it is time to create some resources! In the remaining steps, you will make a resource group followed by creating a storage account.
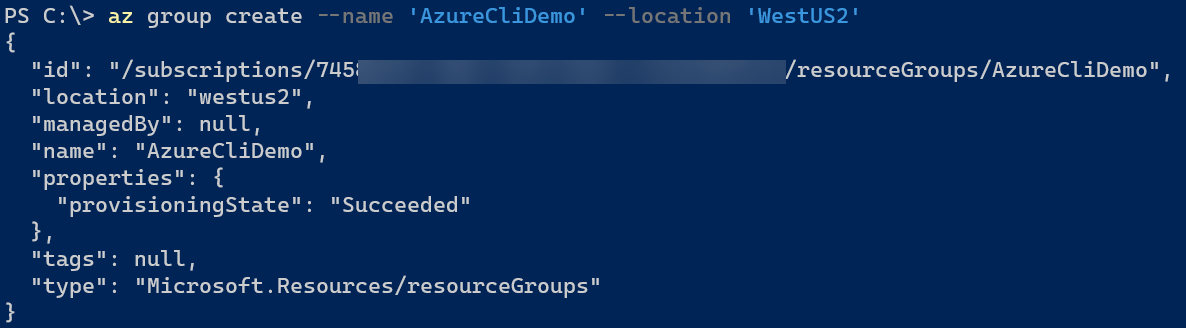
To create a resource group, use the az group createcommand followed by the group name (AzureCliDemo) and the Azure region (WestUS2). You can select any name and Azure region you’d like.
- az group create --name ‘AzureCliDemo’ --location ‘WestUS2’
With the resource group created, create the storage account using the az storage account createcommand. Specify a globally unique storage account name (azclistfacctdemo) along with the resource group name (AzureCliDemo) and Azure location (WestUS2).
Next, specify the storage account properties, such as the SKU (Standard_LRS), the kind of storage account (StorageV2), and the default access tier (Cool).
- az storage account create `
- --name 'azclistgacctdemo' `
- --resource-group 'AzureCliDemo' `
- --location 'WestUS2' `
- --sku 'Standard_LRS' `
- --kind 'StorageV2' `
- --access-tier 'Cool'
Congratulations! You just created your first resources using the Azure CLI!
Azure CLI FAQs
What is Azure CLI used for?
Azure CLI is a command-line utility used to create and manage Azure resources. You can use the Azure CLI to issue single commands to your Azure environment or write a script with several commands to automate a task.
What is the difference between Azure CLI and Azure PowerShell?
Azure CLI and Azure PowerShell use different syntax to accomplish their actions. While both work on multiple platforms, Azure CLI works in shell environments that Azure PowerShell does not, like Windows Command prompt and Bash on Linux.
Closing
In this article, you learned about the Azure CLI and the benefits of using it. You then saw how you can install Azure CLI on multiple platforms and then signed in to your Azure tenant and created your first resources.
Azure CLI is a fantastic tool to learn to manage your Azure environment. By leveraging Azure CLI, you can accomplish tasks more quickly and standardize repeatable tasks. The Bash-like syntax makes the Azure CLI a natural choice for your shell experience if you’re a Linux administrator.