In a previous blog post, I explained what x64dbg is and also broke down some of the features of the tool and why they are useful for malware analysis. This article will serve as an x64dbg tutorial in which I will cover the methodology I use when reverse engineering malware and demonstrate how to use the tool to unpack a malware sample.
x64dbg Use Cases:

In this series, we’ll cover these x64dbg use cases:
- Manually unpacking malware
- Reloading unwrapped malware into x64dbg
- Analyzing malware and how it functions
When I use a tool such as x64dbg to reverse engineer malware I first make sure I have done some behavioral analysis of the binary first using some freely available tools. This initial triage gives me an understanding of what the malware does when it compromises a device. From this, I can determine some key indicators of compromise (IOC’s) such as network traffic, files written to disk, and persistence mechanisms.
I can also get a rough idea of what the malware author’s goals may be in writing a malicious program, perhaps it’s financially motivated such as Ransomware, alternatively, it could be a RAT (Remote Access Trojan) that provides the bad guys with backdoor access to a network.
Get the Free Pentesting Active
Directory Environments E-Book
Without performing this initial gathering of evidence I would be reluctant to open the malware in x64dbg and start blindly stepping through assembly code. Another issue is that if I haven’t performed some basic analysis I might be stepping through packed code and won’t actually get to analyze anything of interest.
Malware is often packed so that the code written by the malware author is obfuscated, the bad guys have taken time to write some malicious code and don’t want it to be an easy task for somebody to take a quick look at the malware and in a short space of time identify what it does and how to stop it.
Packed malware is essentially ‘wrapped’ with a layer of code, this additional layer hides the code the malware author has written and it’s this obfuscation technique that is known as malware ‘packing’. The good news is that a common use case for x64dbg is being able to manually unpack malware, the unpacked file can then be reloaded into x64dbg and the actual analysis of the malware can begin!
Unpacking malware is a great skill to have in your arsenal however once the binary is unpacked where do we start with our analysis? First of all, you don’t want to analyze every line of code from start to finish, it’s simply too time-consuming. From the initial dynamic analysis, there may be some behavior that the malware is exhibiting that you want to investigate further. Perhaps the malware generates a random filename on each device it infects, a potential use case could be to investigate how these names are generated.
The Methodology I Use:
First of all, always remember that a piece of malware is made up of multiple functions that have either been written by the malware author or have been imported by them.
For example, within the malware, a function may exist which creates a file on disk. From analyzing that function using x64dbg we could potentially see where that file is written to and what its name will be. Now the malware author could write a function to do this, however, Windows already contains multiple pre-written functions that can be imported. So in some cases rather than write code to perform a certain function they will instead import legitimate Windows API functions that can do some of the work for them.
The functions that they import are legitimate Windows functions known as Windows APIs. Windows contains several libraries that contain unique functions, these libraries are known as DLL’s (Dynamic Linked Libraries).
For example, Kernel32.dll contains the API ‘WriteFile’ so the malware can import this function and use it to write files to disk. When the malware imports the DLL’s a malware analyst can use this information to get a rough idea of what the malware may do. The Windows API’s that are imported are known as the Import Address Table (IAT).
When analyzing a malware sample in x64dbg you begin at the main function. This is the main body of the code written by the malware author.
However within this function, the malware will make calls to other functions, these may be written by the malware author or will be Windows APIs that have been imported by the malware. For example, if the malware needs to create a file it may use the Windows API CreateFileA to create that file. As that is a legitimate Windows function we wouldn’t want to analyze the assembly code of CreateFileA, we would be interested in the return value of that function and also the arguments that are being passed to the function before it is called or executed.
From doing this type of analysis we could see what the file is going to be called and where it is going to be installed on disk and also identify from the return value if the function successfully created the file.
The image below should help illustrate how functions are called within functions.
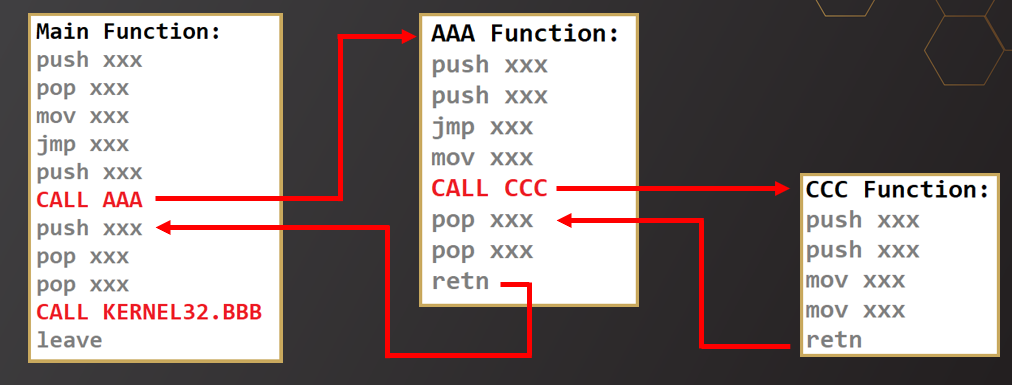
The code that we would be interested in analyzing would be a function that the malware author has written. In the above example let’s pretend that the function I have named ‘AAA’ has been written by the malware author and we want to investigate it further.
In x64dbg there are two instructions you will regularly use, ‘step over’ and ‘step into’, if my instruction pointer, that is the pointer to the next assembly instruction that will execute is set to ‘CALL AAA’ I could either step over this instruction or step into it. If I step over it, the function will still execute, however, I won’t see the instructions that have been run. If I use Step into, I will jump to the address space where this function begins and see the content of that function.
Within that function there may be more functions that I want to look at, in this example, I could step into the function CCC and again I will jump to a new address space where this function begins. By stepping through the code I will eventually get to the end of the function which is evidenced by the return command. Once this command is executed I will then jump to the instruction directly after the call to the ‘CCC’ function and I am back in the ‘AAA’ function.
Again I can step through the code and again will eventually hit the return instruction and jump to the instruction directly after that call to the ‘AAA’ function.
Windows API calls can be identified by the naming convention which will begin with the DLL they are being loaded from or and their documented Microsoft name.. In this example, I have just used the name ‘BBB’ as an example, however, as it is a Windows API I wouldn’t want to step into this instruction as it hasn’t been written by the malware author. I would be interested in what has been pushed onto the stack prior to the function call being made and also what is returned by the function after it has been executed.
This should hopefully give you a good overview and understanding of the methodology used when analyzing malware in a debugger. This can be extremely time-consuming so you wouldn’t want to analyze every function written by the malware author. From your behavioral analysis of the malware, as I mentioned earlier, you may find something of interest that you would like to have a better understanding of.
This sample we are analyzing is Emotet malware, when it infects a machine it generates a random filename for the malware, so when I have previously analyzed this sample I concentrated on API calls that generated this activity and then looked at what the malware was doing at this point.
Step-by-Step Malware Analysis Using x64dbg:
I will demonstrate a technique I use to first identify packed malware and then unpack the malware manually using x64dbg.
Identifying Packed Malware:
Disclaimer – Do not attempt to analyze malware without first setting up a secure, virtualized environment. x64dbg should not be installed on your host machine to analyze malware. Your host machine should also have appropriate malware protection in place.
Sample: b1cad1540ecb290088252635f8e130022eed7486eb128c0ca3d676945d60a9fc
There are several techniques for determining if a piece of malware is packed. One technique I use is by running the malware in a virtual machine with the tool Process Monitor (ProcMon) running. ProcMon records filesystem activity on the machine it is running and can be filtered to show any new processes which have been created. The malware I have detonated in this demo is called ‘267.exe’, the image below shows some of the processes that have been captured on the VM I have run the malware on in ProcMon. The bottom two processes are named ‘267.exe’, the first process that has been generated is from when I launched the malware. The image shows that the malware then spawned a child process of the same name. This is the malware unpacking itself in memory, this technique is known as process injection.
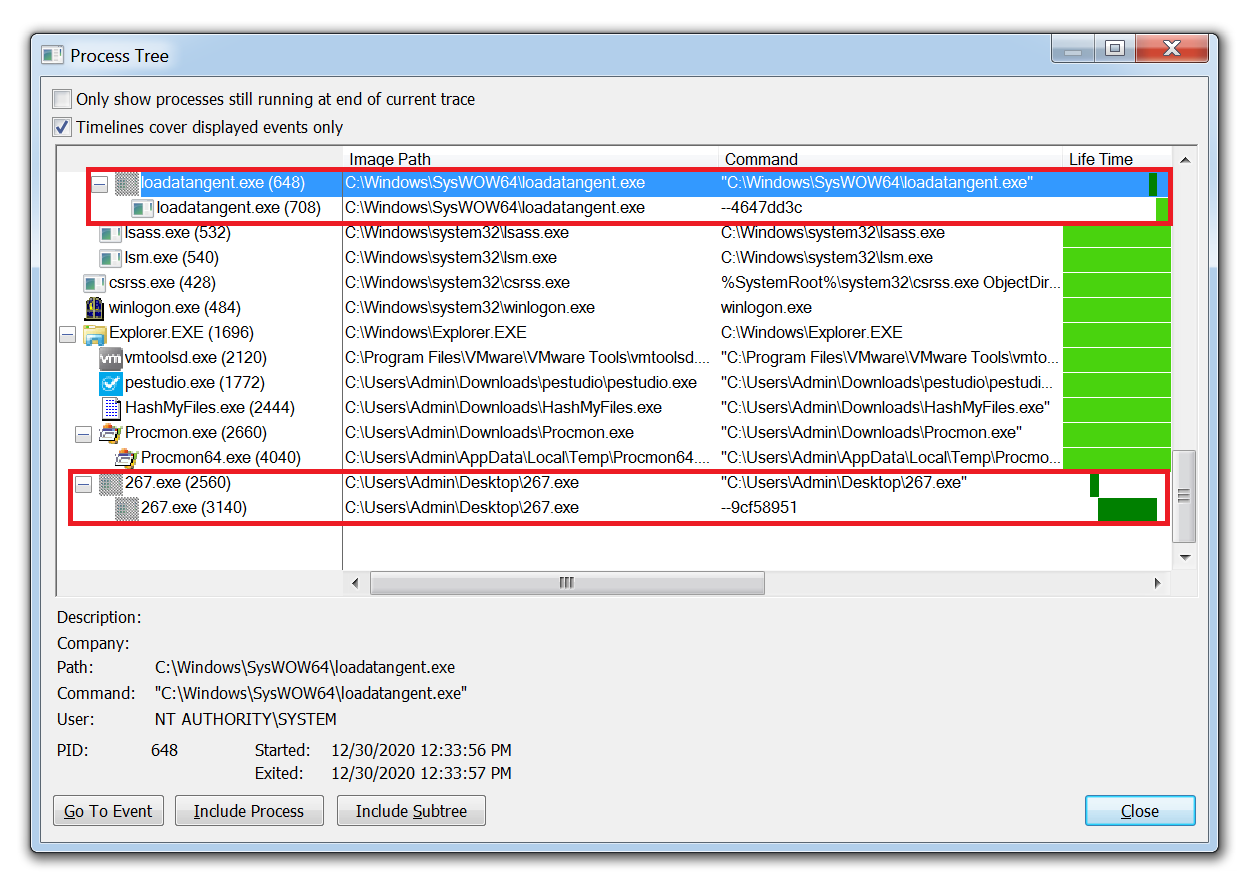
The packed malware has been run, to unpack itself the malware creates a new process, this is the child process seen in the above image. The new child process is then allocated free space within it by the parent process. The unpacked code is then injected into the free space within this newly created child process, hence the name process injection!
In this example, we can also see that malware then deletes itself from the Desktop and copies itself to its persistence location of ‘C:\Windows\SysWOW64’ and renames itself to ‘loadatangent.exe’. The same technique of process injection is used to unpack itself and the malware is now running on disk as the process ‘loadatangent.exe’
H3: Manually Unpacking Emotet Malware:
From conducting some simple behavioral analysis we have now determined that the malware is packed and we have evidence of it unpacking itself in memory. It’s time to use x64dbg to carve out the unpacked malware for further analysis.
By dragging the malware onto the x64dbg icon on the desktop it will load the malware into x64dbg. The first thing to note is the header of the tool:
![]()
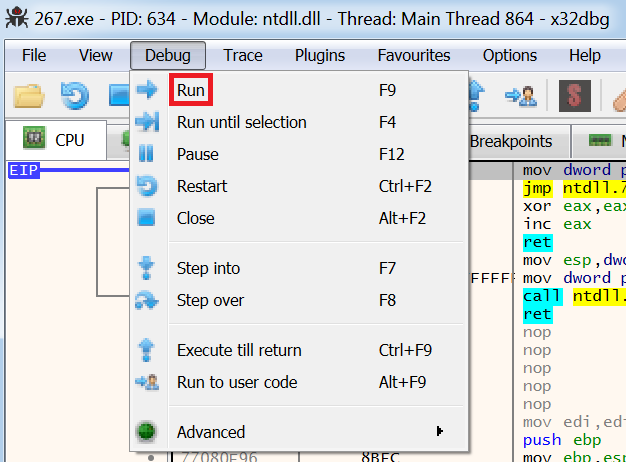
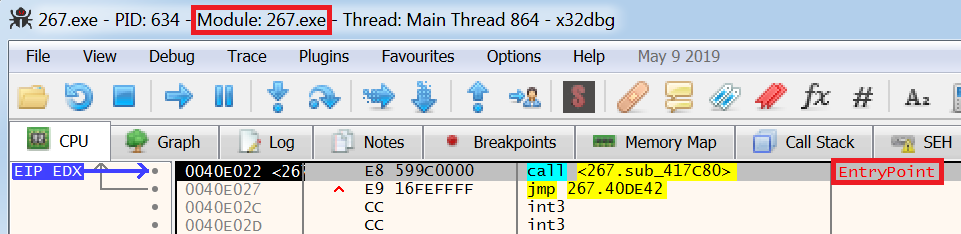
Here the current module that is being analyzed is ‘ntdll.dll’, which is a Windows DLL that has been imported by the malware and not code written by the malware author. We are only interested in analyzing code that has been written by the malware author, the module we need to analyze is the name of the file we have opened in x64dbg, ‘267.exe’. From the toolbar, selecting ‘Debug’ and then ‘Run’ takes us to the entry point of the malware. This is the ‘Main’ function mentioned earlier in the ‘methodology’ section.
x64dbg will now run to the entry point of the malware. This can be confirmed by checking that the module listed has now changed to ‘267.exe’ and the comment ‘EntryPoint’ is now visible in the 5th column of the main assembly window.
We can now start exploring the code of the malware, however, there needs to be a goal that we are trying to achieve. We have already seen that that malware unpacks itself by creating a new process and injecting the unpacked code into that process. So focusing on some Windows APIs which create new processes and allocate memory within that process will be a good starting point.
To do this we can set breakpoints on Windows API calls which may be imported by the malware to generate this activity. I’m going to set a breakpoint on ‘VirtualAlloc’, by doing this I can then see when the malware is allocating space in memory of a new process, I can then check this address space to see if it is being used to inject the unpacked malware.
There are a couple of ways to implement breakpoints, a common method I use is to use the keyboard shortcut ‘CTRL+G’ which opens a new popup window. By entering the name of the Windows API we are interested in, x64dbg will check to see if this value is present within the malware.
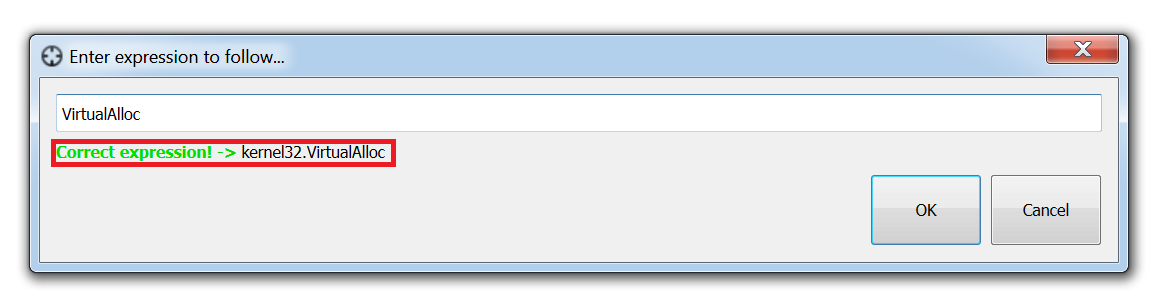
In the above image, we can see that this API has been found in the DLL Kernel32. Pressing ‘OK’ then displays in x64dbg where this function is located.

The above image shows we are in the module ‘kernel32.dll’ and also displays the address where ‘VirtualAlloc’ is located. We could set a breakpoint on the address where ‘VirtualAlloc’ starts, however, our analysis is looking to see what data is going to be placed into the memory created by this API, which will hopefully be the unpacked malware.
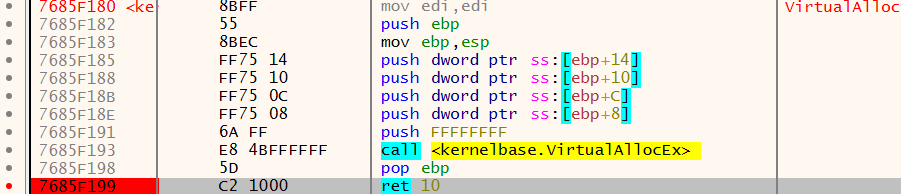
So because of this rather than setting my breakpoint at the start of ‘VirtualAlloc’, I’m going to put it at the end of the function.
In the above image, there are a couple of jump instructions represented by the command ‘jmp’, by pressing the enter key on these jumps x64dbg will follow the ‘jumps’ represented by the red arrows.
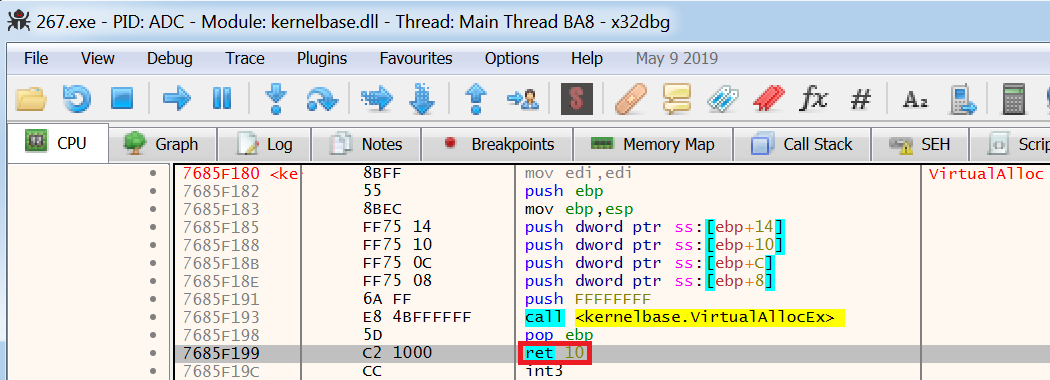
The above image shows that I have now located the end of ‘VirtualAlloc’, represented by the return instruction ‘ret 10’.
To set a breakpoint, right-click on the return instruction, select ‘Breakpoint’, and then ‘Toggle’.
The address of the return instruction is located at ‘7685F199’, once the breakpoint has been set this address will turn red.
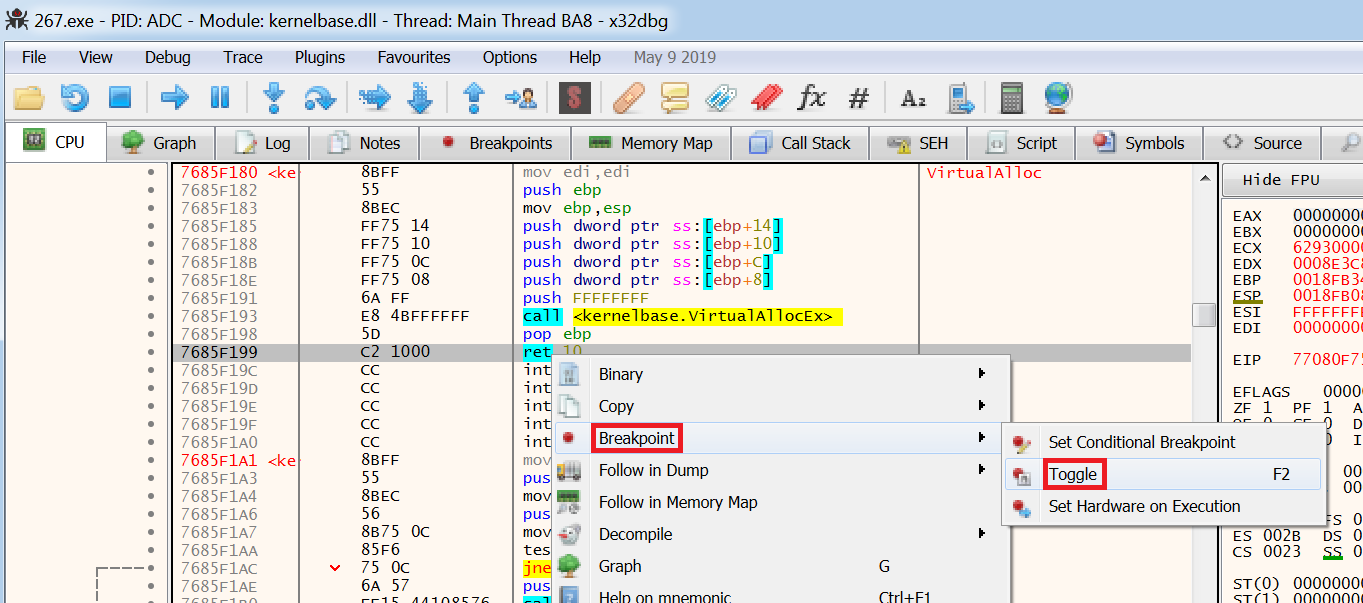
Confirmation that the breakpoint has been set can also be found by selecting the ‘Breakpoints’ tab.

The above image shows the initial breakpoint that was hit for the entry point of the malware. The second breakpoint listed is the one that has been set for the return of ‘VirtualAlloc’, note the assembly instruction and listed address.
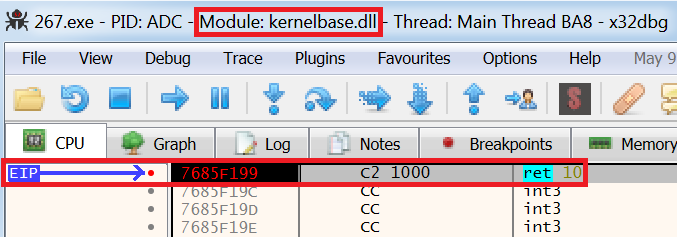
Clicking on the CPU tab takes us back to the assembly code and pressing ‘SHIFT+8’ takes us back to the address where the instruction pointer (EIP) is currently located.
We can now run the code and investigate any breakpoints which are hit when a call to ‘VirtualAlloc’ is made by the malware, note that this breakpoint may be hit multiple times so a little trial and error will be needed in any analysis.
In the toolbar tab selecting ‘Debug’ and the ‘Run’ option will run the malware until a breakpoint is hit and the program will be paused.
In the image below we can see that the breakpoint has been hit and the EIP is now pointing to the address of the return instruction where a breakpoint was placed. Note the top of the x64dbg windows shows the current module as ‘kernelbase.dll’ this is the DLL where VirtualAlloc resides.
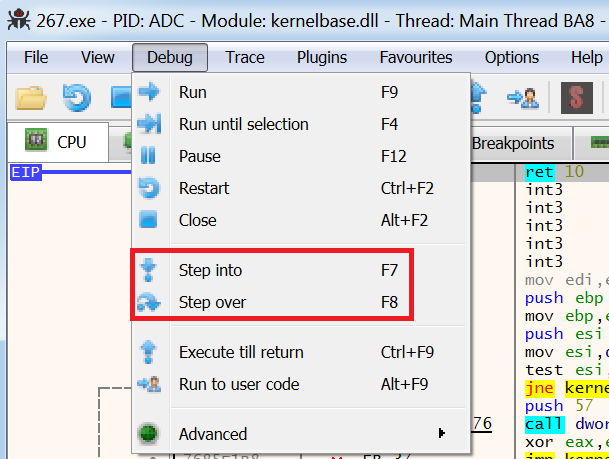
The return value of ‘VirtualAlloc’ can be identified by stepping over this instruction (stepping into will work fine as well), this is done by selecting ‘Debug’ from the toolbar.
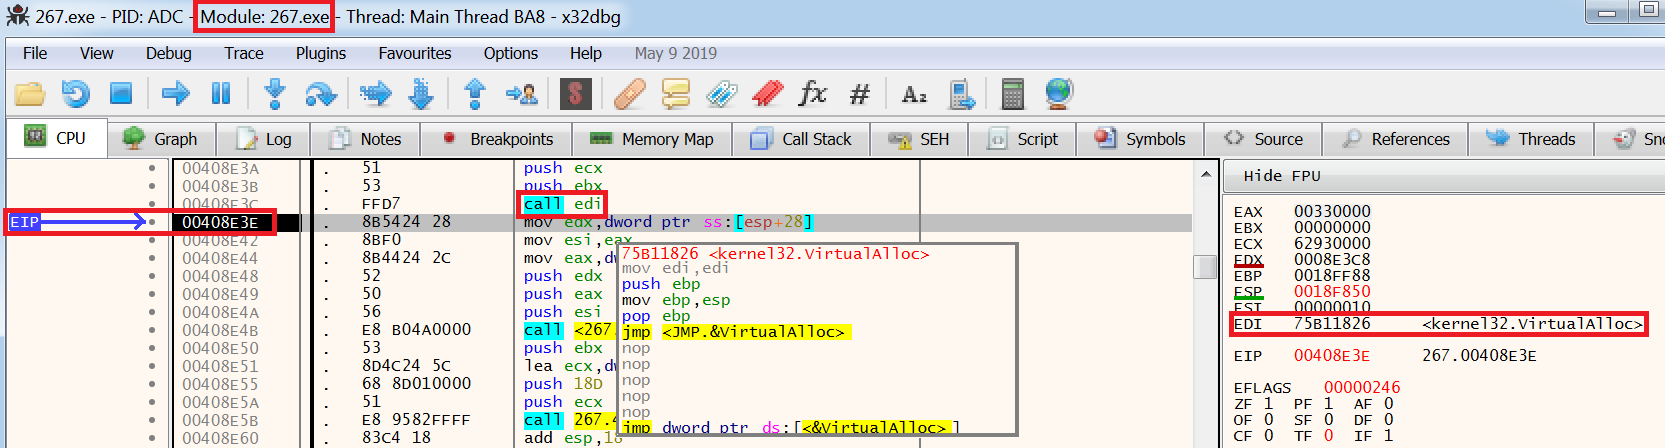
This now moves the EIP to the instruction after the call to ‘VirtualAlloc’ was made, note we are back in the module 267.exe and the call to ‘VirtualAlloc’ was made indirectly. The indirect call means that rather than using the instruction ‘CALL VirtualAlloc’, ‘VirtualAlloc’ was stored in the EDI register and the call was made by the instruction ‘CALL EDI’. The image below shows the call to EDI and ‘VirtualAlloc’ stored in the EDI register.
Memory has now been allocated using ‘VirtualAlloc’ however we need to see if that allocated memory is being used to move the unpacked malware into.
By checking the parameters that are being passed after the space in memory has been allocated we can see if the unpacked malware is being stored in these parameters which are highlighted below.
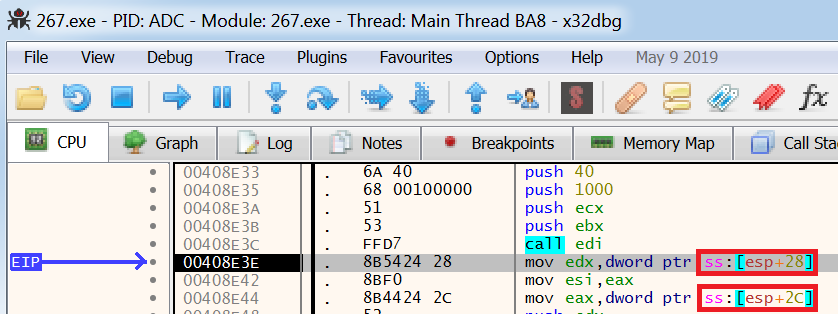
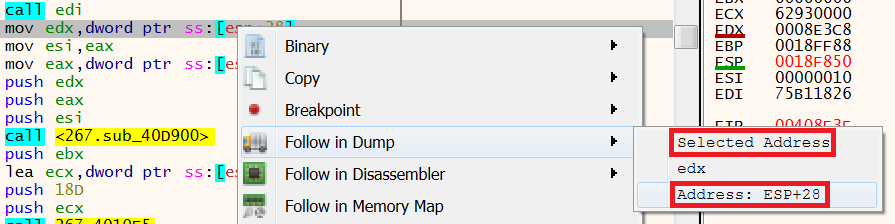
Right-clicking on [esp+28] and then selecting ‘Follow in Dump’ will display the contents of this parameter. Using the option ‘Selected Address’ or ‘Address: ESP+28’ will provide the same outcome.
This will then update the window in x64dbg which contains any data which has been dumped by the user.
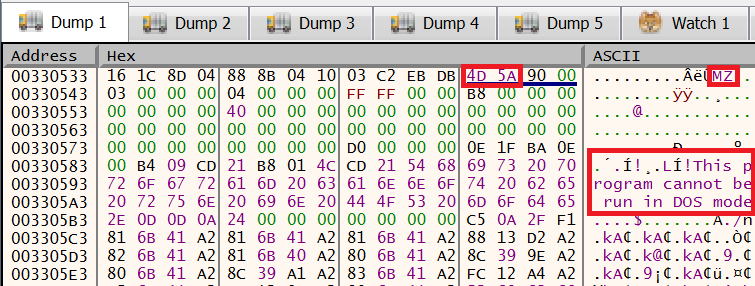
What we are now looking for is the header of an executable file. Headers are found in files and are used by the operating system to identify what the file type is, so the header of a Windows executable always starts with ‘4D 5A’ in hexadecimal, this is ‘MZ’ in ASCII.
By looking at the output of the dumped parameter we can see that the contents of this parameter do not contain what we are looking for as the values ‘4D 5A’ and ‘MZ’ are not present.

The second parameter [esp+2c] also does not contain the malware so the malware needs to be allowed to run until we find it. Again by hitting ‘Debug’ then run the malware until the breakpoint is hit again when a call to ‘VirtualAlloc’ is made.
The same process is followed as before and the new parameters are then analyzed. This time the call was made to ‘VirtualAlloc’ by calling the register EBP, again two parameters are then being used by the malware.
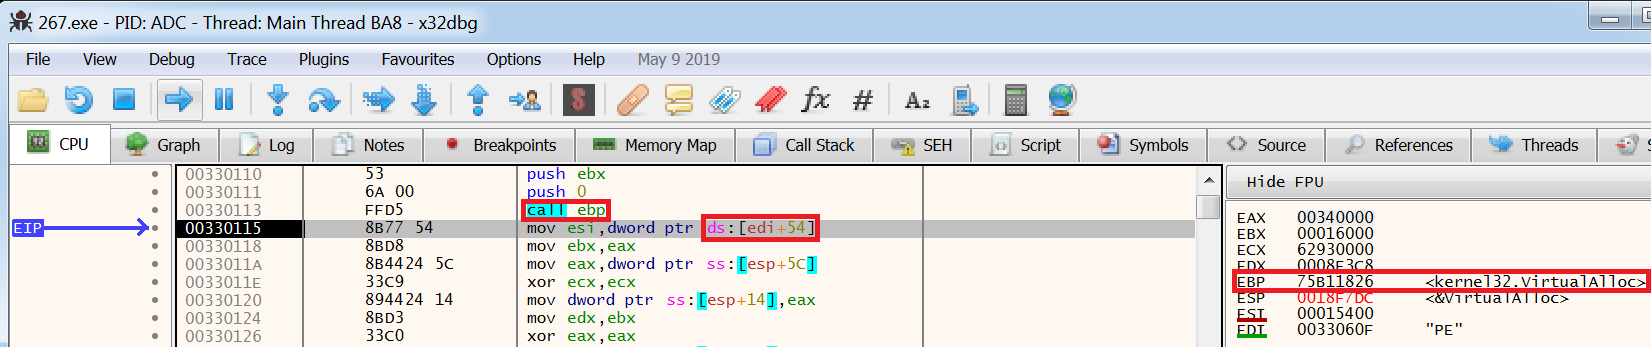
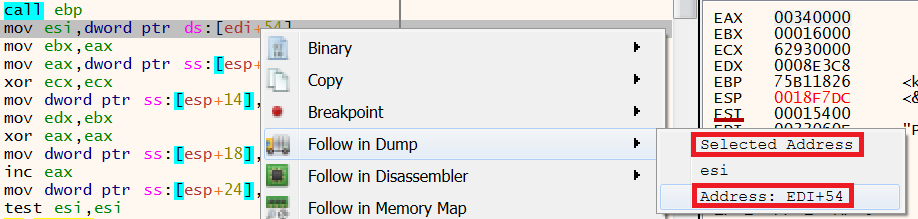
Right-clicking on [edi+54] and following the content of this parameter in the dump window shows that this does contain a Windows executable, spoiler alert this is the unpacked malware!
Scrolling up in the dump window we can see the header of a Windows executable file, we have successfully located the unpacked malware. Note the values ‘4D 5A’, ‘MZ’, and the string ‘This program cannot be run in DOS mode’.
To extract the unpacked malware right-click on ‘MZ’ and select ‘Follow in Memory-Map’.
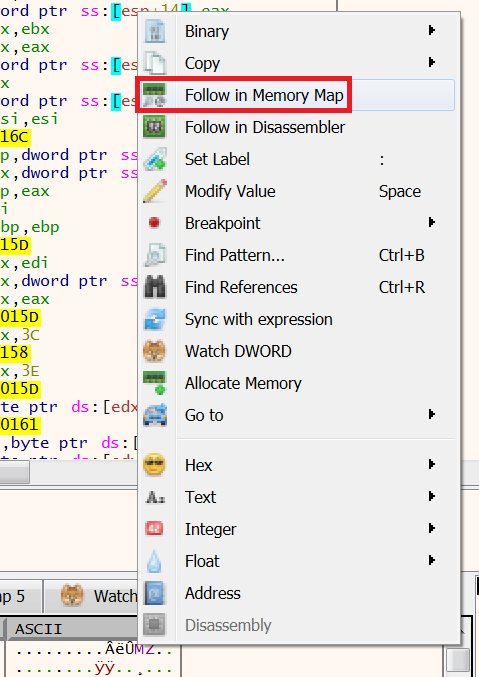
This now shows where the unpacked malware is located in memory and the permissions that area of memory has been allocated.
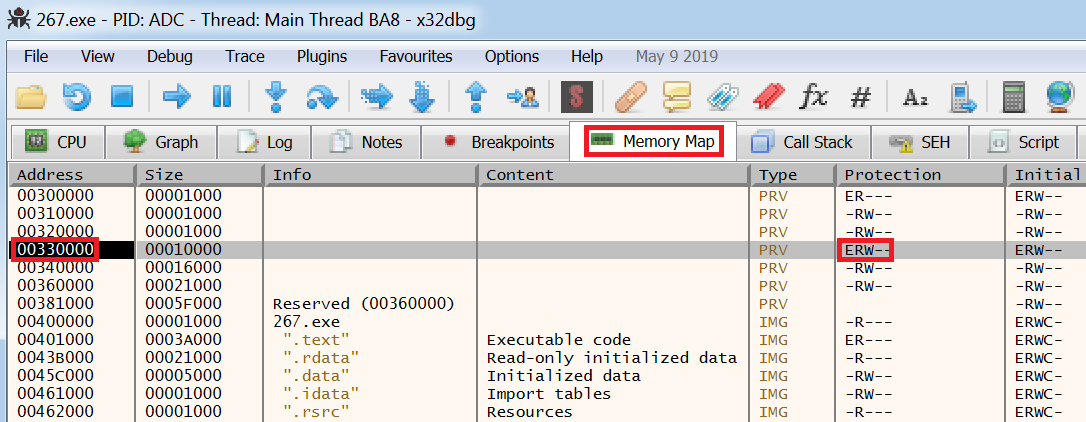
The above image shows the address the unpacked malware is located and also the protection level that has been allocated to that area in memory. Three possible flags can be set ‘E’ – Executable, ‘R’ – Read, and ‘W’ – Write. If the Protection level is set to ‘ERW’ then this is a great indicator this is the unpacked malware as the memory allocated for the malware needs to be executable and writable.
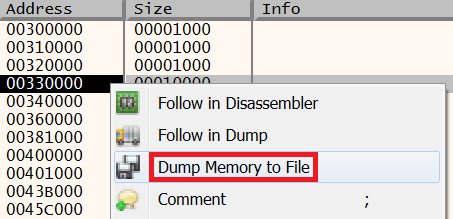
To extract the unpacked malware right click on the memory address and select ‘Dump Memory to File’.
Choose the location to save the unpacked file and then open the file using a hex editor.
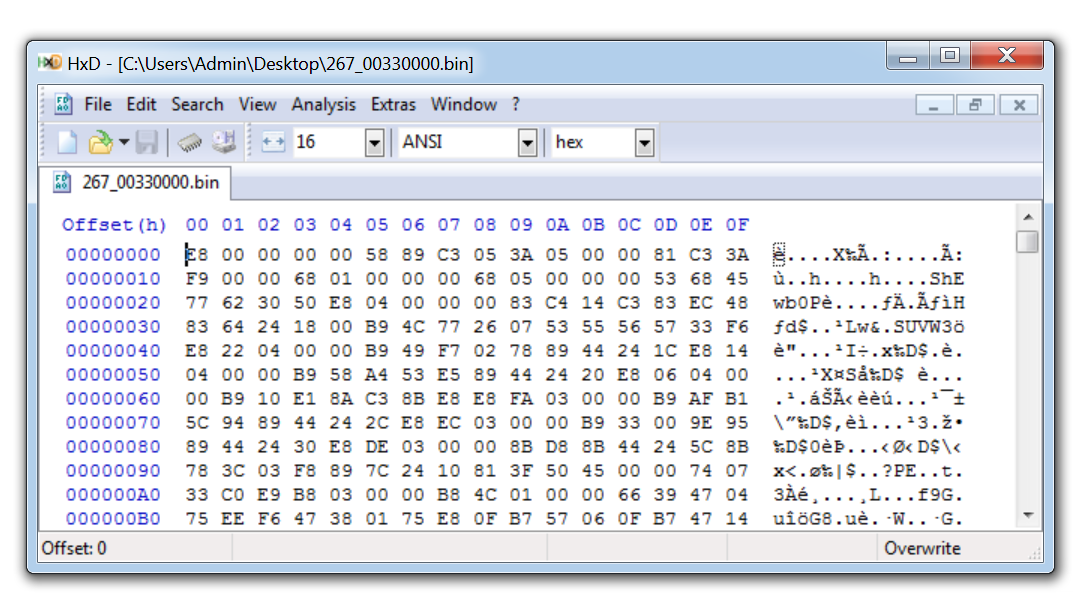
This shows us the header of the file we have just dumped from memory, however, this doesn’t look like a Windows executable as the header does not begin with ‘4D 5A’ in hex and the ASCII values present don’t begin with ‘MZ’. The reason for this is that the malware has been dumped from memory so there is some junk code that has been appended to the file.
To clean up the file use the keyboard shortcut ‘CTRL+F’ to search for a string within the file and search for the value ‘MZ’.
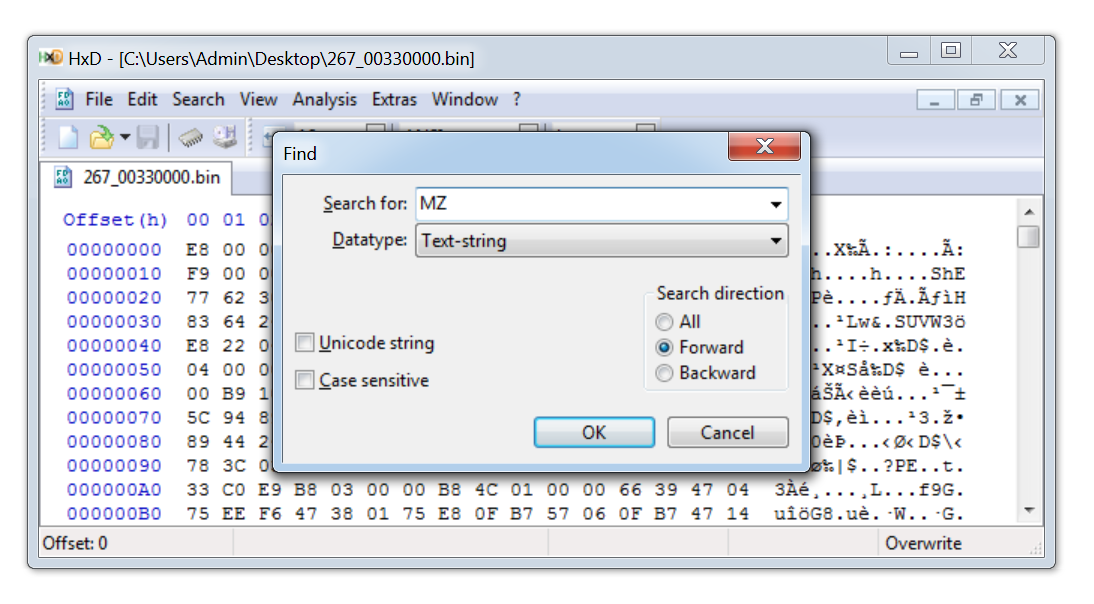
Pressing ‘OK’ then locates the ‘MZ’ flag and the associated ‘4D 5A’ values.
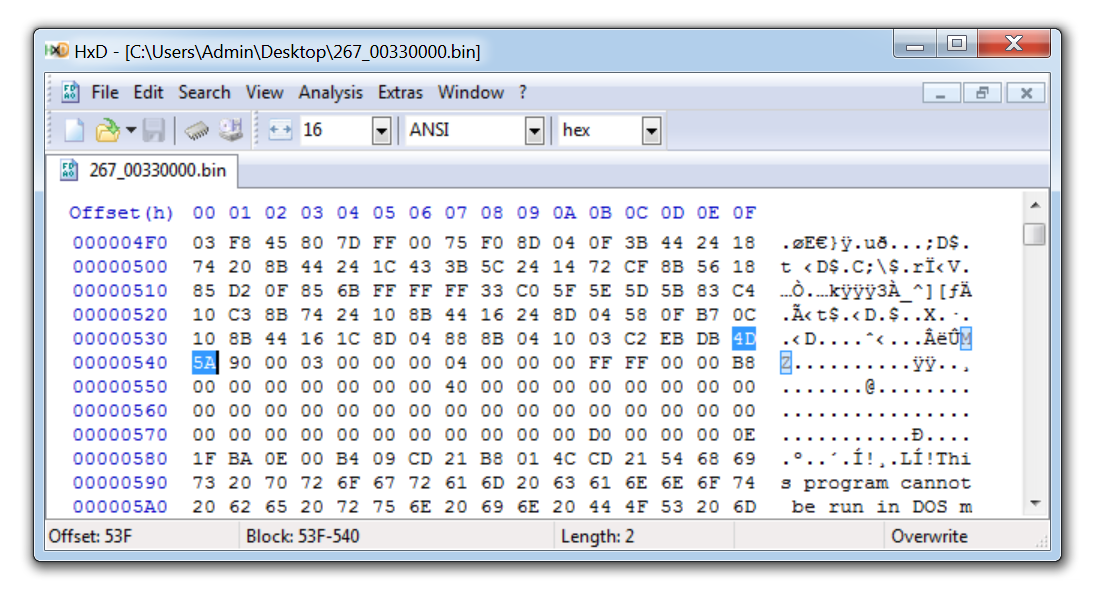
To clean up the file select all the hexadecimal code that has been appended before ‘4D 5A’.
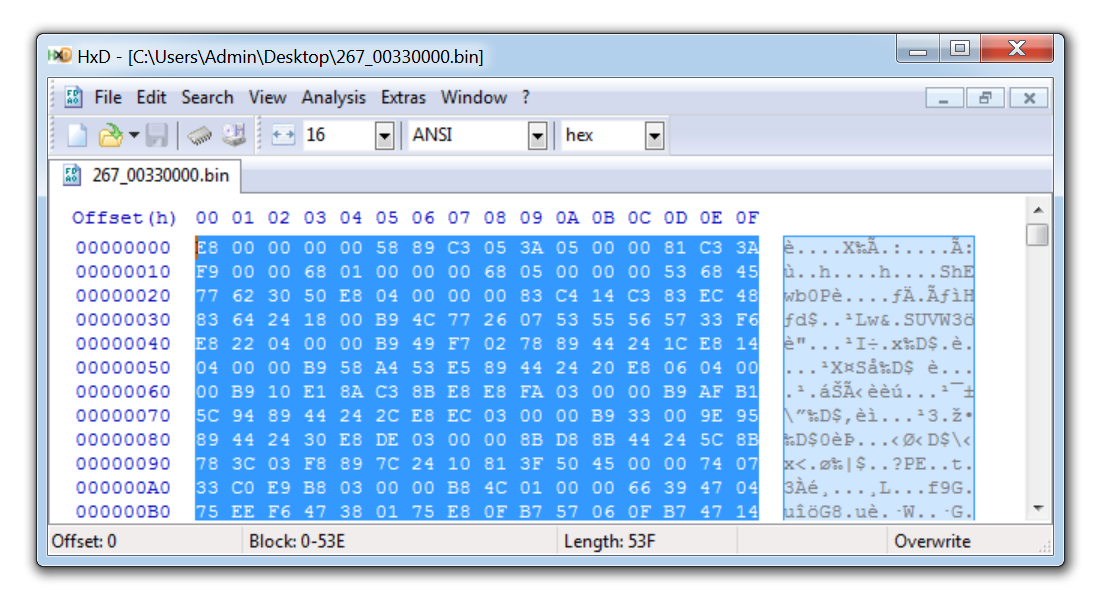
Right-click on the highlighted hex data and select ‘Delete’.
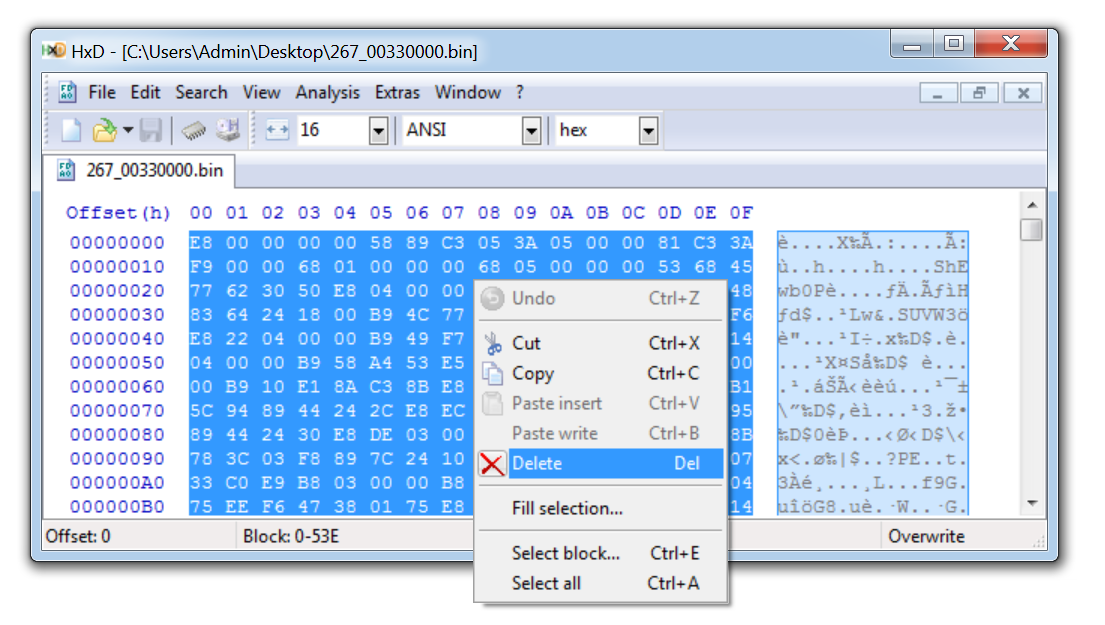
This now gives us a nice clean file which is the unpacked malware.

We have now successfully unpacked the malware and can begin analyzing the code written by the malware author!
Over the past two articles, we have now covered what x64dbg is and also provided a tutorial on how x64dbg can be used to unpack malware. The next article will cover what stack memory is, how it relates to x64dbg and then we will use this knowledge to analyze the malware we have unpacked!
Having the skills to unpack and analyze malware is an invaluable skill when responding to a cybersecurity incident and the likelihood of a cyber attack against your organization may surprise you. If you don’t have a resident malware ninja within your incident response team then you may be interested in how Varonis can detect Ransomware in order to bolster your cyber defenses.


-1.png)
.png)