
Are you deploying resources to Azure and trying to use Azure Resource Manager (ARM) templates? Are you finding the JSON syntax confusing? Microsoft heard the criticism and introduced a new infrastructure as a code project called Azure Bicep.
In this post, you will learn all about Azure Bicep, improvements over ARM templates, and a tutorial on how to get started.
What is Azure Bicep?
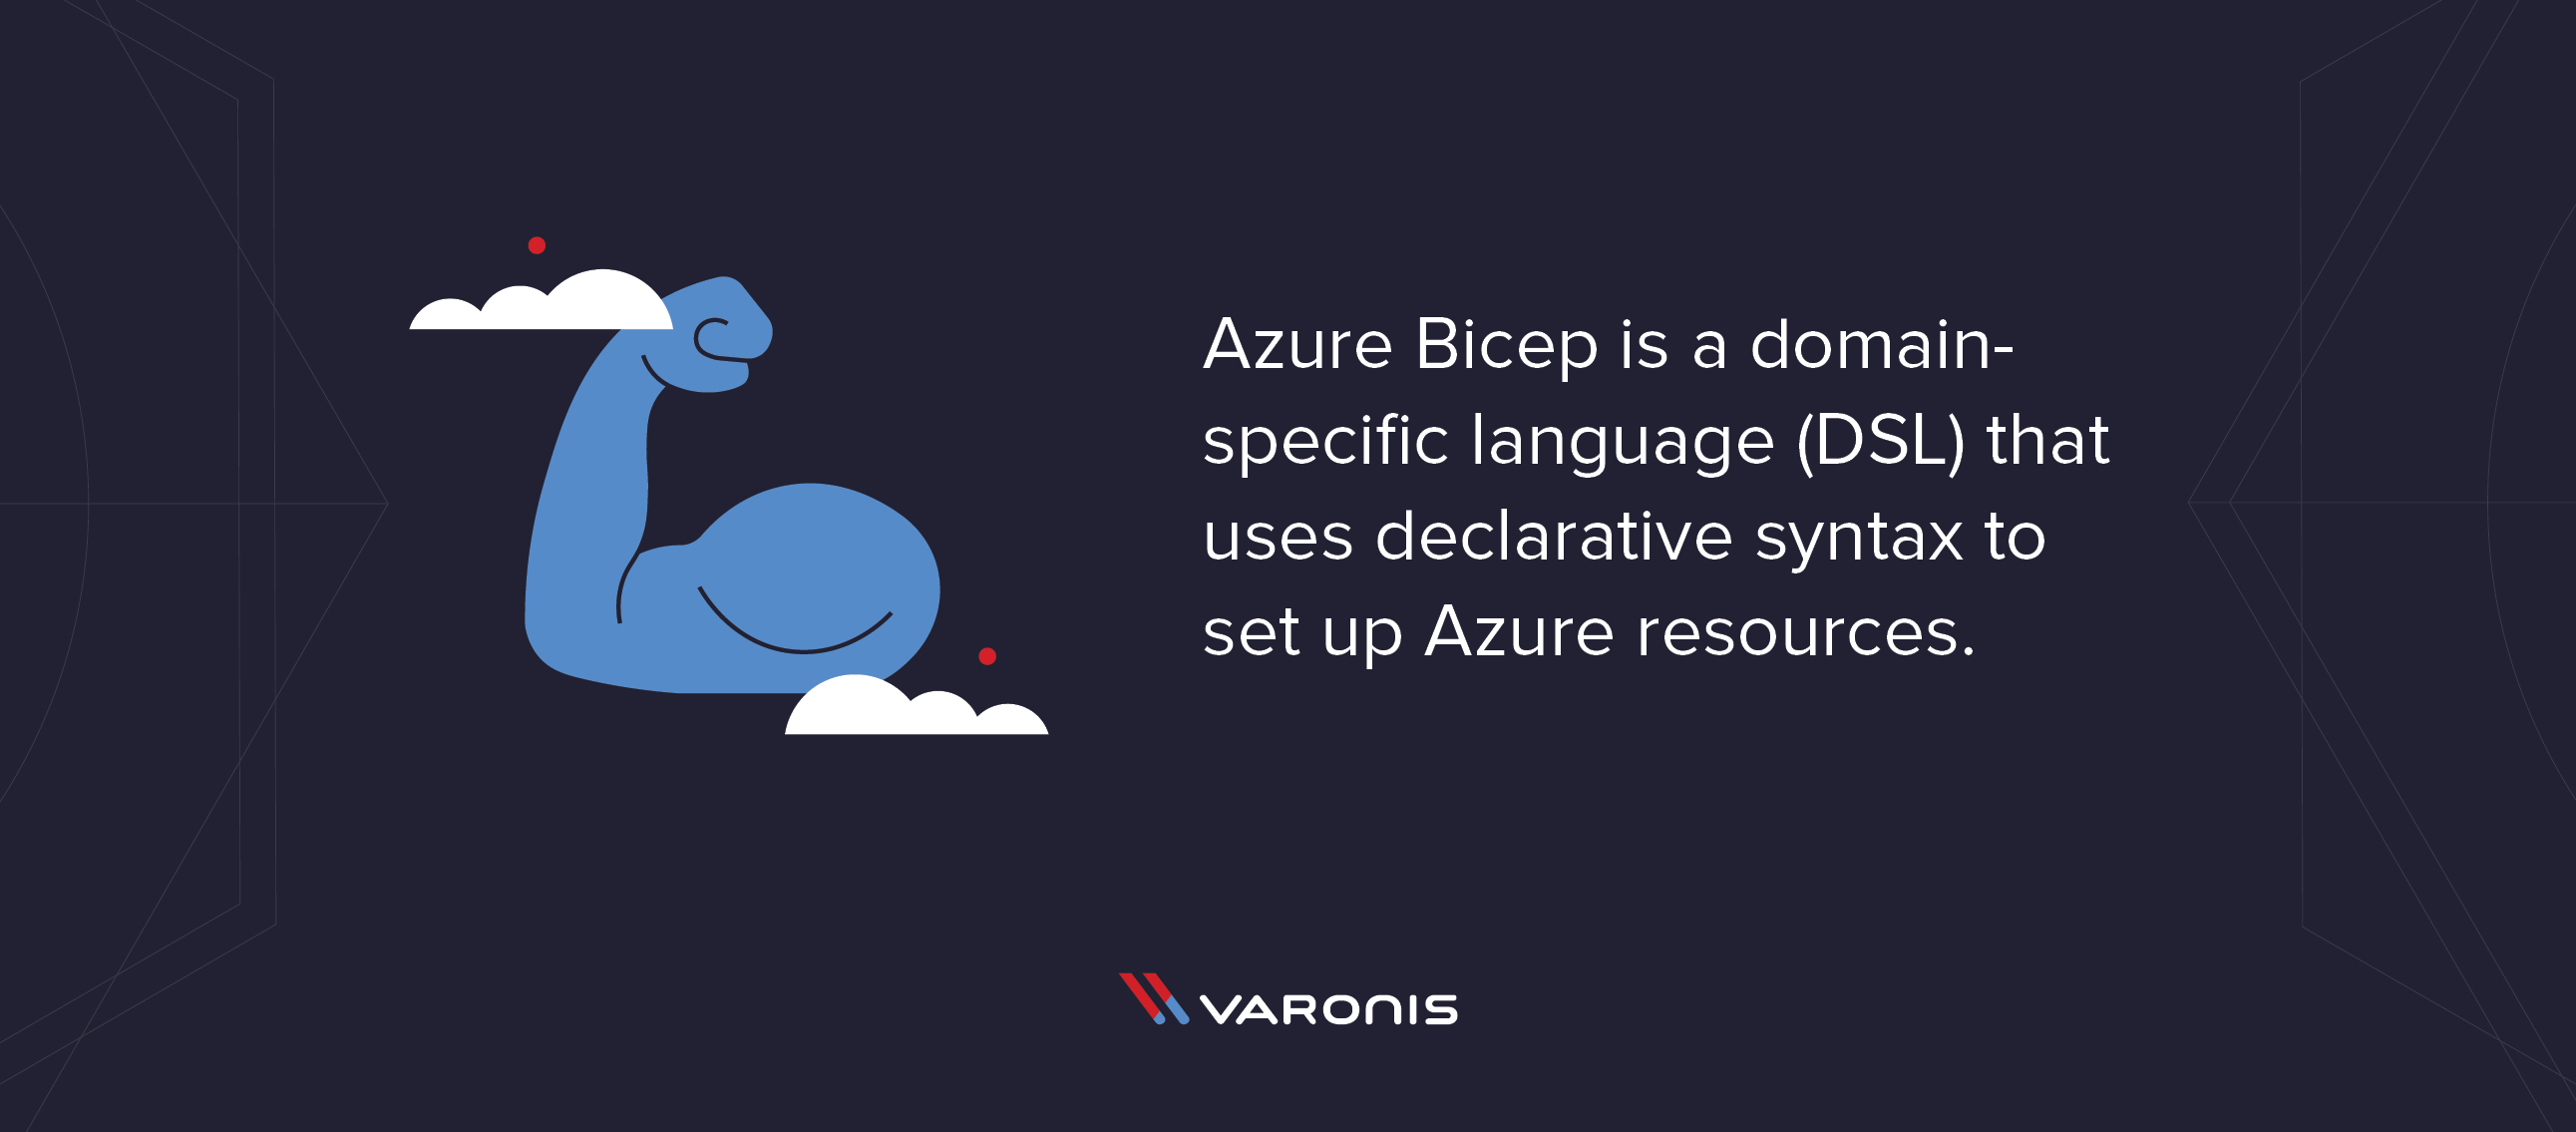
Azure Bicep is a new declarative language for deploying Azure resources. Bicep is a domain-specific language, meaning Microsoft purposefully built the language to be used in specific scenarios. You won’t be able to use Bicep to deploy non-Azure resources or work in other cloud providers, like Amazon’s AWS or Google’s GCP cloud. Bicep isn’t a standard programming language for writing applications either.
Want to get started learning a new programming language? Check out Rob Sober’s article 11 Popular Programming Languages to Open Doors!
Microsoft’s goal for Azure Bicep is to provide a better authoring experience through simpler syntax, better code reuse, and more flexible file structure. Azure Bicep has better support for modularity and being able to reuse code.
Azure Bicep Vs. Azure ARM Templates
ARM templates are files that represent Azure resources. You write them in a special JSON format that is more than just JSON. The ARM template syntax contains functions and methods to perform complex operations.
One common complaint with ARM JSON is it is challenging to write and interpret due to the complex syntax. Bicep addresses this complaint with a more straightforward approach to the language syntax. When creating an ARM template, you must use complicated expressions, and the final output can be pretty verbose.
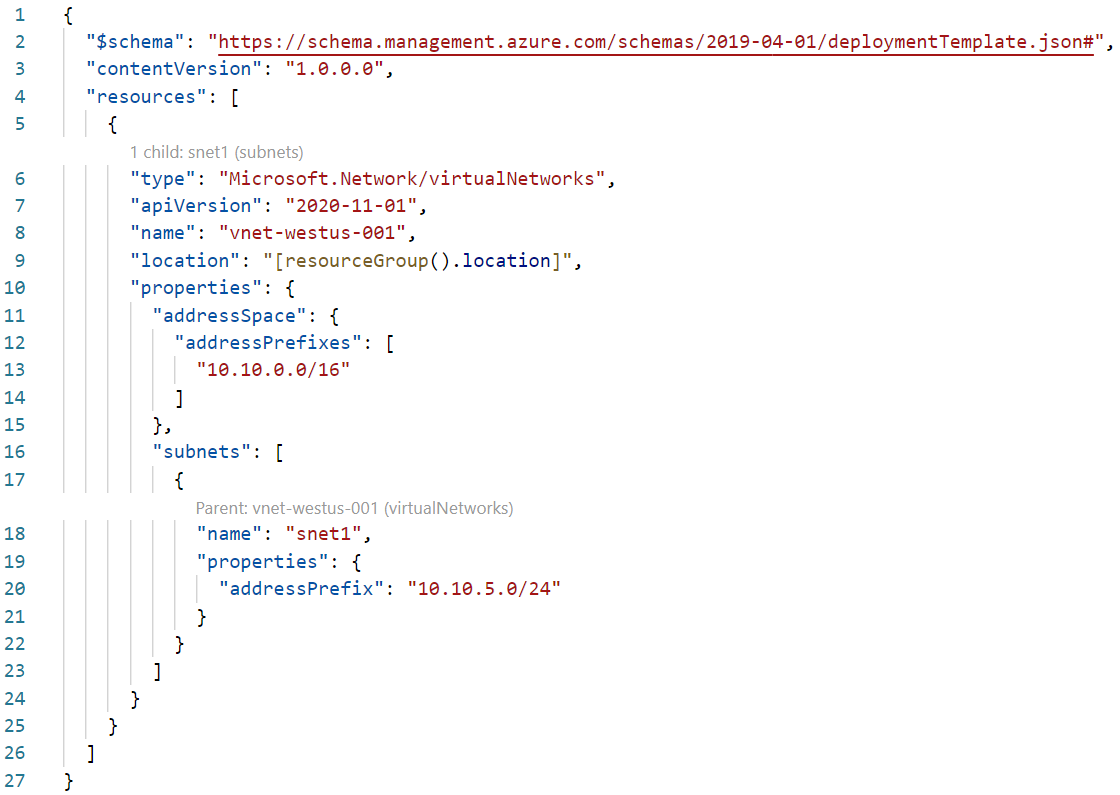
Let’s compare the syntax and code required to deploy an Azure Virtual Network between ARM JSON syntax and Bicep syntax. Here is a basic ARM template to deploy these resources taking up 27 lines:
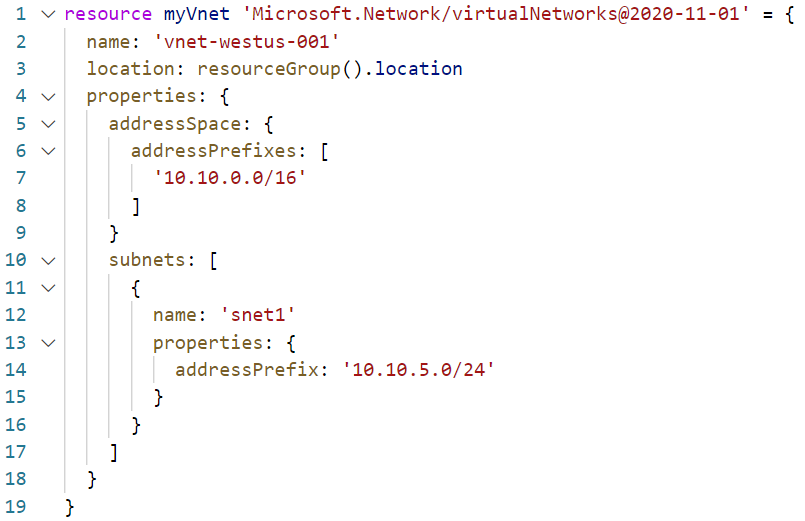
Here is the equivalent resource deployment with a Bicep template using only 19 lines. Don’t worry about understanding the syntax. You’ll learn more about the Bicep file structure later in this tutorial.
Benefits of Azure Bicep
Microsoft created Azure Bicep as a response to the steep learning curve of ARM templates. Many IT professionals find the verbosity and syntax of ARM templates to be cumbersome compared to other solutions.
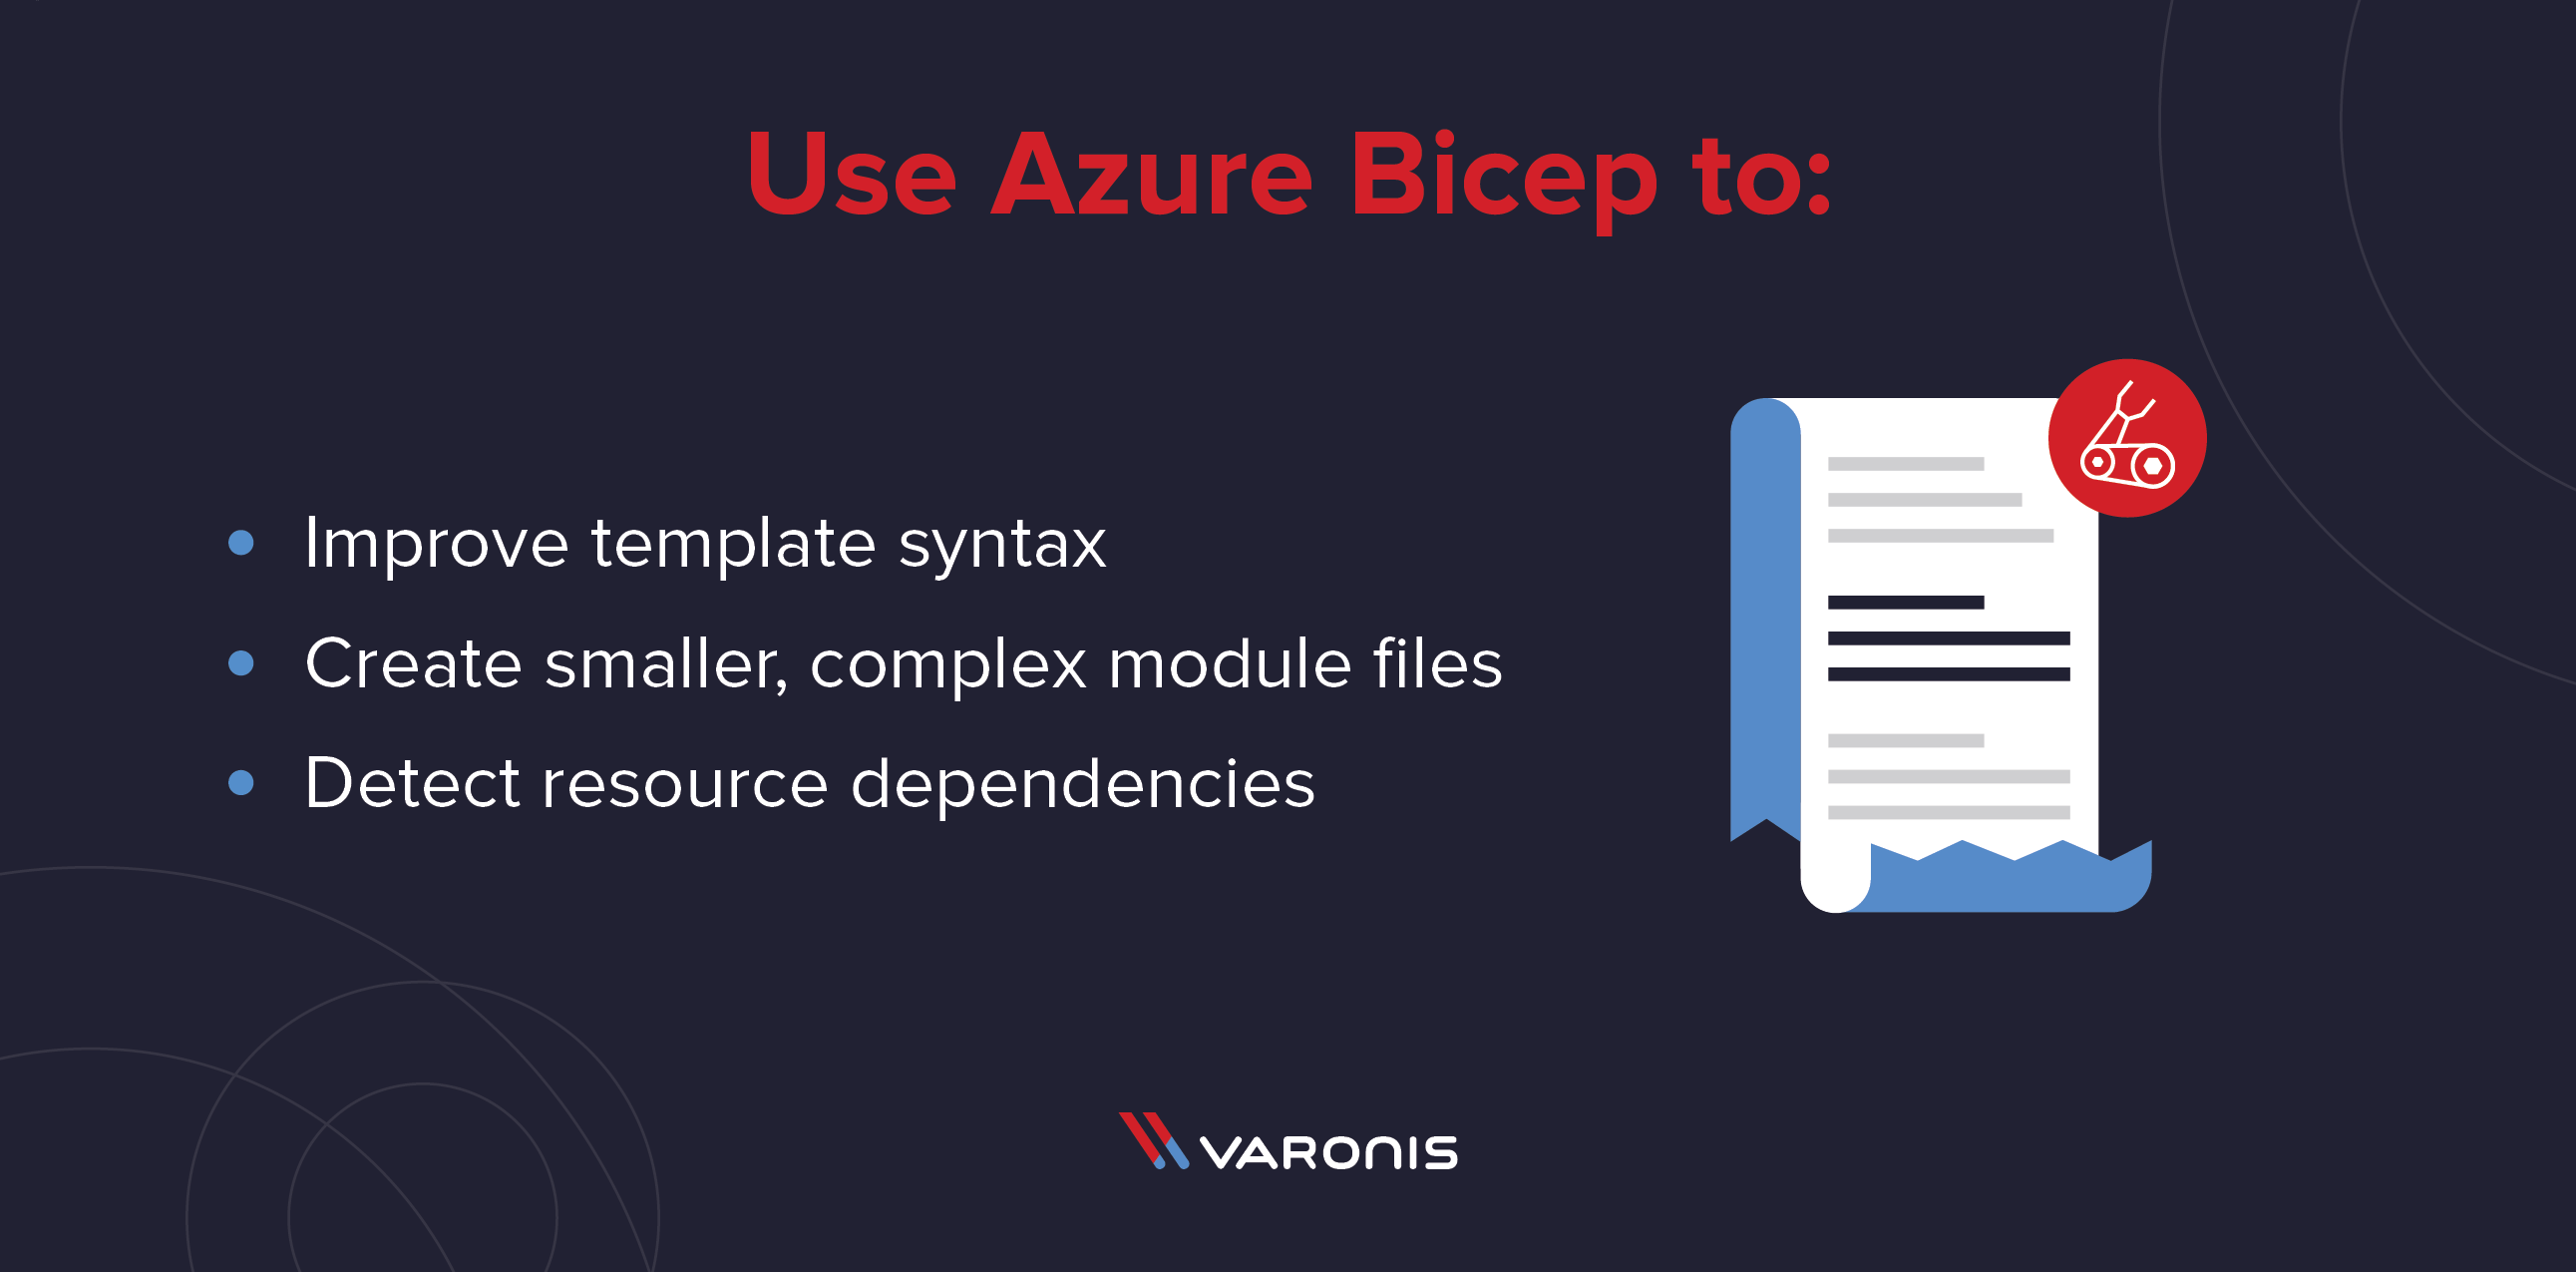
Benefits of Azure Bicep include:
-
- Syntax improvements: Bicep has a simpler syntax for writing templates. If you are familiar with the Hashicorp Terraform syntax, you will quickly learn Bicep as the syntax is very similar. With Bicep, you can reference parameters and variables without using functions. Bicep incorporates string interpolation instead of concatenating strings. You can also reference resource properties using their symbolic names instead of complex reference statements. These improvements aid in authoring and reading Bicep templates compared to ARM JSON syntax.
- Modules: You can create complex template deployments by creating smaller module files. You then reference these modules in the main template. For example, you can have a module for creating a virtual machine, then reference it from the main template.
- Resource dependency management: In most cases, Bicep will automatically detect resource dependencies. ARM templates require that you create these dependencies yourself when authoring a template. For example, a virtual machine requires a network interface, which requires a virtual network and subnet. Bicep will automatically identify these resource dependencies and deploy them in the required order.
Installing Azure Bicep
To create and deploy Bicep files, you need to install some tools on your local system. Microsoft has several options for installing this tooling across Windows, Linux, and macOS.
Bicep CLI
Azure Bicep has a command-line interface (CLI) for compiling the Bicep files into ARM JSON templates. You can also use the Bicep CLI for decompiling ARM JSON templates into Bicep files if you have existing templates you want to convert.
Microsoft makes installers for Windows, Linux, and macOS. You can find the latest installer here on the project’s GitHub page. If you install the Bicep CLI manually, you will need to add the install location to your PATH environment variable to use the commands from a console.
Microsoft also has several scripts available to download, install, and configure your PATH variable automatically:
Azure CLI
The Azure CLI is a set of commands used to create and manage Azure resources. The Azure CLI is available for Windows, macOS, and Linux operating systems and is an alternative to using Azure PowerShell. Learn more about how to install the Azure CLI on your system.
Starting with Azure CLI version 2.20.0 or later, Microsoft automatically includes the Bicep CLI binaries. This configuration means that you don’t need to install Bicep separately if you plan on using it with the Azure CLI.
The Azure CLI natively supports deploying Bicep files using deployment commands. For example, instead of compiling a Bicep file into ARM JSON template for deployment, you can deploy the Bicep file directly using the following command:
- az deployment group create \
- --template-file azuredeploy.bicep \
- --resource-group myResourceGroup
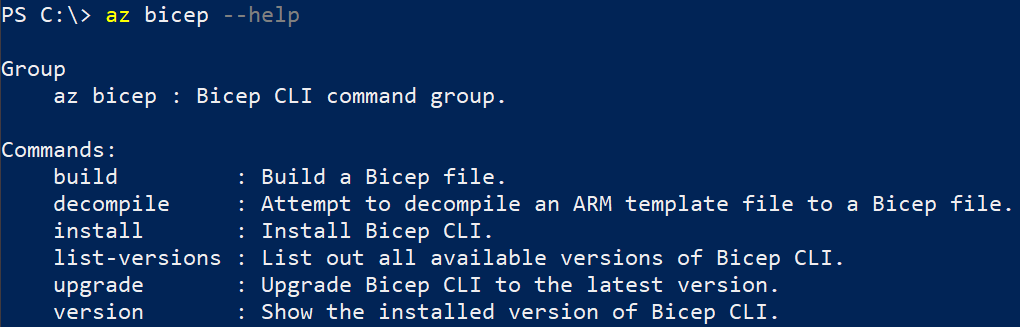
You can also perform many Bicep commands using the az bicep command:
- az bicep
Available commands include building a Bicep file from an ARM template or upgrading the Bicep CLI version. Here are the commands currently available inside the Azure CLI with Bicep version 0.3.539.
The Azure CLI installs a separate version of the Bicep CLI that does not conflict with other installations you have on the system. The Azure CLI does not add Bicep CLI to your PATH environment variable either. If you intend on using Bicep outside of the Azure CLI, you’ll need to install using the instructions from the previous section.
Azure PowerShell
Like the Azure CLI, Azure PowerShell is a set of modules designed for deploying and managing Azure resources using PowerShell. Azure PowerShell works with PowerShell 5.1 for Windows Systems and PowerShell 7 and higher on all platforms.
Unlike the Azure CLI, Azure PowerShell does not automatically include Bicep CLI commands. To use the Bicep CLI, Azure PowerShell needs to be at version 5.6.0 or later. You will need to have already the Bicep CLI installed and added to your PATH environment variable.
Be on the lookout for a future version of the Azure PowerShell module that native support for Bicep CLI commands.
Creating Azure Bicep Files
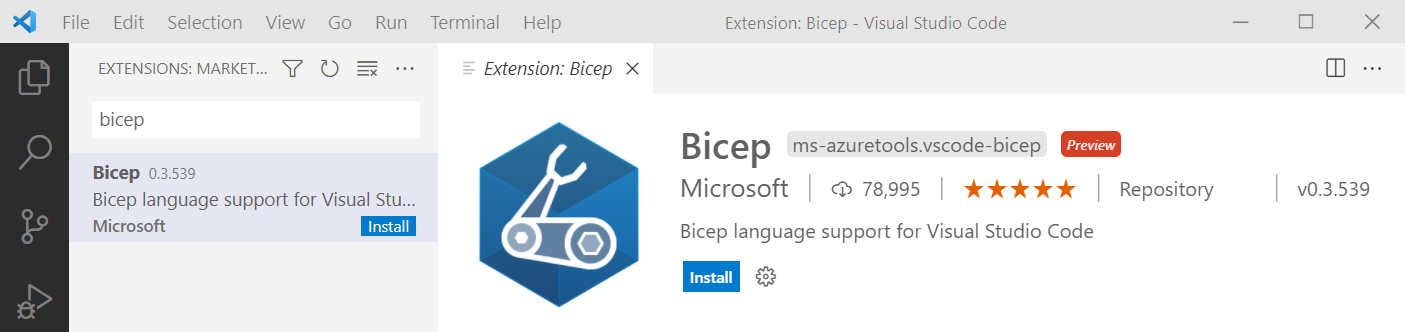
To get started writing Bicep templates, Microsoft provides a Visual Studio Code extension for the Bicep language. The extension provides language support and resource autocompletion to assist with creating and validating Bicep files.
In Visual Studio Code, select the Extensions icon on the left rail to view the marketplace. Search for “bicep” and install the Microsoft-provided extension.
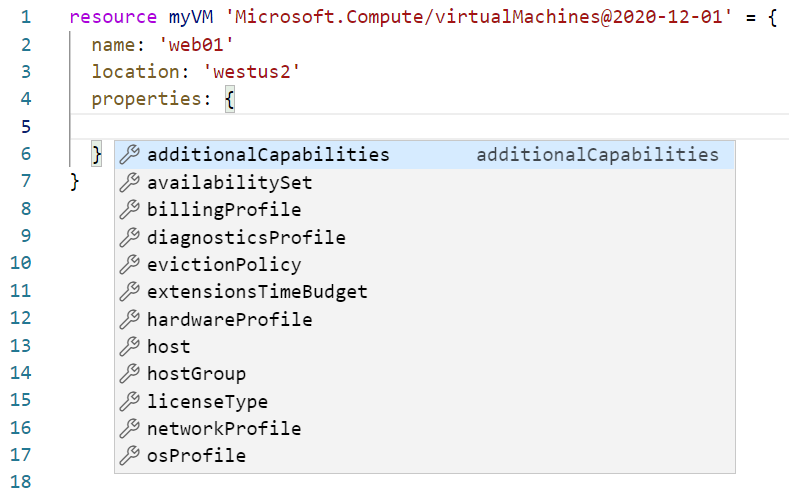
For example, when defining a virtual machine with VS Code, the Bicep extension provides intellisense for virtual machine properties. You can quickly find virtual machine properties to define in the template.
To get started with your first Bicep template, create a file named storageAccount.bicep. Azure Bicep files have a .bicep extension to distinguish themselves from ARM templates. Let’s cover some Bicep syntax to get started creating this storage account.
Resource Declaration
A Bicep template’s primary component is resource declaration. You need a way to define the Azure resource you want to deploy. Here is a basic framework of how to declare a resource:
- resource <symbolic name> ‘Microsoft.<resource type>@<api version>’ = {
- // Required properties
- name: ‘<resource name>’
- location: ‘<Azure region>’
- // Remaining resource-specific properties
- }
Here’s each resource declaration component in more detail:
-
- Resource: Used for declaring an Azure resource for deployment
- Symbolic Name: The identifier or reference name for use in other locations in the Bicep template. For example, suppose you are deploying a virtual network and a virtual machine. In that case, you need to reference the virtual network where to deploy the virtual machine network interface. Do note that this is not the name of the deployed Azure resource. You only use this name to reference the resource later in the template.
- Type: The type of resource you are deploying. The type is made up of the resource provider, such as Microsoft.Storage, followed by the resource type, like storageAccounts.
- API Version: The API version to use when deploying the resource. The API version determines what properties are available when deploying the resource. Declaring an API version is similar to what you used in ARM templates.
- Properties: Every resource needs a name and a location for deployment. The name you specify here will be the name of the resource when deployed to Azure. The combination of the type and API version determines what properties you can use.
Here is the beginning of a Bicep template to deploy a storage account. The symbolic name is stgAcct, but the deployed resource name is stgacctbicepdemo. Also, note the Type and API Version declaration in the first line. You then define the remaining storage account properties such as location, storage account type, and SKU.
- resource stgAcct 'Microsoft.Storage/storageAccounts@2021-02-01' = {
- name: 'stgacctbicepdemo'
- location: 'westus2'
- kind: 'StorageV2'
- sku: {
- name: 'Standard_LRS'
- tier: 'Standard'
- }
- }
Parameters and Variables
Parameters and variables make your Bicep templates more dynamic. Instead of hard-coding resource values, you can specify values at deployment time. When you declare parameters, you must pass a value to the Bicep template when creating the deployment.
You declare parameters using the param keyword, and you declare variables using the var keyword. Here are some examples of Bicep parameters called name and location and a variable named stgAcctName. Note that the location parameter has a default value of westus2, so if you do not specify a value, the deployment will use the westus2 region for deployment.
- param name string
- param location string = 'westus2'
- var stgAcctName = concat(name, '2468')
The stgAcctName variable performs a string concatenation of the name parameter and some numbers. This action is to give the storage account a unique name within Azure. The variable declaration also demonstrates how you can use the same ARM template functions within Bicep templates.
Here is the updated storageAccount.bicep template using your declared parameters and variables. Note that the storage account name and location property values have been replaced with their equivalent parameter and variable names.
- param name string
- param location string = 'westus2'
- var stgAcctName = concat(name, '2468')
- resource stgAcct 'Microsoft.Storage/storageAccounts@2021-02-01' = {
- name: stgAcctName
- location: location
- kind: 'StorageV2'
- sku: {
- name: 'Standard_LRS'
- tier: 'Standard'
- }
- }
Bicep templates use the same parameters files written in JSON as ARM templates. This means you can use your existing ARM parameter files for deploying Azure Bicep templates.
String Interpolation
One of the more popular ARM template functions is concat(). This function connects multiple strings into a single string. You used this in the previous section to concatenate the name parameter and a number to create the stgAcctName variable value.
Instead of using concatenation, Bicep templates allow using string interpolation. You can define strings using a parameter or variable name, and Bicep will evaluate the final string using the actual values.
For example, instead of using the concat() function in the variable declaration, you can surround the parameter name using ${ }, like this:
- var stgAcctName = '${name}2468'
Conditional Assignment
Conditional assignments allow setting a value based on different conditions. For example, let’s say your storage account Bicep template has a boolean parameter on whether or not to use more expensive SSD disks for the storage account (default is false):
- param useSSD bool = false
Within the resource declaration, you can use a ternary operator to determine the sku. A ternary operator is the same as using an if then else statement. If useSSD is set to true, then the storage account uses the Premium_LRS SKU; otherwise, the storage account uses the Standard_LRS SKU.
- param name string
- param location string = 'westus2'
- param useSSD bool = false
- var stgAcctName = '${name}2468'
- resource stgAcct 'Microsoft.Storage/storageAccounts@2021-02-01' = {
- name: stgAcctName
- location: location
- kind: 'StorageV2'
- sku: {
- // if true, use Premium SSD, else use Standard HDD
- name: useSSD ? 'Premium_LRS' : 'Standard_LRS'
- }
- }
Deploying Bicep Templates
Now that you have a Bicep template built, it is time to deploy the storage account to Azure! You have two options for deploying Bicep templates. You can deploy using the Bicep template or convert the template to ARM JSON for deployment.
Using the Bicep Template File
Azure Resource Manager still operates using the templates written in JSON. When you submit a Bicep template to Azure, the Bicep tooling converts the template to the JSON format. This process is called transpilation, when means converting one programming language to a different language.
As the template author, you don’t need to worry about this conversion. You continue to define Azure resources in the Bicep template, and Bicep performs the conversion for you.
To deploy the Bicep template using Azure PowerShell, use the New-AzResourceGroupDeployment command specifying the resource group to deploy the resources. The example below uses a resource group named bicep-rg.
Looking to manage Azure Active Directory and other Office 365 services? Check out How to Connect to Office 365 PowerShell: Azure AD modules!
Since the location and useSSD parameters have default values, you only need to specify the name parameter. Since the New-AzResourceGroupDeployment already has a -Name parameter, you use -nameFromTemplate to specify the parameter for the Bicep template.
- New-AzResourceGroupDeployment `
- -ResourceGroupName bicep-rg `
- -TemplateFile storageAccount.bicep `
- -nameFromTemplate 'stgacctbicepdemo'
To deploy using the Azure CLI, use the az deployment group create command specifying the resource group name and template file. Use –parameter to specify the storage account name for the template.
- az deployment group create \
- --resource-group bicep-rg \
- --template-file storageAccount.bicep \
- --parameters name='stgacctbicepazcli'
Converting Bicep and ARM Templates
To manually convert a Bicep template to an ARM template, use the bicep build command specifying the path to the Bicep template file.
Here is an example of converting the storageAccount.bicep Bicep template to an ARM template.
- bicep build storageAccount.bicep
With the converted ARM template, you can deploy it using the Azure PowerShell New-AzResourceGroupDeployment command or the Azure CLI az deployment command.
If you have an existing ARM JSON template, you can convert it to a Bicep template using the bicep decompile command, like so:
- bicep decompile storageAccount.json
The decompilation process is a best-effort process. Microsoft does not guarantee a direct mapping from ARM JSON to Bicep. You will need to review the Bicep template and fix warnings and errors. If you encounter an issue decompiling, you can report an issue or inaccuracy on the Bicep GitHub Issues page.
Azure Bicep FAQ
What is Azure Bicep?
Azure Bicep is a new domain-specific language from Microsoft for deploying Azure resources. Azure Bicep is a companion deployment technology to Azure Resource Manager (ARM) templates.
What is Azure ARM?
Azure Resource Manager (ARM) is is the deployment and management service for Azure responsible for creating, updating, and deleting resources. ARM templates are JSON files with one or more Azure resources defined as code for consistent deployments.
Next Steps
Hopefully, you are now convinced that Azure Bicep is better than ARM templates for writing Azure infrastructure as code. Microsoft is rapidly improving the Bicep tooling to make it the premier choice for Azure deployments.
If you want to learn more about Azure Bicep, check out the available Microsoft Learn modules for getting started. If you want to compare Bicep and ARM templates quickly, check out the Bicep Playground. You can write in either template language and see the corresponding code immediately. You can also view sample templates to learn how to write Bicep templates.